


Which mugs should I use?
The most important thing is to choose a microwave-safe mug that is large enough (250-300 ml/8,5-10 oz). The cake rises in the oven, so make sure there is enough room for the batter to rise.


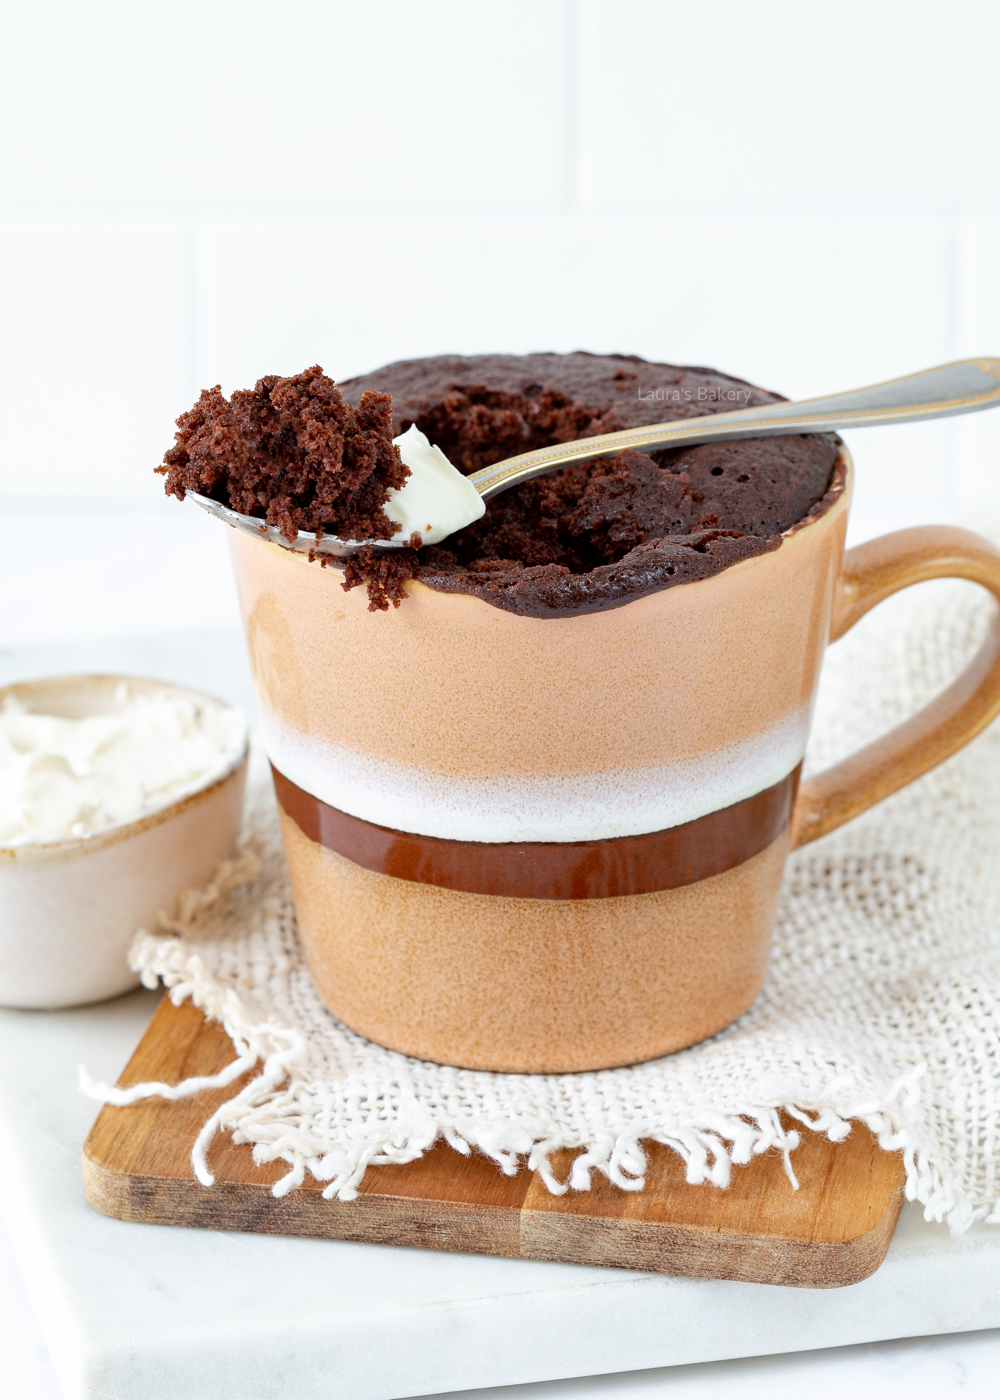
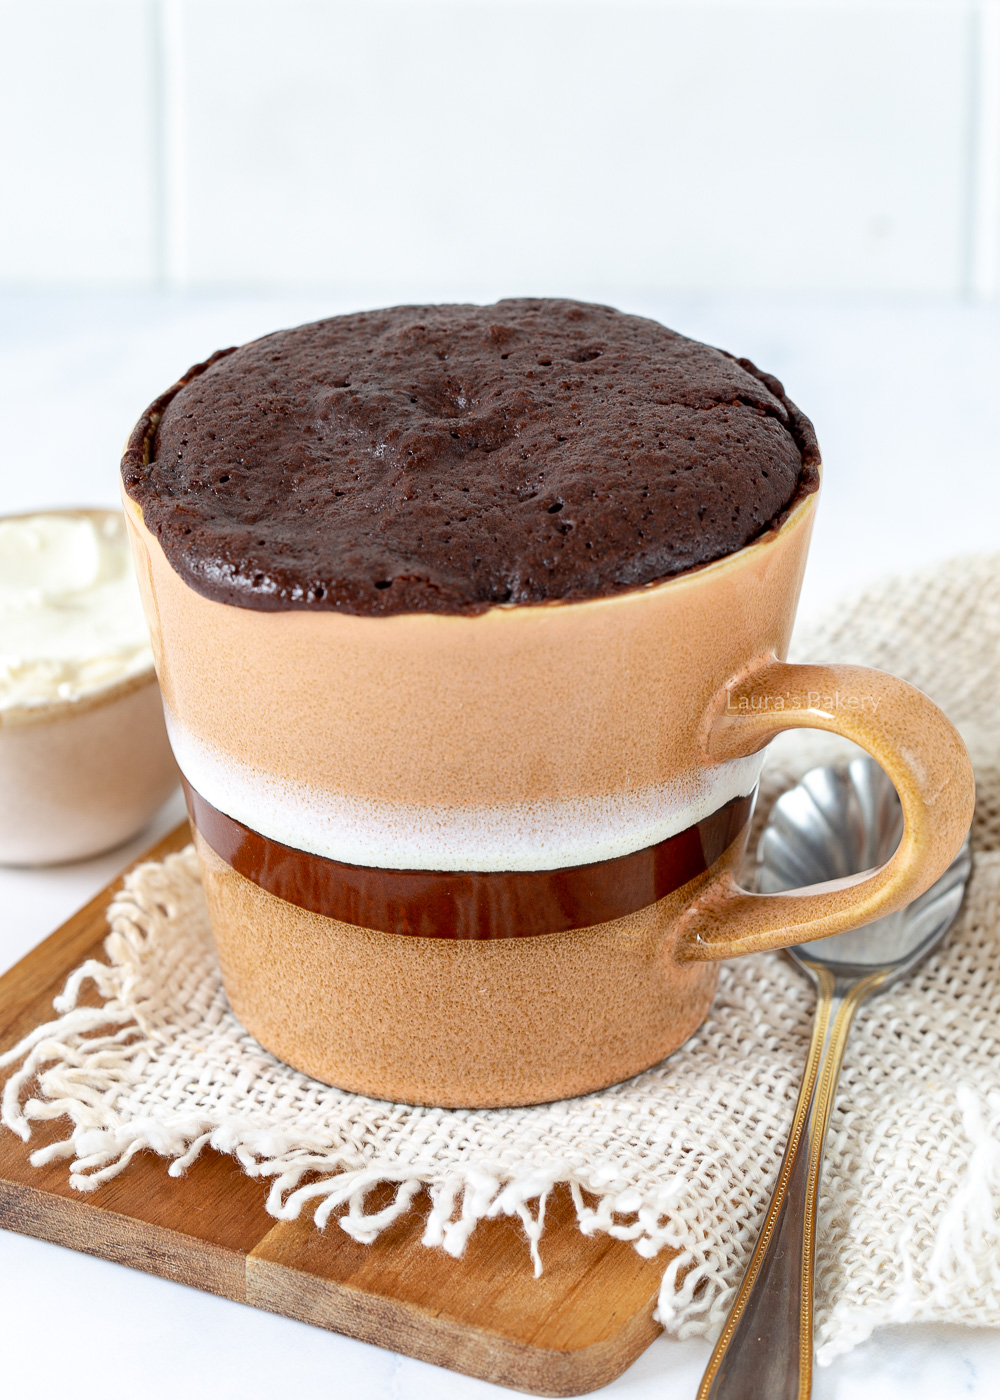
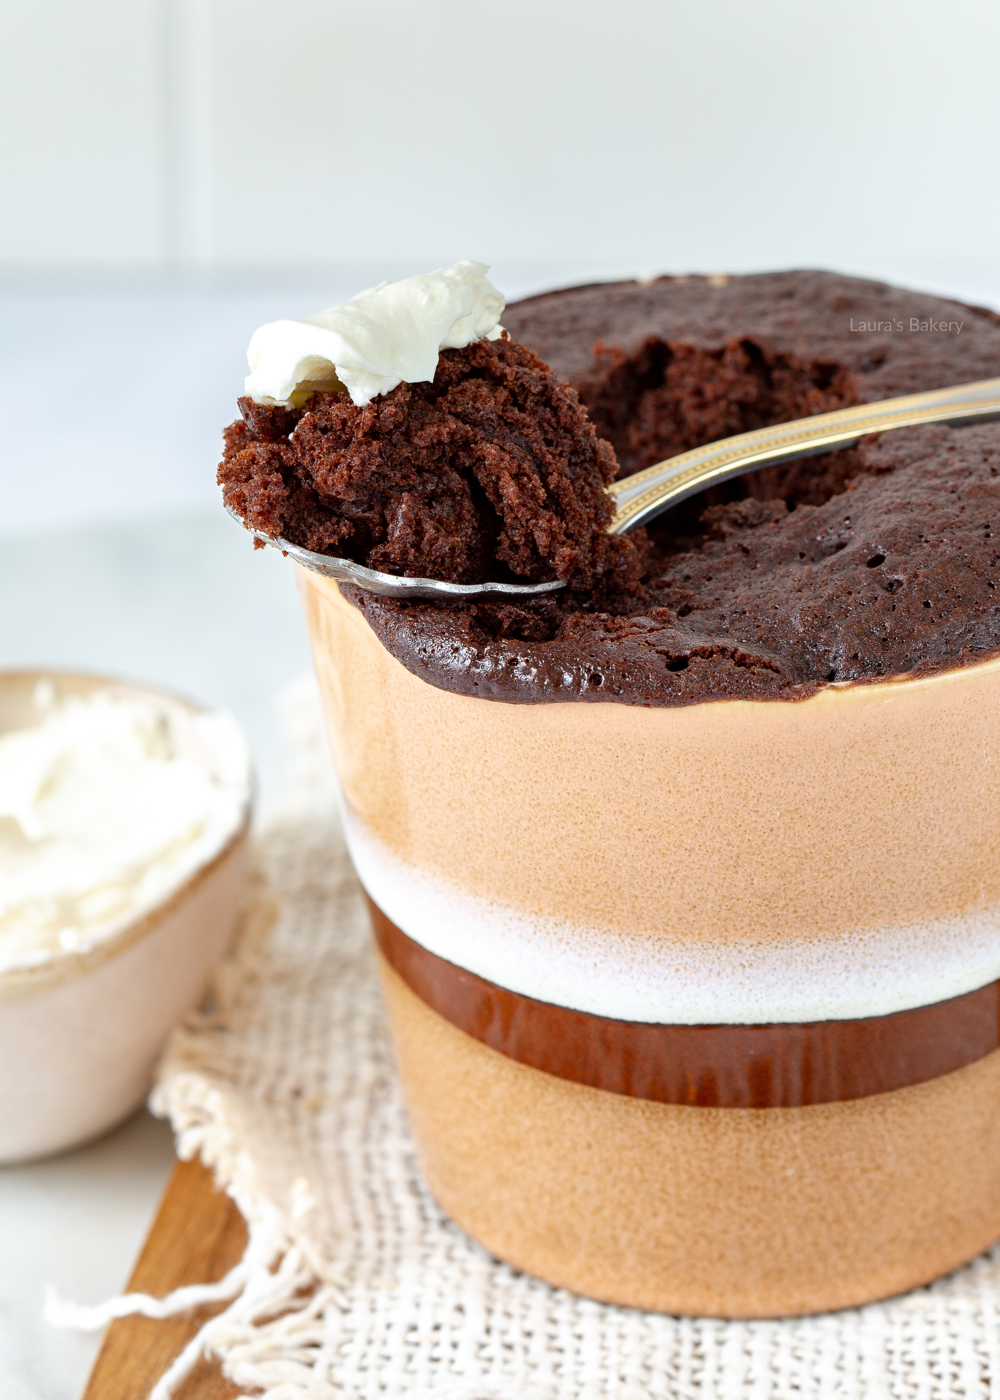
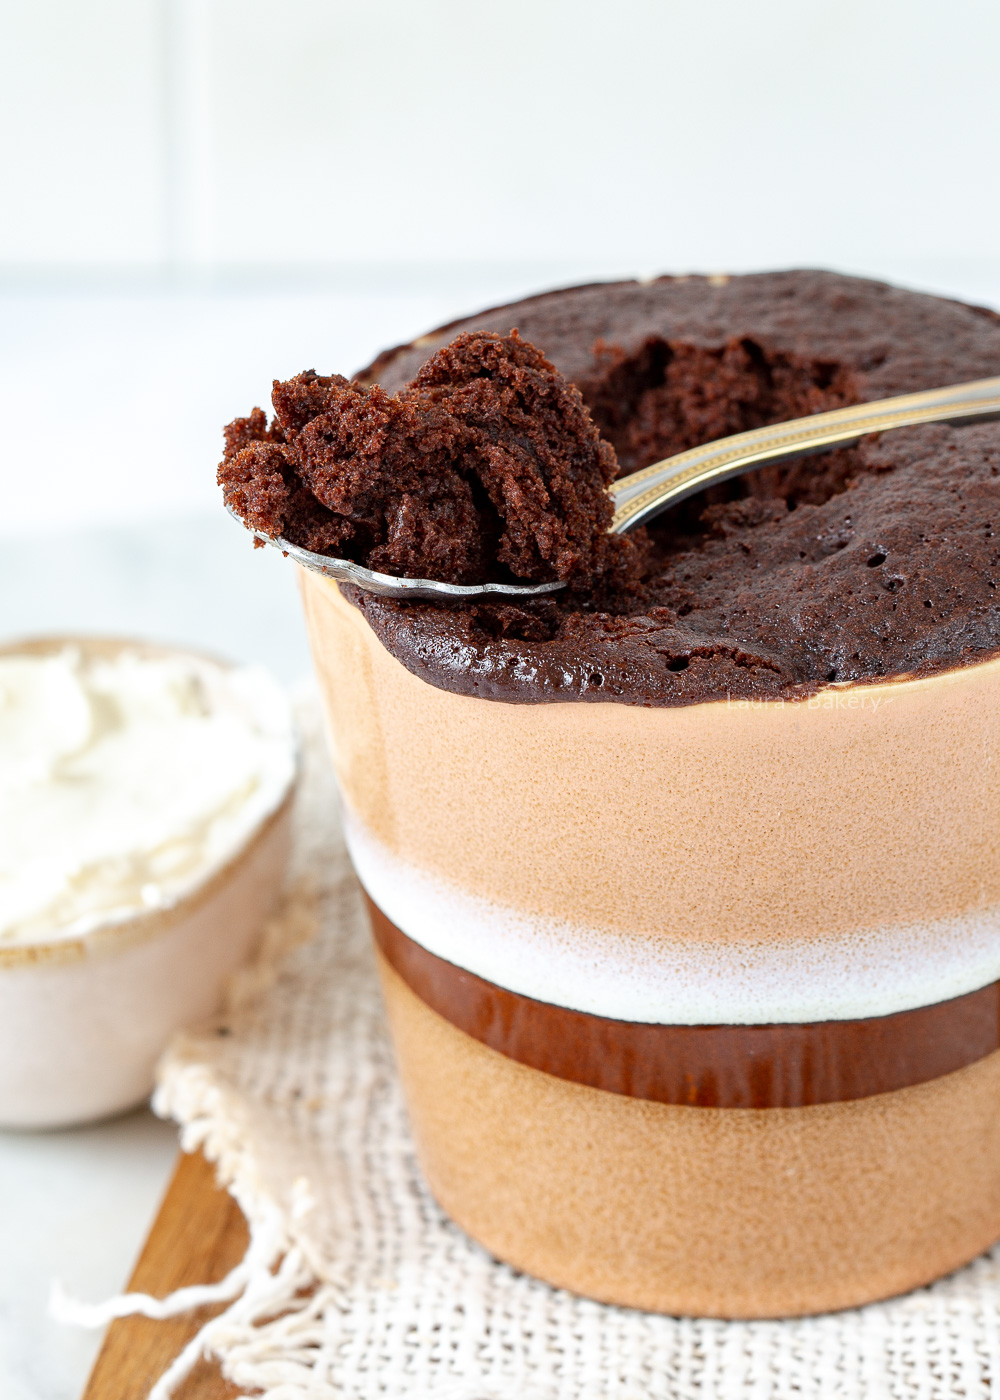
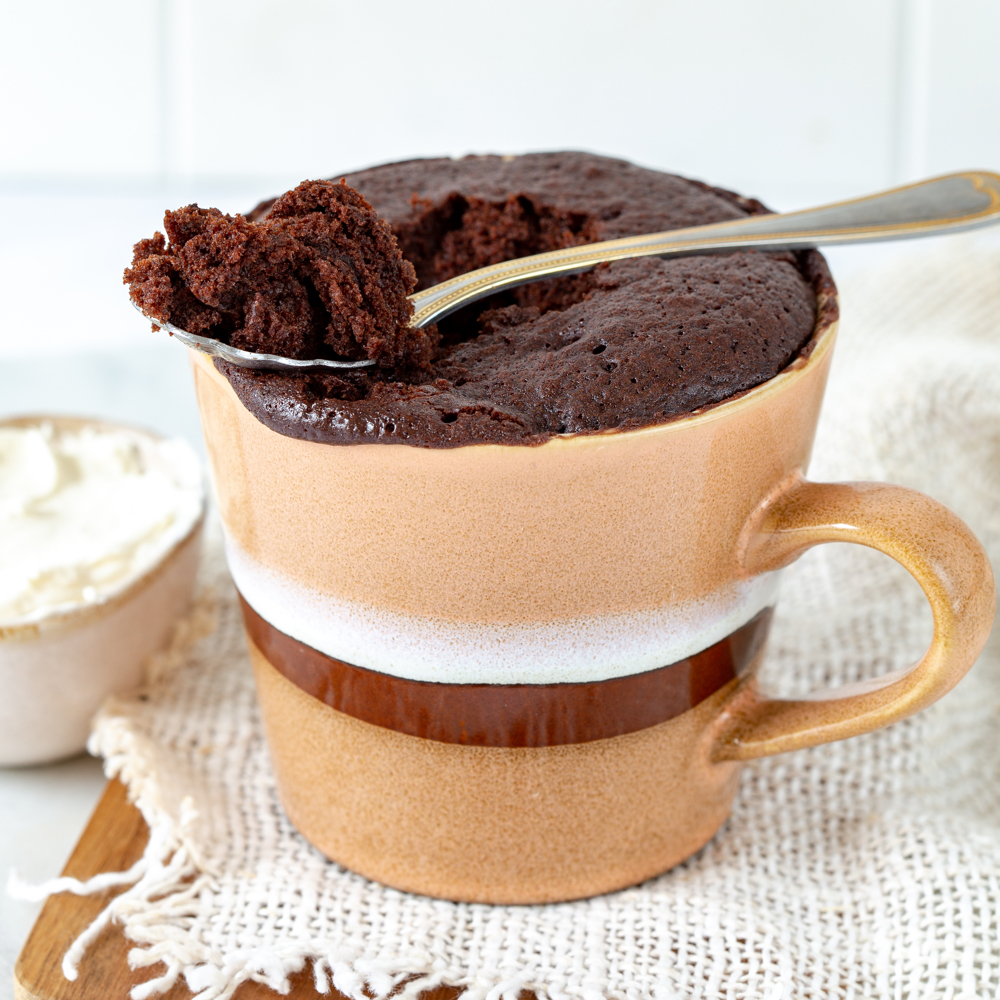
This easy recipe for a chocolate mug cake without eggs can be made in minutes! Just stir a handful of simple ingredients, pop your mug in the microwave and enjoy. If you love mug cake recipes, this chocolate mug cake will be definitely one of your favorites. And even better: no eggs needed for this recipe!
In the early 2000s, mug cakes became very popular in America and a few years later they were popular in The Netherlands too. I thought the idea of a cake in a mug that you could microwave in just two minutes was brilliant for a sweet tooth like me and made it for the first time a few years ago.
Unfortunately, my first chocolate microwave cake recipe didn’t turn out so well. It was not tasty at all and not even close to a fluffy mug cake. At that moment, I was done with mug cakes and didn’t think about them for a long time. It took me a few years to try again and develop a recipe for this small batch dessert.
My first (new) attempt at making a chocolate mug cake was pretty okay, but I decided to make some changes to the recipe. A few mug cakes later, I came up with a recipe that is similar to a regular chocolate cake. It’s the best mug cake I’ve ever tried. Very tasty!
It’s not exactly the same, of course. It can’t be, because the ingredients are different. Still, I was pleasantly surprised, and it proves that a microwave mug cake can be really tasty! And more important: I don’t need to bake an entire cake when I’m craving some chocolate cake.
This question came up so often that I really had test it for you. With a simple adjustment in the recipe, you can bake this chocolate mug cake in the oven. You add 2 grams of baking powder (a little less than half a teaspoon) to the cake batter and then bake your little cake in the oven at 180°C/350°F (top and bottom heat) for 20-25 minutes until done.
Test the cake with a cake skewer to make sure it is done, otherwise leave it in the oven for a few more minutes. It’s a great recipe with a little adjustment to bake in the oven.
Want to bake more than one cupcake in the oven? Take my recipe for chocolate cake and divide it by four, for example, to make two to three cup cakes. In my opinion, this is still the most perfect recipe for baking a delicious cake in the oven.
I have made many mug cakes over the years and I will absolutely translate all those recipes for you and share them here. Here are a few that I already shared with you:
Did you know you could also add some ingredients to this chocolate mug cake for some variation? Some of my favorites:

The most important thing is to choose a microwave-safe mug that is large enough (250-300 ml/8,5-10 oz). The cake rises in the oven, so make sure there is enough room for the batter to rise.
No, it doesn’t taste the same, and frankly, I think real chocolate cake tastes the best. But now imagine you have an incredible craving for chocolate cake and want to eat it right now, this chocolate mug cake is a great idea! You always have the ingredients, and to make it a real party, you can serve it with some whipped cream.
Yes, you can! In this case, use a combination of all purpose flour and baking powder to replace the self rising flour.
Yes, substitute the dairy milk for almond milk, oat milk or soy milk and you will have a vegan mug cake with chocolate.
Most likely your microwave was not set to the correct wattage. When cooking in the microwave, a small adjustment in wattage, or 10-20 seconds more or less, can make a huge difference in the result. Next time, you can lower the wattage or shorten the time you microwave your chocolate mug cake.
I mostly use caster sugar for my mug cakes, but you could also use brown sugar for this recipe.
This easy recipe for a chocolate mug cake without eggs can be made in minutes! Just stir a handful of simple ingredients, pop your mug in the microwave and enjoy. If you love mug cake recipes, this chocolate mug cake will be definitely one of your favorites. And even better: no eggs needed for this recipe!
In the early 2000s, mug cakes became very popular in America and a few years later they were popular in The Netherlands too. I thought the idea of a cake in a mug that you could microwave in just two minutes was brilliant for a sweet tooth like me and made it for the first time a few years ago.
Unfortunately, my first chocolate microwave cake recipe didn’t turn out so well. It was not tasty at all and not even close to a fluffy mug cake. At that moment, I was done with mug cakes and didn’t think about them for a long time. It took me a few years to try again and develop a recipe for this small batch dessert.
My first (new) attempt at making a chocolate mug cake was pretty okay, but I decided to make some changes to the recipe. A few mug cakes later, I came up with a recipe that is similar to a regular chocolate cake. It’s the best mug cake I’ve ever tried. Very tasty!
It’s not exactly the same, of course. It can’t be, because the ingredients are different. Still, I was pleasantly surprised, and it proves that a microwave mug cake can be really tasty! And more important: I don’t need to bake an entire cake when I’m craving some chocolate cake.
This question came up so often that I really had test it for you. With a simple adjustment in the recipe, you can bake this chocolate mug cake in the oven. You add 2 grams of baking powder (a little less than half a teaspoon) to the cake batter and then bake your little cake in the oven at 180°C/350°F (top and bottom heat) for 20-25 minutes until done.
Test the cake with a cake skewer to make sure it is done, otherwise leave it in the oven for a few more minutes. It’s a great recipe with a little adjustment to bake in the oven.
Want to bake more than one cupcake in the oven? Take my recipe for chocolate cake and divide it by four, for example, to make two to three cup cakes. In my opinion, this is still the most perfect recipe for baking a delicious cake in the oven.
I have made many mug cakes over the years and I will absolutely translate all those recipes for you and share them here. Here are a few that I already shared with you:
Did you know you could also add some ingredients to this chocolate mug cake for some variation? Some of my favorites:
The most important thing is to choose a microwave-safe mug that is large enough (250-300 ml/8,5-10 oz). The cake rises in the oven, so make sure there is enough room for the batter to rise.
No, it doesn’t taste the same, and frankly, I think real chocolate cake tastes the best. But now imagine you have an incredible craving for chocolate cake and want to eat it right now, this chocolate mug cake is a great idea! You always have the ingredients, and to make it a real party, you can serve it with some whipped cream.
Yes, you can! In this case, use a combination of all purpose flour and baking powder to replace the self rising flour.
Yes, substitute the dairy milk for almond milk, oat milk or soy milk and you will have a vegan mug cake with chocolate.
Most likely your microwave was not set to the correct wattage. When cooking in the microwave, a small adjustment in wattage, or 10-20 seconds more or less, can make a huge difference in the result. Next time, you can lower the wattage or shorten the time you microwave your chocolate mug cake.
I mostly use caster sugar for my mug cakes, but you could also use brown sugar for this recipe.

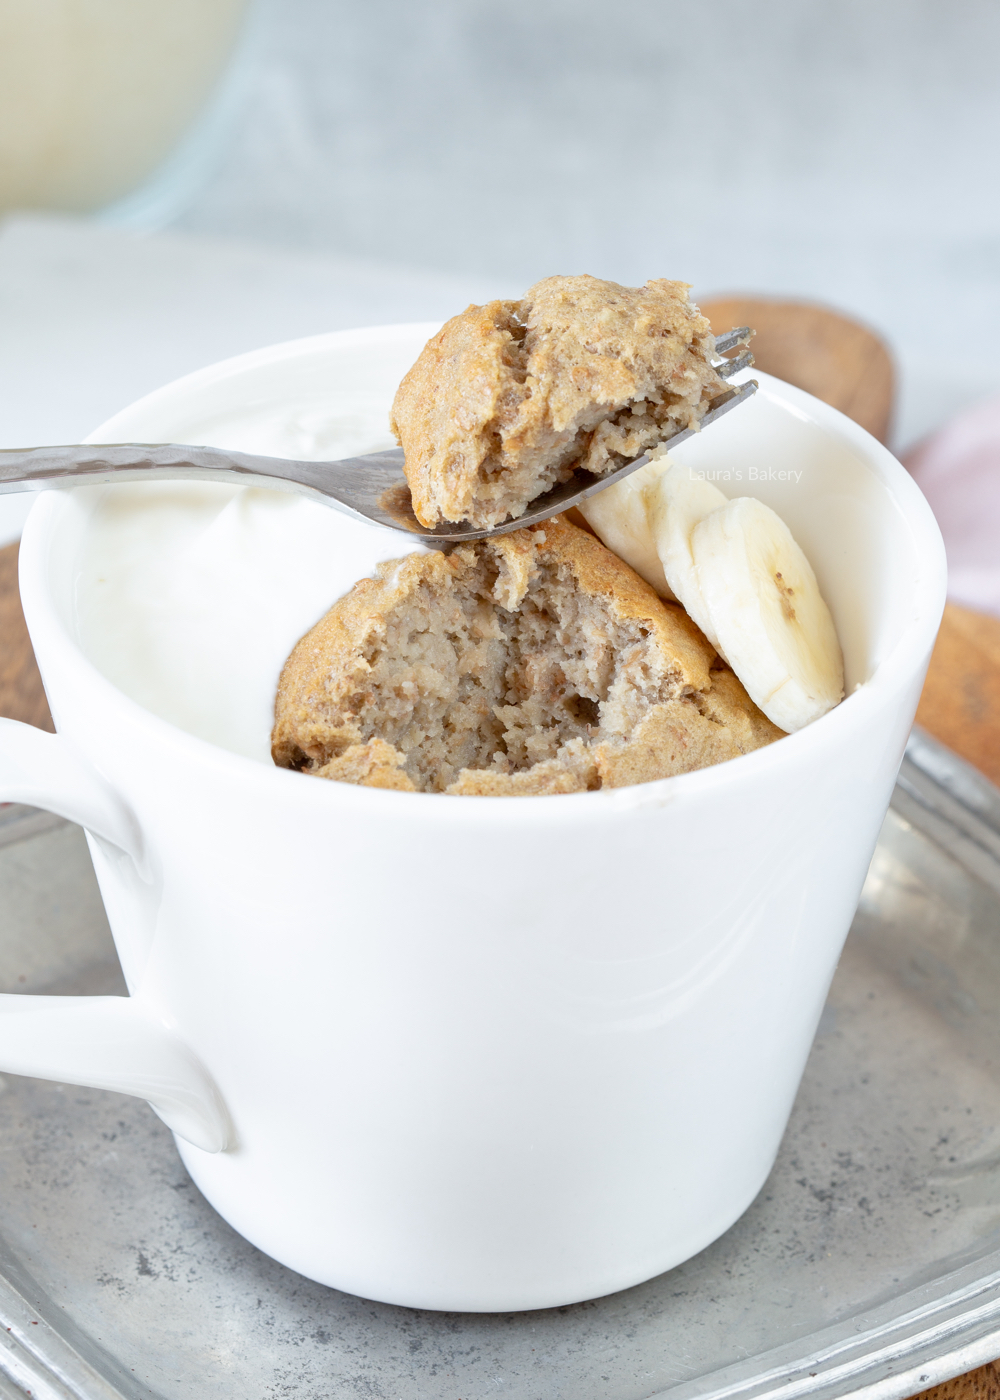
Fan of mug cakes, but craving a more healthy afternoon snack? This recipe for a healthy banana bread mug cake is the one you’re looking for! You can make this recipe in the oven and in the microwave.
I used my favorite banana bread recipe and made that into a mug cake recipe. My banana bread is made without sugar, oil or butter and is a pretty healthy (and delicious!) snack. Perfect for a healthy mug cake and an easy and quick alternative to a slice of banana bread.
I like eating it for breakfast, but I made it the other night as a late-night dessert with a scoop of ice cream and that’s probably going to happen more often as I enjoyed that dessert a lot.
Use a microwave-safe mug, those are often also oven safe. But make sure to check that before baking. I like to use a coffee mug or other large mug. You want to make sure there is plenty of room for the mug cake as it rises in the oven.
The recipe calls for two bananas to make 2 mug cakes. But if you only have 1 overripe banana, just halve all the ingredients for 1 mug cake. You will also need to use halve an egg. The other half could be used with some extra eggs for an omelet or something.

You just need a few simple ingredients to make this delicious banana mug cake. I like to put them together in a small bowl and stir the ingredients with a spatula before putting the batter in the mug.
And that’s all you need to make your own little banana cake! As you can see, I don’t use sugar, the banana add enough sweetness. But if you’re a sweet tooth, you could add some brown sugar or maple syrup to the batter.
To make the batter, you start with the banana, egg and vanilla extract. After those wet ingredients are combined, you can add all the dry ingredients at once. Just mix it up until incorporated and your cake batter is done.
At first, I wanted to develop a recipe for a mug cake you could make in the oven as that was something I got asked for a lot. But I decided to try and make this recipe for the microwave as well.
I’m happy to say this recipe can be made in the microwave and in the oven, I’ll share the directions for both options.
If you have a microwave on hand, this is the quickest way to make your mug cake. I baked it for 140 seconds (2 minutes and 20 seconds) at 800 watts. The cooking time may vary due to the strength of your microwave.
Bake the mug cakes for 20-25 minutes at 180 °C/350 °F. Don’t bake them too long, as you want a moist cake and baking it too long may result in a dry banana cake.
Here you can see my mug cake, made in the microwave:

The most important thing is to choose a microwave-safe mug that is large enough (250-300 ml/8,5-10 oz). The cake rises in the oven, so make sure there is enough room for the batter to rise.
While the mug cake tastes amazing just as it is, I like to add a scoop of (Greek) yogurt and some banana slices for breakfast. If I make a dessert out of it, a scoop of ice cream is a great addition
The mug cake is best when it comes out of the microwave and is still warm. As it cools, it dries out and is not nearly as tasty.
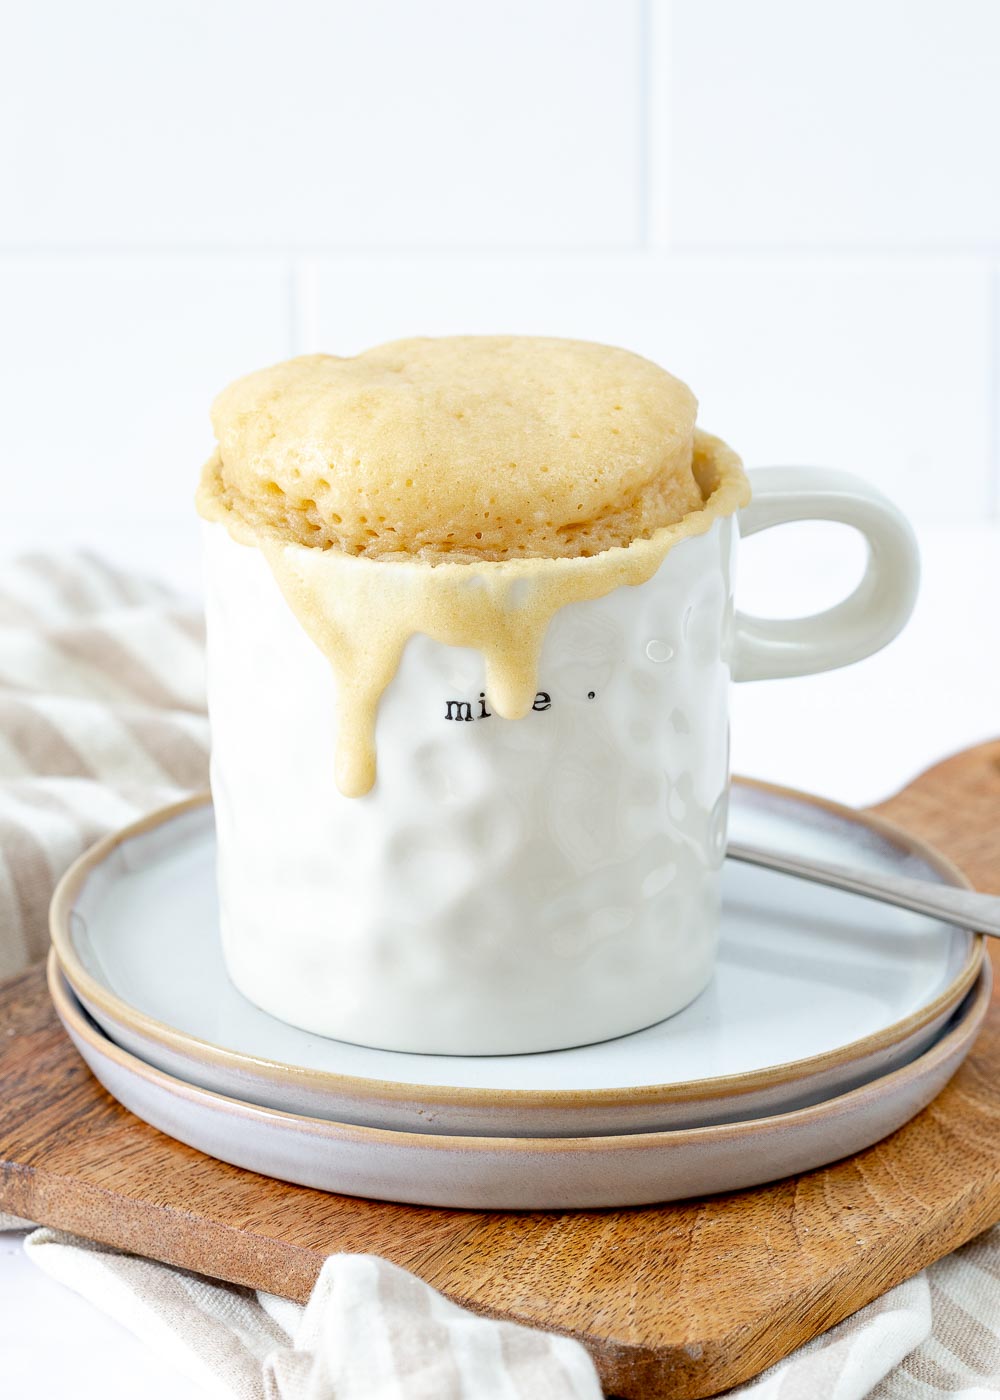
In the mood for homemade cake, but in minutes instead of an hour? Make this easy vanilla mug cake recipe in the microwave!
In a nutshell, a mug cake is nothing more than cake in a mug from the microwave. Truth be told, a real baker will now turn his nose up at even the mention of making a cake in the microwave, but it can be a real bonus if you know how to make this well. It’s the fastest way for making single serving desserts.
We all know this one. You’re in the mood for a nice piece of cake, but the thought of having to wait another hour for it to be done keeps you from getting into the kitchen. That’s why this easy microwave vanilla mug cake is ideal. With this recipe, you can enjoy a delicious serving of vanilla cake in a cozy mug in just five minutes.
Those five minutes include both the prep time ánd the baking time for this recipe. To prepare, all you need to do is stir the ingredients together in the mug. And then the real magic begins, because a mug cake takes about two minutes of microwave time. Yes, a microwaveable cake. And the best part? It tastes delicious!
Baking tip: I usually use 250-300 ml (1 cup or a little more) large mug for my mug cakes. Make sure the mugs are microwave safe
Of course I already made a couple of different versions for you to try:

Once you’ve mastered making the best vanilla mug cake recipe it is super easy to vary and make any kind of mug recipes you want. You can add pieces of fruit, chocolate, spices or nuts. Serve it with whipped cream or a scoop of vanilla ice cream and you have an individual serving of a very easy dessert. Pretty close to the perfect dessert or a sweet treat if you ask me!
Making this you need pretty simple ingredients and you can add wet ingredients and dry ingredients together at the same time. It just requires a bit of stirring in your mug and you have the best mug cake you’ll ever need.
You will need:
After many questions, I have tested this extensively for you and yes, it is possible by adding some extra baking powder to make the cake rise sufficiently. This is because the microwave makes the cake rise explosively in a short amount of time, while eggs combined with baking powder make the cake rise in a normal cake recipe. I prefer not to use eggs in this case because it becomes a complicated calculation for a mug cake.
If you want to make this moist cake in the oven you do the following:
You add 2 grams of baking powder (a little less than half a teaspoon) to the recipe.
Bake this cupcake in the oven at 180°C (350˚F, conventional oven) for 20-25 minutes until done. Test with a cake skewer to make sure the cake is done, otherwise leave it in the oven for a few more minutes.
Want to bake more than one cupcake in the oven? Take my recipe for vanilla cupcakes and divide it in half or four for a smaller portion. After all, this is the best recipe for baking delicious cupcakes in the oven.

The most important thing is to use a mug that is microwave-safe and roughly a little more than one cup in size (250-300ml).
No, it will not taste the same because the ingredients are different. If I were to compare my recipe for vanilla cake and this cake in a microwave mug, I would prefer the vanilla cake from the oven. The addition of butter and eggs and the baking process in the oven gives me the best taste experience. However, that said, I can truly enjoy one of my mug cakes and make them on a regular basis.
You can make this recipe with a combination of all purpose flour and baking powder if you don’t have self-rising flour at home.
It could be a number of things:
When cooking in the microwave, 30 seconds (or even 10 seconds!) can make a big difference. Has your cake become a bit too hard? You might want to lower the wattage or shorten the baking time next time.

Turning a simple tea mug (or coffee mug) into a darn tasty breakfast is easy with this recipe for banana oatmeal mug cake with blueberries. Thanks to the mug, you have the perfect portion for one person. Of course, you can also double it if you want to enjoy it as a couple or if you want to prepare breakfast for the next day.
The fun part about this oatmeal mug cake is that it can be prepared in either the microwave or the oven. So perfect for all people without a microwave (and of course for the people with a microwave as well). You need just a few simple ingredients to make this delicious healthy mug cake recipe.
You might have already seen this banana bread mug cake which is also delicious but has a different flavor to this one due to the use of the oatmeal.

And that’s all there is to it. This banana mug cake is full of only healthy ingredients, making this also perfect for a quick breakfast. Do make sure you use a microwave-safe mug if you’re preparing it in the microwave and obviously an oven-safe mug when preparing in the oven. I like to use a large mug of roughly a little more than one cup in size. Slightly taller mugs work best.
Making the mug cake cannot be easier. The best way to make the batter is with an immersion blender but you can use a fork as well. I simply add wet ingredients and dry ingredients together but keep the blueberries separate. Blend it with the immersion blender, add the fresh berries in and your batter is done. Pour into the mug and microwave for 140 seconds on high power. Your healthy breakfast is done (or your healthy single-serve cake!)
As said this is a pretty perfect mug cake. But you can add other things to it. Making it potentially a little less healthy but no less delicious! I sometimes sprinkle a few chocolate chips in and adding just a bit of ground cinnamon is also delicious. You can make a pumpkin spice version by adding a teaspoon of pumpkin spice mix. Delicious during fall season. The blueberries can be replaced by almost any kind of fresh fruit, so just pick whatever is in season at the moment.
If you have a really sweet tooth you can add a teaspoon of brown sugar. You can also do this if the banana you’re using is not as ripe as you want it to be. Instead of brown sugar a touch of pure maple syrup is great too.

Now for me the combination of oatmeal and blueberries is a match made in heaven. I will soon have more in that particular combination coming up, but for now I have a few other mug cake recipes you might want to try too! As you can tell I love this easy way or making a single serving dessert. Check the full description in the recipe card.
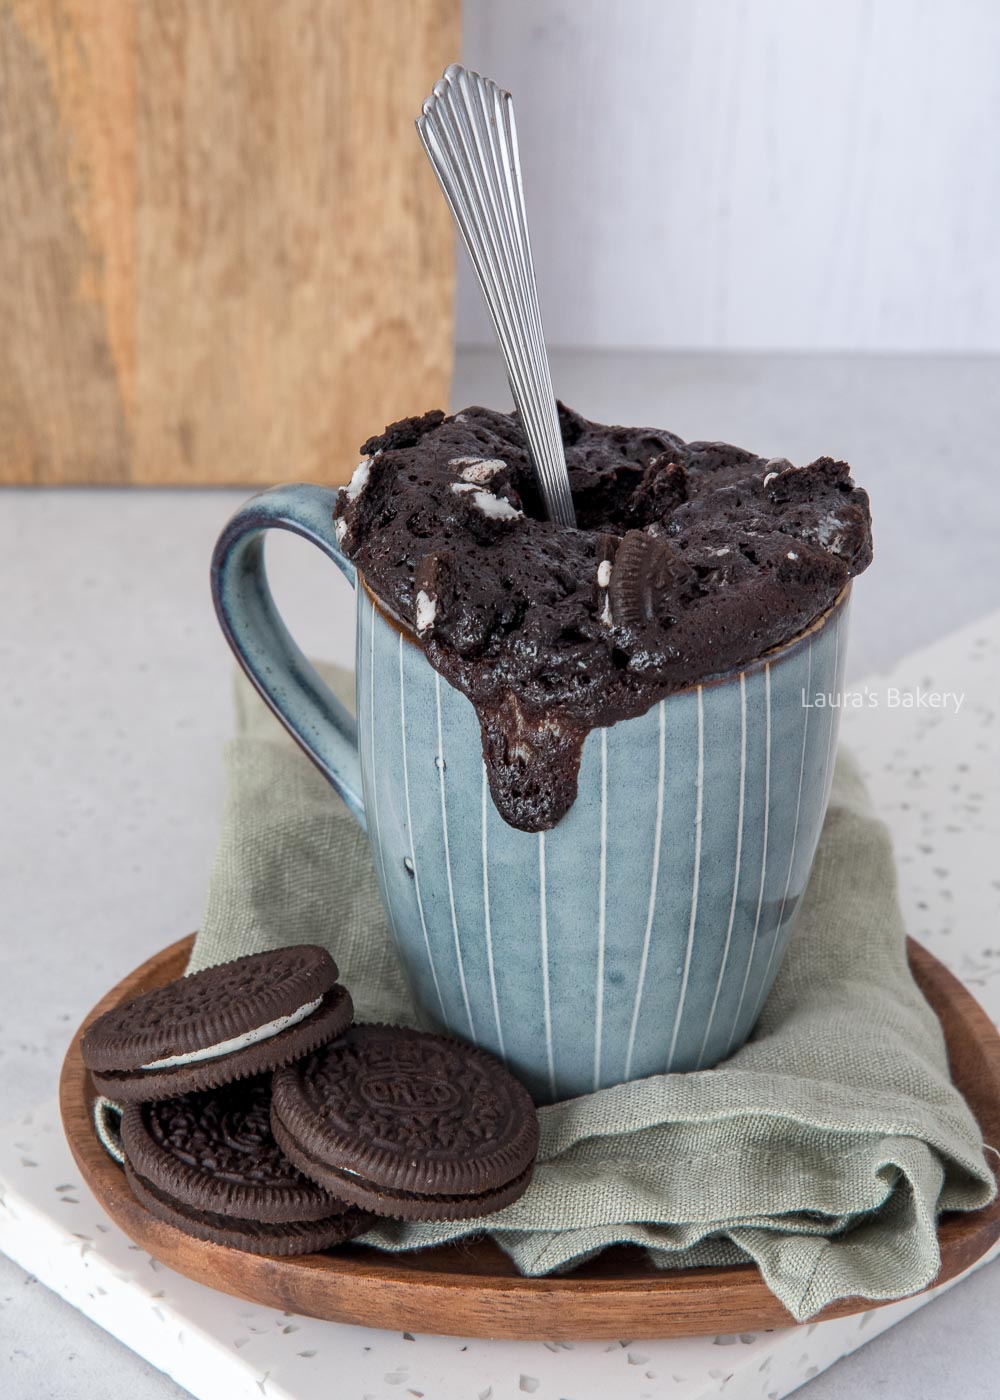
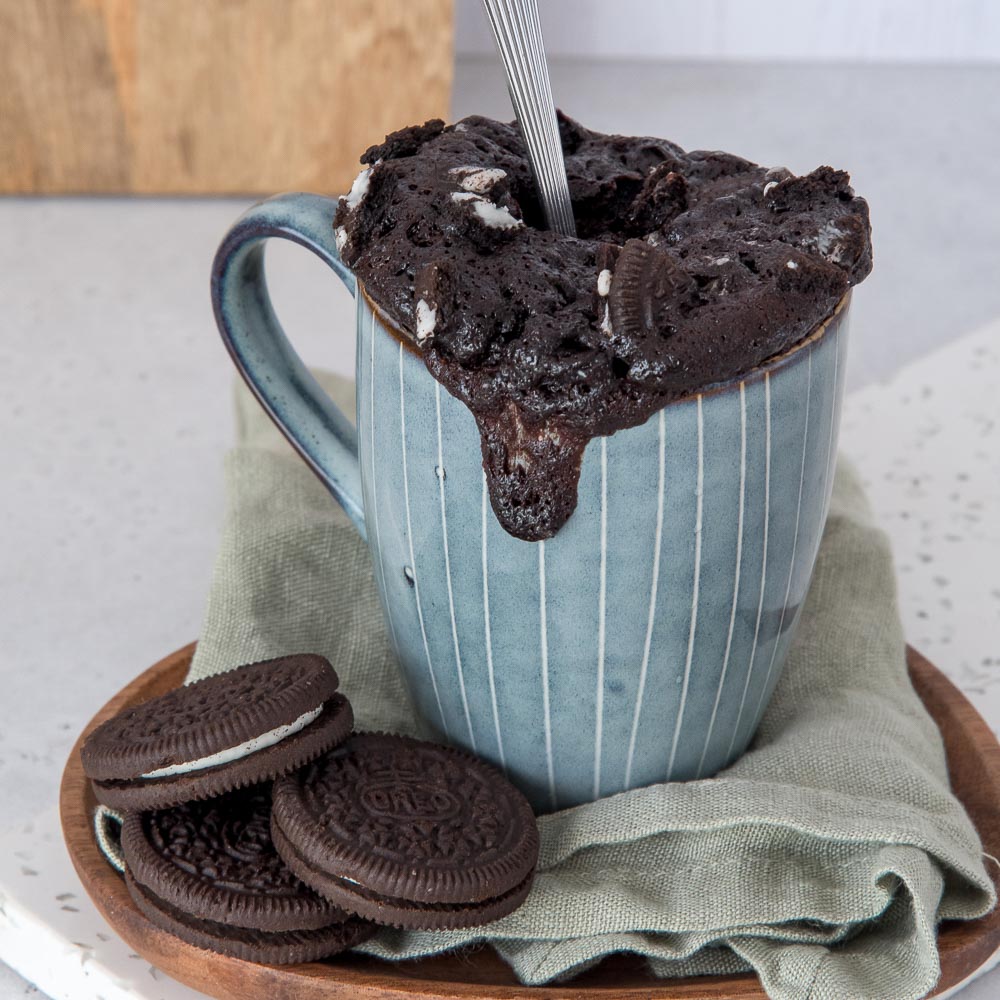
I’m starting to develop a bit of an addiction to mug cakes. It’s really nice to be able to conjure up a delicious cake so quickly and easily, isn’t it? This Oreo mug cake was another real success!
It’s been years since I shared my very first mug cake recipe with you (or at least it’s been years since I shared it on the Dutch website). Those were a vanilla mug cake recipe and a chocolate mug cake recipe. Many of you have been asking for more mug cakes recipes. While I generally prefer a ‘real’ cake like my favorite vanilla loaf cake, sometimes it is so convenient to whip up a delicious cake in no time at all. Today I am sharing my easy Oreo mug cake recipe.
Now for this Oreo cake you need only a few simple ingredients. That’s the fun of making a mug cake right? It’s such an easy dessert and serve it with a scoop of ice cream for an even better dessert. Or use a big dollop of whipped cream. So good.
In addition you will also need a microwave-safe mug. I like to use a mug that is roughly a little more than a cup in size.
Now this easy mug cake recipe requires you to mix the ingredients. And that’s about all that there is to it. The only difference is that you need to keep the Oreo cookies and the chocolate chips separate. You can simply mix all the ingredients together in the mug itself.
If you find that a little hard to do you can also use a separate small bowl for mixing the ingredients and then pour it into your mug. You really do not need a food processor for making this. A whisk or spatula is enough.
The microwave will need to be on high power for making the Oreo mug cake. Now how much that is depends on your microwave. For mine that is 800 watt. On that setting it takes a total of 140 seconds (2 minutes and 20 seconds) to make the best Oreo mug cake ever.
You might have seen the Oreo mug cake trend on TikTok where only two ingredients are used. Crushed Oreos and a cup of milk. While it looks good (haven’t tried this for myself though!) I would think it is not exactly a cake-like texture. It’s more a giant Oreo cookie after it’s been baked in the microwave.
But by all means try this for yourself! If you do want the airy texture of a cake? Try my Oreo microwave cake. I might try the tiktok version next time!

With the current prices of eggs, having a couple of baking recipes without eggs under your belt is a good idea. If only for budget purposes.
So today I am giving you my favorite recipes that do not require any eggs at all. From a delicious vanilla cake to a tiramisu without eggs. Once you know how baking without eggs works it is not that complicated to do.
Egg-free recipes are not only easy for budget purposes it is also great if you have guests or friends with an egg allergy. And while you might think that an eggless cake can not be as airy as a regular cake with whole eggs, I beg to differ.
There are a couple of tricks you need for replacing the eggs in the recipes. Or just pick one of the delicious recipes listed below.
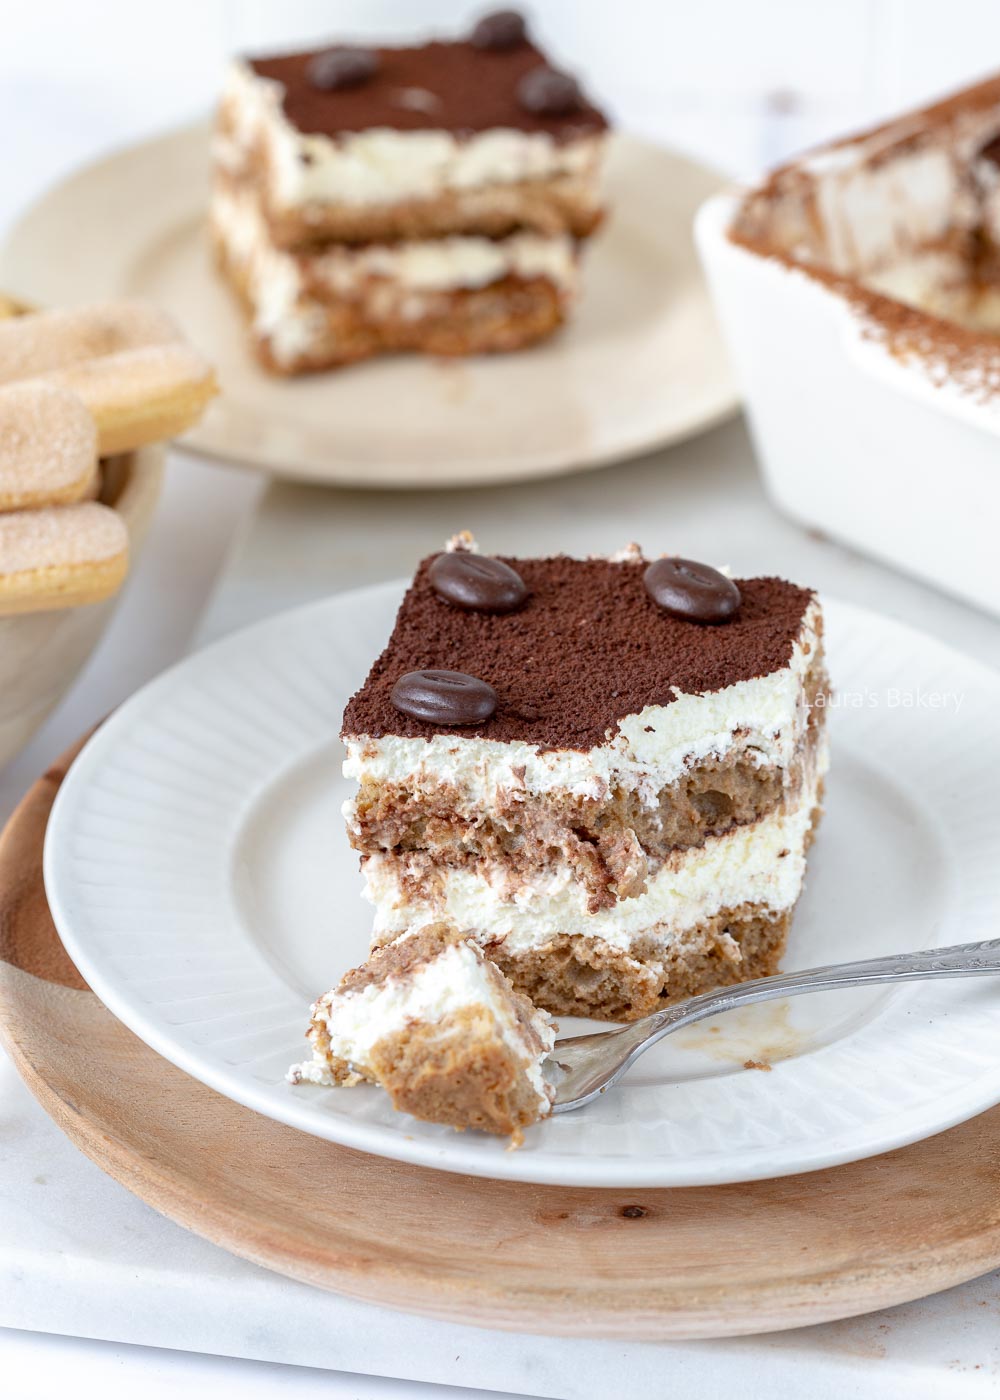
To start the list of delicious egg free recipes I have a classic tiramisu recipe without eggs and without alcohol. I do have an option in the recipe to include alcohol if you prefer.

If you love Oreo you’re going to want to try this Oreo mug cake recipe. It doesn’t contain any eggs, is delicious and fluffy and ready in no time at all! The only equipment needed is your microwave.
Another fabulous mug cake which uses no eggs at all is this vanilla mug cake. It’s the base of most of my mug cakes and all of them are super quick and easy to prepare. It would be your go to recipe for a very fast cake recipe.

The perfect vanilla cake without eggs is this easy recipe. I’ve made it so many times already I lost count and it still continues to be one of my favorite recipes. And not only mine, but my guests are always happy when I make this delicious vanilla cake.

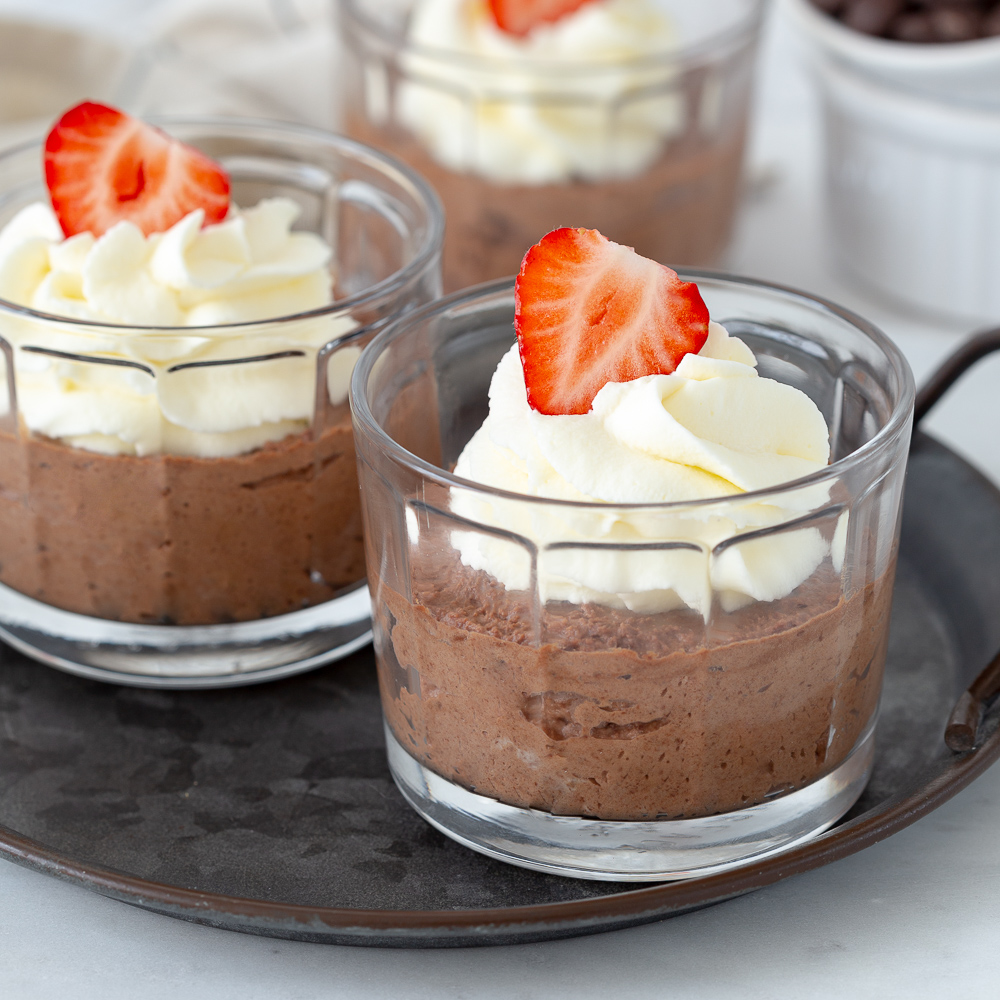
If you love chocolate mousse, like I do, you might be used to the fact that it contains egg whites most of the time. But this delicious recipe uses only three ingredients and no eggs! You will love it!
Panna cotta usually doesn’t contain any eggs and that makes it the perfect make-ahead dessert for any dinner party. It’s no bake too!

When it comes to baked cheesecakes eggs are used for stabilizing the mixture. For no bake cheesecakes that is not necessary so it’s a delicious eggless dessert!

One of my favorite recipes by far is this Dutch breakfast cake. It doesn’t contain any eggs and is perfect for serving both as a breakfast cake and also delicious served with a steaming cup of coffee!

These cheesecake bites are the perfect little treat. I love the fact that strawberry season is getting closer and these bites are perfect for serving.

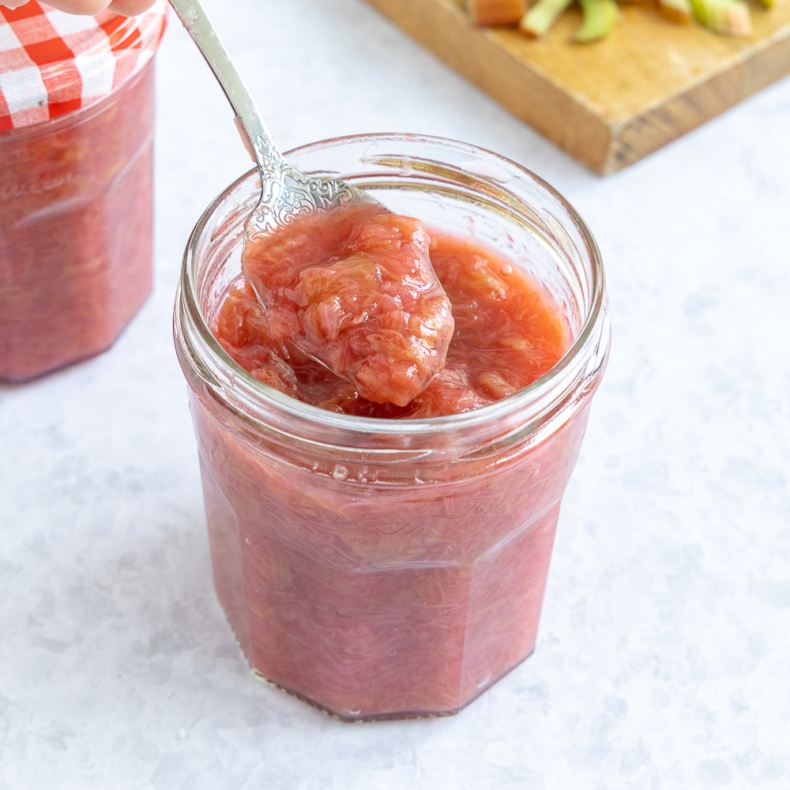
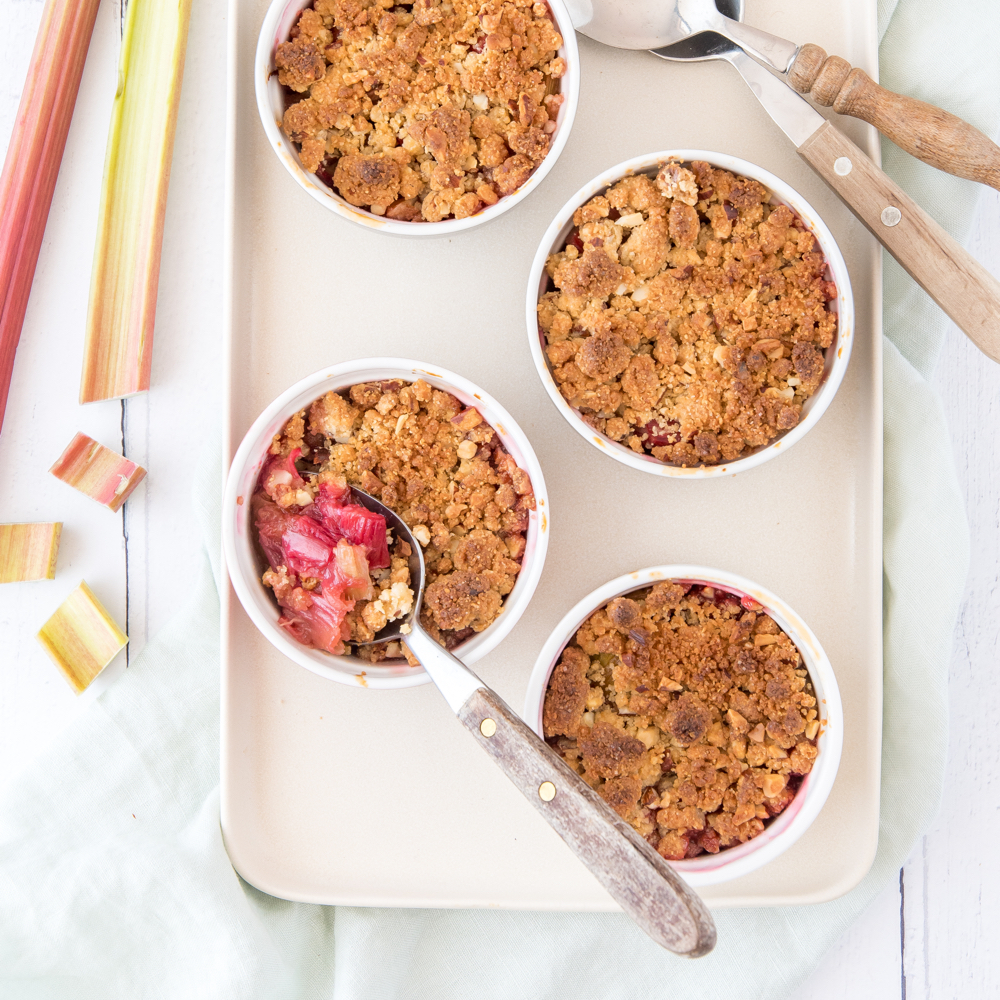
Who doesn’t love a good crumble? Rhubarb season is too short if you ask me but with this easy crumble recipe you have a dish that can serve both as breakfast (just add some crumble to your morning yogurt) as dessert (add a scoop of vanilla ice cream!) or as a coffee treat.
Every year at the end of the year you can find many different speculaas cookies everywhere in the Netherlands. But the good news is that you can serve these delicious cookies year round and even better; they are eggless cookies!

Like all my tiramisu recipes this one also does not contain any eggs. No eggs but all the creaminess and due to the use of whipping cream it is every bit as light and airy as tiramisu recipes that do contain eggs.

These eggless oatmeal cookies are easy to make and due to the oatmeal I always feel they are (a bit) healthier than any other cookie.

Yes another delicious mug cake. This time with chocolate flavor. Ready in just a few minutes and a favorite on the site! It’s been successfully made by lots of people already. Are you going to try this recipe next time?
Scones are another delicious recipe that uses no eggs. If it’s important for you to not use any eggs, make sure you use eggless ingredients as the toppings as well. The good news is that you need a milk wash for the scones and not an egg wash. But pay attention if you would want to add lemon curd as that does contain eggs.

One of the things that eggs provide is a moist and light texture. Not using eggs might make your cake dense and in general not the best cake. You can use various ingredients to solve that issue.
Think about adding applesauce, mashed banana or yogurt. Things like flaxseeds and chia seeds are mostly used to replace the egg and do require extra liquids like milk or water.
Another texture element is the density of the cake. Not using eggs can make the cake a lot denser. Things like apple cider vinegar, baking soda and even sparkling water can help with that.
Of course one of the best known qualities of eggs is the fact that they bind everything together. Not using eggs in your baking recipe might result in the cake or cookies falling apart.
That’s where a so called flax egg or chia seeds come in handy. They replace the function of eggs. In general the formula for a flax egg is 1 tablespoon of flax seeds to 3 tablespoons of water would replace one egg.
Don’t we all love a golden brown cookie! One aspect you might not think about when it comes to baking without eggs is the browning effect the eggs have to the end result.
You can solve part of that problem by brushing the surface (cookie recipes or similar) with melted butter or a milk mixture.
The best way to start baking your eggless recipes is to use one of the recipes I have outlined above. Those are all extensively tested and will work. I also have an article on replacing eggs and what other things you need to take into account.

A real typical Dutch recipe is a so called Dutch banketstaaf or almond paste filled pastry log. It’s the thing we make during Sinterklaas and it’s a favorite of mine. It’s pretty easy to make, but you can also make all the components yourself. It’s a pretty traditional Dutch pastry that is also quite popular at Christmas time.
A tempting slice of banketstaaf is delicious with a hot chocolate, a nice cup of coffee or a mug of hot tea.
Some recipes are so simple that I wonder if I should share the recipe. This recipe for making your own pastry log is one of those. In total, you only need three ingredients to make a pastry log, Dutch banketstaaf, or almond letter (whatever you want to call it):
You can make it as hard or easy as you like. For example, I used a large puff pastry sheet from the refrigerated section of the grocery store, but you can also make your own. The same goes for the almond paste, although it really is incredibly quick and easy to make it yourself. Keep in mind that homemade almond paste needs to “age” in the refrigerator for a while. The full list of ingredients is in the recipe card.
A homemade banketstaaf is really incredibly delicious. Of course you will have to taste it fresh out of the oven, when it has just turned golden brown and smells absolutely intoxicating. Nothing beats a slice of warm pastry log.

Now for making this you will need a bit of parchment paper, a prepared baking sheet and a large roll of puff pastry. You cut the sheet in half lengthwise. It’s easiest to do this on a lightly floured surface. The almond paste is mixed with one beaten egg and you keep the other egg for the egg wash. You can mix it by hand or in the bowl of a food processor.
Now you might not be able to find this particular kind of almond paste everywhere in the world, but the good news is; making your own almond paste is incredibly easy.
You divide the almond paste into two equal parts and roll it into a sausage shape. You place each sausage in the center of each long strip of dough. Brush the ends of the dough with a little bit of water. Now fold and press the dough into the shape of a log. Press to seal the log and place it on the baking sheet (seam side down). You can sprinkle some sliced almonds over the top if you want after having used the egg wash. Bake in the oven in about 25 to 30 minutes.
You will find people that love to eat a Dutch banketstaaf cold and you will find people who love to eat it warm. In my opinion you should really be eating it warm. That’s when the flavor is at its very best. I reheat the banketstaaf in the oven as that will also make the puff pastry crispy again. Just like it was when you first baked it.
When reheating puff pastry snacks, I usually stick to about 5 minutes in the oven at 225˚C (440˚F) (conventional oven), depending on the size of the snack. If you are reheating the entire almond log at once, it will take a little longer.
You can also use an air fryer, but be aware that this will be even faster because of the hot air feature.
Over the years, I have come to appreciate almond paste more and more. While 15 years ago I preferred gevulde speculaas with just a little almond paste, I now prefer a well-filled variety. You can also vary the filling for this banketstaaf, more on that below in the tips section.

The function of the egg in this recipe is to bind the almond paste and keep it creamy during baking. It also gives a nice shine to the pastry. I have sometimes read that you can replace the almond paste with apple sauce or (vegetable) milk, but I have not tested this.
To brush the pastry you can also use milk, although it does not give the same shine as egg. Another option is to brush a little apricot jam on top. Also quite good!
Absolutely! You can use as much or as little almond paste as you like. My tasting panel and I found the almond paste log to be rich with this amount of almond paste. So I can imagine that if you like more puff pastry in proportion, you might use 300 grams of almond paste (150 grams per bar). I recommend using a maximum of 250 grams of almond paste per bar, otherwise it will be difficult to seal the pastry properly.
No there is a difference between almond paste and marzipan. Marzipan contains more sugar.
This recipe is really about almond paste, but if you have an allergy or intolerance to almond paste, you can substitute coconut paste. I developed it specifically for this purpose and it can be substituted 1:1. I will soon share the recipe for this as well (it’s here in Dutch if you can’t wait). You can also make a paste of any other kind of nut but there are no recipes online for that just yet.
You most certainly can! A few years ago, I made a savory pastry log with puff pastry and a sausage stuffing. Absolutely delicious! I’ve also made a savory pastry bar with a smoked sausage (rookworst) filling, mm!

Eggs are one of my favorite ingredients. Probably not surprising since I love baking and they are used in countless baking recipes. And for me using eggs is not an issue at all. I don’t not have an egg allergy and I am not on a special diet that restricts the use of eggs.
However, I do know there are a lot of people who cannot use eggs due to egg allergies and need to use egg substitutions for all their baking and cooking. And that can be quite a challenge. Now while eggs have a pretty specific use in a lot of recipes you cán replace them.
Another good reason is the fact that egg prices are going through the roof. And with vegan baking on the rise that is another good reason to have some alternatives ready. I’ll tell you how to substitute eggs in baking.
So in this article I will explore the best egg substitutes and how to use them. It is good to know that substituting eggs will give a different result, depending on which alternative you go for. The good news is that you can still continue baking, even though you cannot use or don’t want to use eggs. The reason why can vary of course.
It’s also good to know that I am not specifically talking about plant-based recipes or vegan substitutes. Even though most will work as a vegan alternative as well, but that aways depends on the rest of the recipe. Also I am not talking about any commercial egg replacement product as I have not tried those myself.
Using these alternatives is also great if you do not have eggs at home and don’t want to go to the grocery stores. Of course that is assuming that you have the following alternatives available to you!
The below options are all common alternatives to the use of eggs and are ones that you will likely have in stock in your cupboard.
Flax eggs are made from flax seeds and 3 tablespoons of water. The ratio is one tablespoon of flax seeds to 3 tablespoons of water.
Another almost similar replacement is chia seeds. Same as with a flax egg, for chia eggs you keep the same ratio of 1 tablespoon chia seeds to three tablespoons of water.
Now here is one that might come as a bit of a surprise but you can use peanut butter as well. If you think about it and I’m sure most people can relate, stick a tablespoon of peanut butter in your mouth and that sticky feeling?
Well that’s exactly why it works. For replacing one egg you would need 3 tablespoons of peanut butter.
For replacing one egg you would need 80 grams of apple sauce. That’s about 1/3 of a cup of applesauce.
You can also use other fruit purees. In that case you’d need 3 tablespoons of fruit puree.
Yes, ripe bananas can also function as a great substitute for a whole egg. You need about half a mashed banana for 1 large egg.
To replace an egg for yogurt in baked goods you will need about 60 ml or 1/4 cup of plain yogurt.
Another replacement for an egg is 3 tablespoons of aquafaba. Aquafaba is the liquid you will find in a can of chickpeas. It’s pretty magical stuff a you can use to make meringue and mayonnaise too!
Now while the above are popular egg substitute options it does not give you any guarantees and a lot of these things take a bit of trial and error for best results.
It will vary from recipe to recipe and the final product will also be slightly different than the original with eggs.
The eggless recipes we have on the site right now are all tested, so those are a sure bet, but if you want to try your own hand at using some replacement than it would really need some testing.
Not all replacements work for all recipes. You can imagine that a banana would work really well for banana bread for instance, but it might not be a good idea for quick breads.
Also something like peanut butter has a distinct flavor so you would want the nutty flavor to work with the rest of the ingredients.
Now as you probably know eggs also have a leavening function. The replacements are not necessarily a leavening agent. So you might have to look at another way to increase the rise in your baked goods.
Think about extra baking powder, baking soda and/or apple cider vinegar.
Eggs have a pretty strong binding function. Stronger than most of the ingredients above. So the finished product will have less binding and will be a bit easier to fall apart.
You can counter balance some of that by using something like arrowroot powder and tapioca starch in addition to the egg replacements. Both can be used interchangeably and are great binding ingredients.
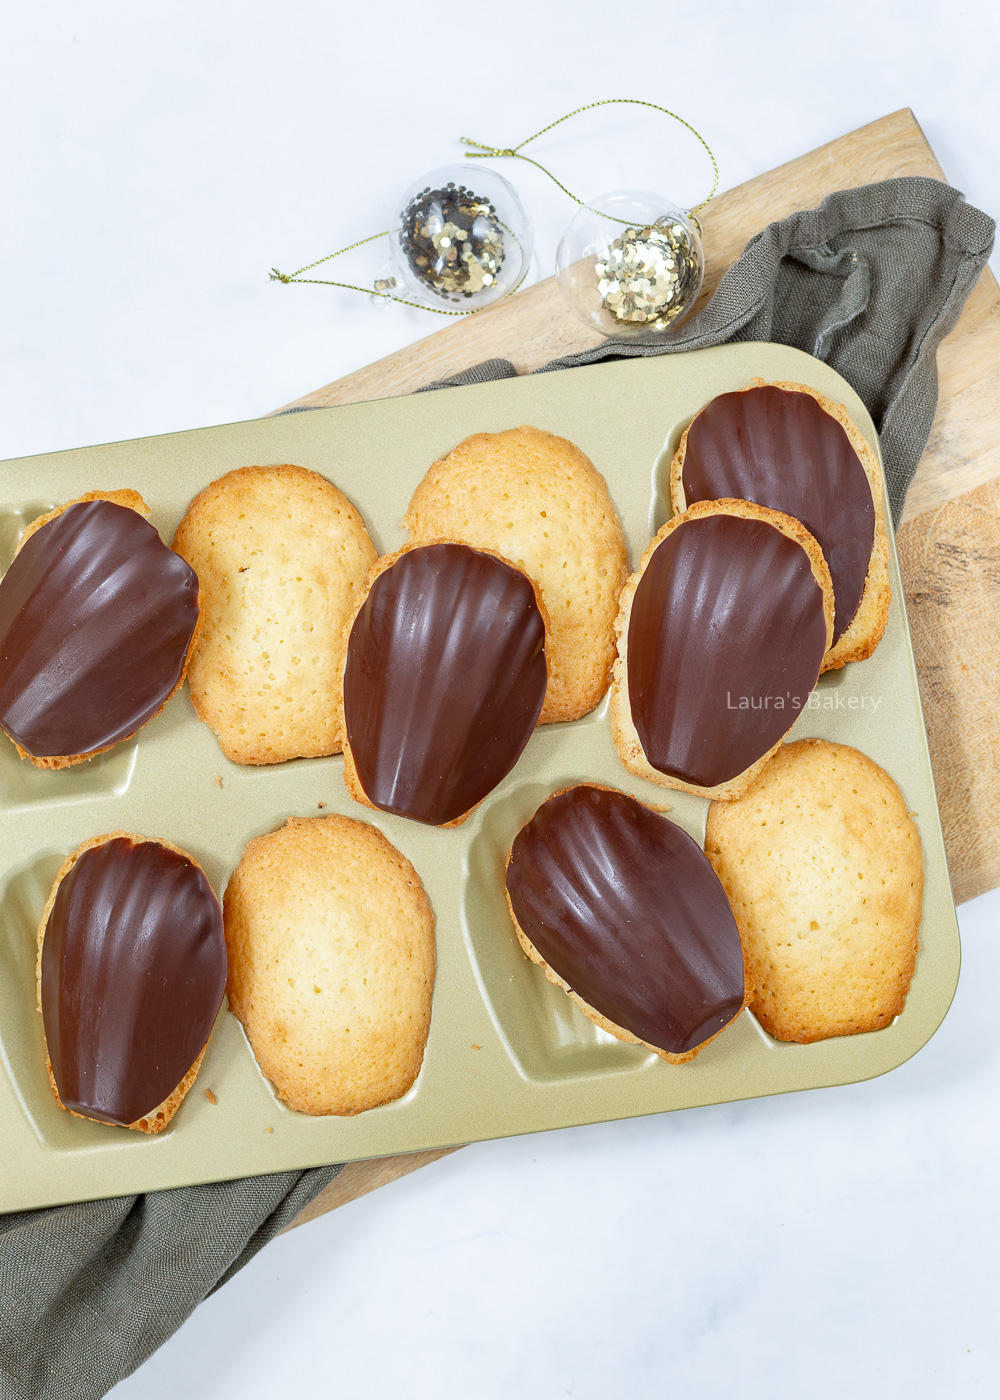
The classic French madeleine cookies with a layer of chocolate, a perfect little treat that is really easy to make. I’ll share my recipe for vanilla madeleines dipped in chocolate.
Let’s start with the fact that madeleines are not cookies. They are small shell shaped cakes, French butter cakes to be exact.
A good madeleine is crispy on the outside and soft and spongy on the inside. And don’t forget: a well-baked madeleine has a nice little belly. The other side looks like a shell, which is due to the shell-shaped molds used to bake French madeleines.
Enjoy a homemade madeleine with a cup of coffee or hot tea. These delicate French cakes are perfect little treats to serve to your guests.

It’s not that hard to make madeleines at home. But there are some things to keep in mind to have the best result. I will share what I’ve learned of baking a lot of madeleines in all kinds of flavors.
To make these little cakes, you need chilled batter. I put a piping bag with the batter in the fridge, as that’s the easiest way to pipe the batter in the baking pan.
Chill the batter for about 2 hours. you can wait longer, but keep in mind the batter wil be hard an cannot be piped with a piping bag in you buttered pan.
To get the shell shape, you’ll need special madeleine pans. Brush the pan with melted butter with a pastry brush or use baking spray.
After baking, tap the pan on the counter immediately. They will come out of the pan very easily when they come straight out of the oven. Wait any longer and they will just stick to the pan.
I like to use metal molds to bake fluffy madeleines, but you can also use a silicone mold.
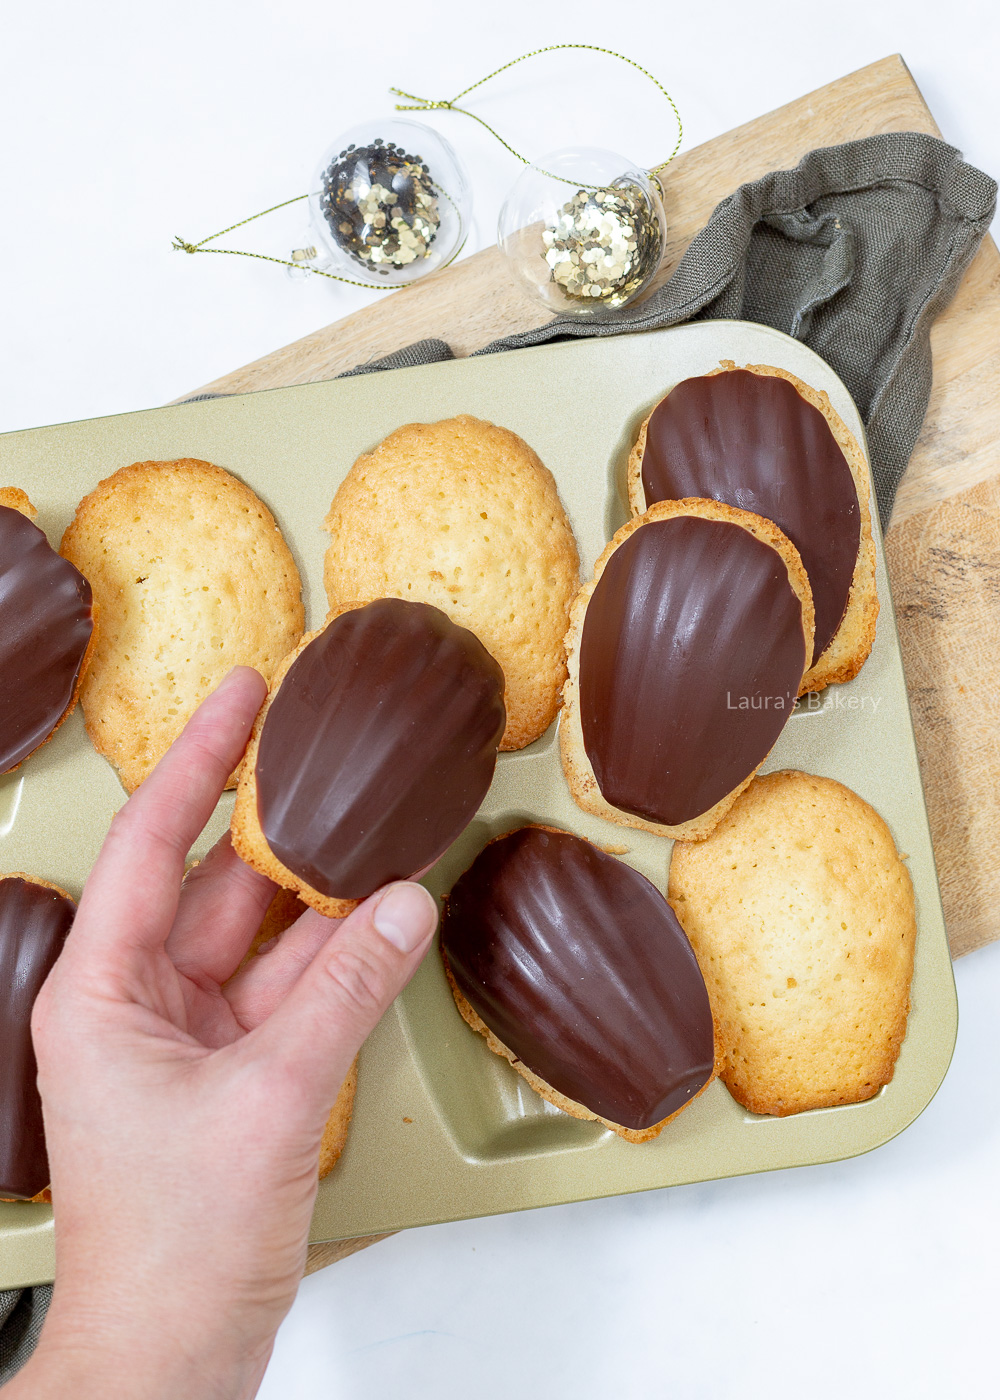
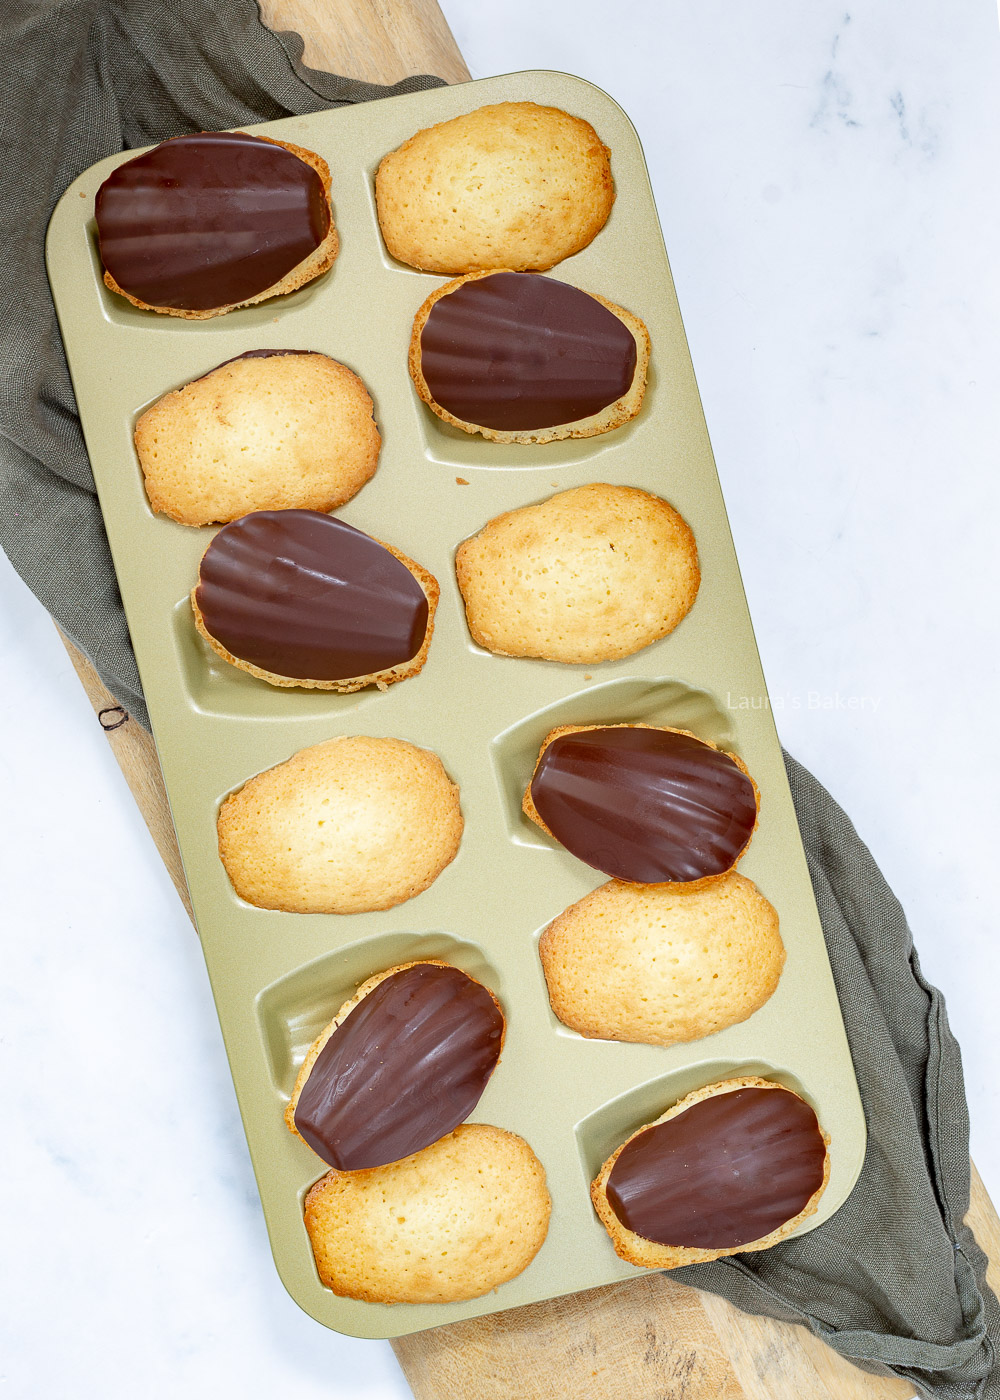
The concept is very simple. First, bake the madeleines and let them cool to room temperature on a wire rack. Then fill the cavities of the (well-cleaned) madeleine pan with a tablespoon of melted chocolate.
You can use a thermometer to check if the chocolate is tempered for that perfect shiny chocolate coating, but I personally don’t use a thermometer. I’ve included instructions on how to temper your chocolate without a thermometer in the recipe. It takes a little practice, but it’s very easy.
Then you simply add some chocolate to the special pan and press the baked madeleines back into the chocolate-filled cavities. When the chocolate is fully set, you can remove them from the non-stick madeleine pan.
The result is beautiful, delicious chocolate-filled madeleines. Very fancy ones, if you ask me. These madeleines are ready for the holidays!
Yes, you can use any type of chocolate. I used 50% dark chocolate and 50% milk chocolate for this recipe.
In this case, you can possibly add a teaspoon of baking powder to the dough, this will make the madeleines rise faster and the belly (the bulge on top of the madeleine) will be bigger.
When baking madeleines, it is important to grease the pan well and to dust it with flour if necessary. You remove the madeleines immediately after baking. The longer you wait, the harder it is to remove them easily.
If you have problems removing the madeleines with the chocolate layer, the chocolate may not have been properly tempered or may not have fully set, which can take a while.In this case, you can place the pan in the freezer for another 10 minutes and then remove the madeleines.Tap the counter several times and the madeleines should come out on their own.
TIP: Love chocolate? Try my recipe for a quick and easy chocolate mug cake! No egg needed for this recipe and ready in minutes.

This carrot cake banana bread recipe had been on my to make list for a long time. It just felt like such a great combination of flavors and that’s just bound the be delicious right? The texture of this bread is just absolutely delicious.
I quickly ordered a bunch of bananas and the rest of the ingredients I usually have available. My bunny Lot had to sacrifice some of her carrots, Haha.
I had to wait for the bananas to ripen, because that is the most important part of any banana bread; the bananas have to be really ripe as they provide most of the sweetness. Once they were ripe I got to work.
This recipe is a variation of my favorite banana bread recipe and I am always playing around with variations on it. After some trial and error I was happy with how the carrot banana bread batter tasted so I poured the batter into a cake tin and placed it in the oven.
Initially I wanted to make a cream cheese glaze to go on top of the bread but I decided against it as I wanted to be able to freeze it easily so I would always have an easy afternoon snack.
If you want you can absolutely make my favorite cream cheese frosting to top the carrot bread with. With this frosting it’s less healthy, but very delicous.

As you can see you do not add any other refined sugar which is also why it is important to make sure you’re using overripe bananas (brown bananas are best!).
If they are not you could consider adding a small amount of brown sugar to the mix but it’s better to wait until the bananas are ripe.
Making this homemade banana bread with carrots is as easy as mixing the wet ingredients together in a large bowl. Mix the dry ingredients together and add to the wet ones. Fold it through until incorporated and add the chopped walnuts and the shredded carrots at the last step.
Since the mixing doesn’t require a lot of time you don’t really need a food processor or hand mixer here. Just a large mixing bowl is enough.
Fold it through and pour batter into the prepared loaf pan. You can either grease the loaf pan and dust with flour or you can use parchment paper.
Place the banana bread carrot cake in the preheated oven and bake until golden brown. Let the bread cool for a few minutes in the loaf pan and take it out to cool completely on a wire rack.
This moist carrot cake will keep for 2-3 days in an airtight container (not in the fridge) or freeze it in slices for easy acces to a quick snack. You can read more about how to store banana bread here.
Now the number of variations on my classic healthy banana bread recipe are ever growing. If you’re a fan of banana bread make sure to check out the recipes below and stay tuned for much more variations coming soon!
You can store the banana bread in an airtight container for 2-3 days or for 3 months in the freezer
No, if you don’t like banana go for a regular carrot cake recipe.
Sure. Just make sure that the dimensions of the other tin are somewhat similar. Also keep in mind that baking times may vary if you change the tin. So always test if the cake is cooked through.

Want to make carrot cake? This easy recipe makes a creamy, fluffy and spiced carrot cake. The best carrot cake recipe I’ve ever had! So if you’re a carrot cake lover I would urge you to try this recipe!
Here it is at last: a recipe for carrot cake! And if I may be so bold, this really is the most delicious carrot cake ever. I had eaten a lot of carrot cakes and had a clear idea of what I wanted my version to be. The result was even more delicious than I had hoped, so you can understand how happy I am with this easy carrot cake recipe.
This carrot cake is airy, creamy, and has just enough spices. It’s perfect on its own, but when paired with the cream cheese frosting, it’s a real party. I made a layer cake out of it myself, but hesitated for a long time about whether to bake it in a bundt. I’m sure it would also look great with cream cheese frosting and walnuts on top.
Baking tip: Did you know that you can make carrot cake in an air fryer? I’ll share the recipe for that soon too.

A carrot cake is a cake in which grated fresh carrots are mixed into the batter. This not only gives the carrot cake a beautiful color, but also gives it a slightly sweet taste and a nice smoothness.
In addition, carrot cake always contains a special spice mixture consisting of at least cinnamon and ginger, but preferably also nutmeg and cloves.
Before the recipe came to Holland, it was already very popular in England and later in America. That is why we have so many words for this delicacy. Think worteltaart (in Dutch), carrot tart or carrot pie, depending on which country you live in.
Personally, I like to stick to the official English name carrot cake as most people would refer to it that way. Even most people in The Netherlands.
One final element that a carrot cake is known for is the topping. A carrot cake topping is usually called a frosting, a cream cheese frosting to be exact. This is my favorite cream cheese frosting recipe. This is a mixture of cream cheese, butter, powdered sugar and vanilla.
It seems that this frosting is a modern addition, not found in old recipes. Whoever came up with it, I am very grateful, because the sweet and creamy addition of the frosting completes a spicy carrot cake!

In my opinion, a carrot cake should have a deliciously creamy base, but the layers should also be nice and fluffy and with moist crumbs. To get both that creaminess and lightness in this carrot cake, I played around with the ingredients. Below I will tell you a bit more about the role of the ingredients in this layer cake:
As always make sure all ingredients are at room temperature before you start baking your homemade carrot cake recipe.

I personally used baby carrots, but you can also use winter (big) carrots.
Don’t grate the carrots too coarsely (like julienne), but certainly not so finely that they come out as a mush. You want small, thin strands of carrot. That’s what tastes best in the cake. I like to use a coarse grater to grate the carrots.
If you do have julienne cut carrots, make sure to chop them into smal pieces before adding the carrot to the batter.
You certainly can, but I haven’t done it myself (yet!). I read in the comments that someone has already baked this carrot cake recipe in this Nordic Ware cake pan with a baking time of 60 minutes.
This cake has three layers and I prefer to bake them in the oven at the same time. I use three of these 9-inch cake pans around the house. By greasing and dusting them with flour, the cakes come out perfectly after baking.
Yes, you can. The only thing you need to be aware of is the effect of the baking soda on the dough, as the baking soda is activated when it comes into contact with the light brown caster sugar or baking powder. Therefore, divide the carrot cake batter into three bowls (just weigh it out) and add the baking soda just before you pour it into the prepared pans and put it in the oven.
If you do it in 3 separate layers, yes. But not if you want to bake all of the batter in one big cake. I do not recommend it for this recipe.
You bake the cake in 3 separate layers because you get a better result than if you bake it as 1 big cake and cut it later.
Do you want to bake it in a larger springform pan and serve it as a single layer cake? Use a 24 cm (9.5 inch) or 26 cm (10 inch) pan. The bake time will need to be longer, so it’s best to experiment. Use a skewer or a cake tester in the center of the cake to check if the cake is done (it should come out clean) before you remove it from the oven.
Haven’t done that myself, but it’s definitely possible. The best thing about this carrot cake recipe is that it is pretty flexible. Cupcakes usually take 18-20 minutes to bake.


