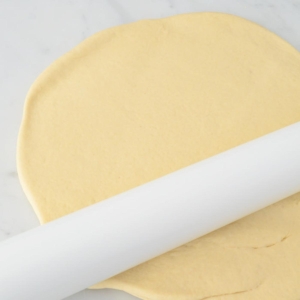
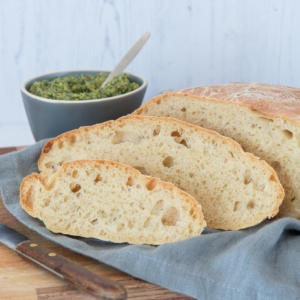
Whether slathered with cream cheese or simply topped with butter and a slice of cheese, bagels are a timeless brunch or lunch favorite. Packed with hearty grains, these multigrain bagels deliver the wholesome goodness you crave so you can enjoy every bite with a little less guilt.
Hearty And Wholesome Multigrain Bagels
Get the most out of your carbs by transforming plain bagels into hearty multigrain savory bites. Use pantry staple ingredients and an easy, foolproof process.
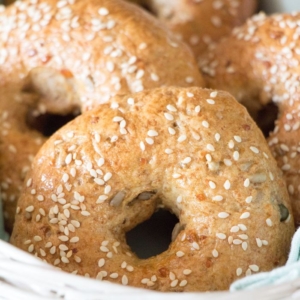
They’re chewy with an irresistible crunch and a golden crust. Perfect for lunch with cream cheese and smoked salmon or ham.
Recipe Ingredients
Learn how to make bakery-worthy multigrain bagels. Using just a handful of everyday ingredients, you’ll whip up bagels that beat anything from the store or your local café. For the exact measurements and step-by-step details, scroll down to the recipe card below.
lukewarm water – warm water helps the dough to rise
superfine sugar – I like to use super fine sugar for these bagels as it dissolves instantly in the lukewarm water, ensuring it feeds the yeast evenly and blends smoothly into the dough
fresh yeast – or use 10 grams of dry active yeast
multigrain bread flour – don’t use bread mix. Those are pre-formulated for bread machines and only need water. Bread flour, on the other hand, is just a type of flour, so you’ll still need to add the yeast, sugar, salt, and other ingredients yourself
salt – balances and enhances the flavors
egg – I used a medium egg, beaten. This is brushed over the tops of the bagels just before baking for a golden, crisp finish
sesame seeds – for sprinkling over the boiled bagels for a deliciously savory crunch
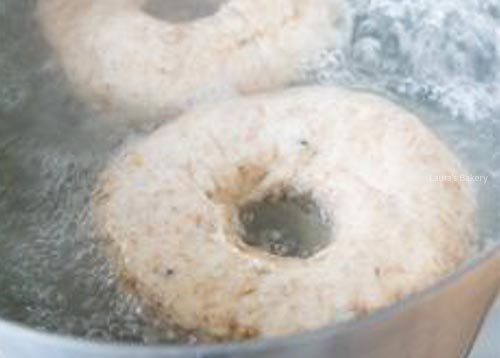
BAKING TIP: Don’t skip boiling the bagels. It locks in a dense, chewy interior while creating that signature shiny, golden crust. Without it, you’d just have round bread!
How To Make Multigrain Bagels
1
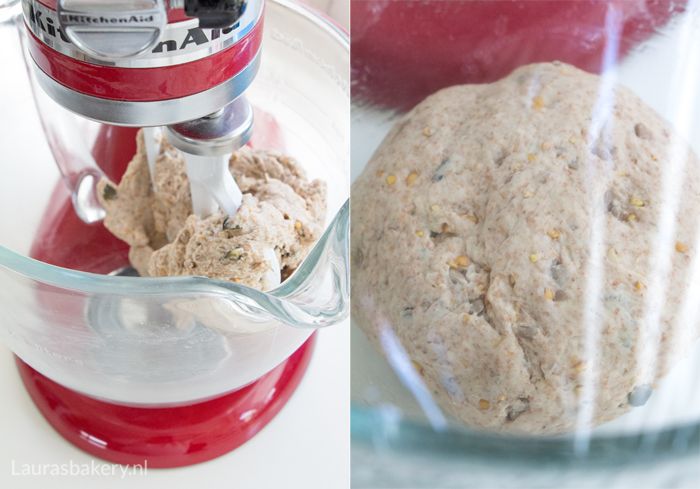
Combine sugar-yeast mixture and flour in a bowl of a stand mixer. Knead for 10 mins. until crumbly.
Store these multigrain bagels in a sealed container in a dry and cool place. The bagels will keep for a few days, but like any other bread, they will become chewier.
Can I freeze multigrain bagels?
Yes. Freeze them once completely cool for up to 3 months, but no longer. Thaw them overnight in the refrigerator or at room temperature.
The bagel dough can also be frozen. Simply wrap it tightly in plastic wrap, followed by a layer of aluminum foil, and freeze for up to three months.
When you’re ready to use them, thaw the dough overnight in the refrigerator, then proceed with shaping the individual dough balls and following the rest of the recipe.
Reheating multigrain bagels
Reheat leftover bagels at 350°F/175°C (conventional oven) for 5-7 minutes to restore a crisp exterior and soft interior.
You can also reheat the bagels in the microwave by wrapping each bagel in a damp paper towel and heating for 15-20 seconds. This keeps it soft but can reduce the chewy exterior.
More Savory Bread Recipes
Loved making these savory multigrain bagels? Don’t stop here; browse my collection of easy, bakery-style breads for more homemade deliciousness.
There are two main reasons for boiling bagels once the dough has been shaped:
First, it gives the bagels their glossy shine which comes from the dough’s starches gelatinizing. In the oven, those starches turn into a crisp, shiny crust.
Secondly, the boiling also cooks the outer layer of dough, helping the bagels keep their shape during baking.
How do I create a crisp, caramelized crust?
Brushing the tops of the bagels with beaten egg just before baking adds a golden finish and crisp texture to the tops of the bagels. Another trick is to add honey, maple syrup, or barley malt syrup to the pot of boiling water.
How do you shape the bagels?
All you need to do is flatten each bagel dough ball slightly, then use your thumbs to poke a hole through the center of each ball. Gently stretch the hole to form a bagel shape, and that’s it!
What other mix-ins can I add to these chewy bagels?
Feel free to experiment by adding herbs and spices to the bagel dough.
What can I serve with these wholegrain bagels?
Enjoy these multigrain bagels with cream cheese and smoked salmon or ham. They’re also tasty with a simple spread of butter and a slice of cheese. While I’ve sprinkled these homemade bagels with sesame seeds, feel free to use poppy seeds or sunflower seeds instead.
Can I use bread mix?
No. Don’t use bread mix for these whole wheat bagels since those mixes are usually made for bread machines where you only need to add water. Bread flour is simply a type of flour, and for that reason, you still have to add all the other ingredients yourself for this recipe.
Simple to make and unbelievably delicious; these homemade multigrain bagels are perfect with a smear of cream cheese, though they’re just as good with any of your favorite toppings!
In a bowl, combine the water and sugar, stirring until the sugar has dissolved. Add the yeast and let it sit for about 10 minutes.
Place the multigrain bread flour and salt in the bowl of a stand mixer. Once the yeast mixture has had time to activate, add it to the flour and mix until a crumbly dough forms. Knead on low speed for about 10 minutes, until you have a smooth, elastic dough.
Remove the dough from the bowl and shape it into a ball. Lightly grease the bowl with oil and return the dough to it. Cover with plastic wrap and let it rise in a warm place for 2 hours, or until doubled in size.
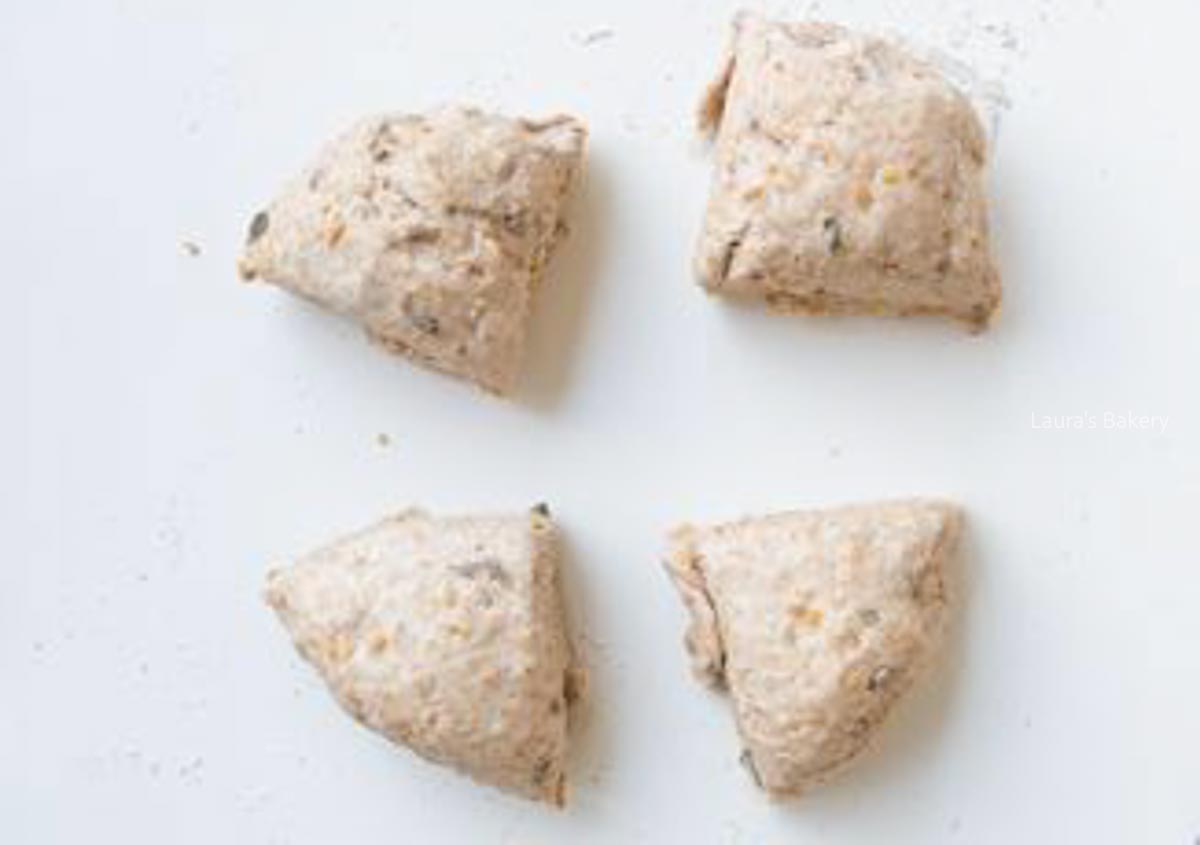
After rising, remove the dough from the bowl and divide it into two equal portions. Divide each portion into four pieces, giving you eight pieces total. Roll each piece into a ball, flatten it slightly, and use your thumbs to poke a hole through the center. Gently stretch the hole until it resembles the shape of a bagel. Let the shaped bagels rest for 10 minutes.
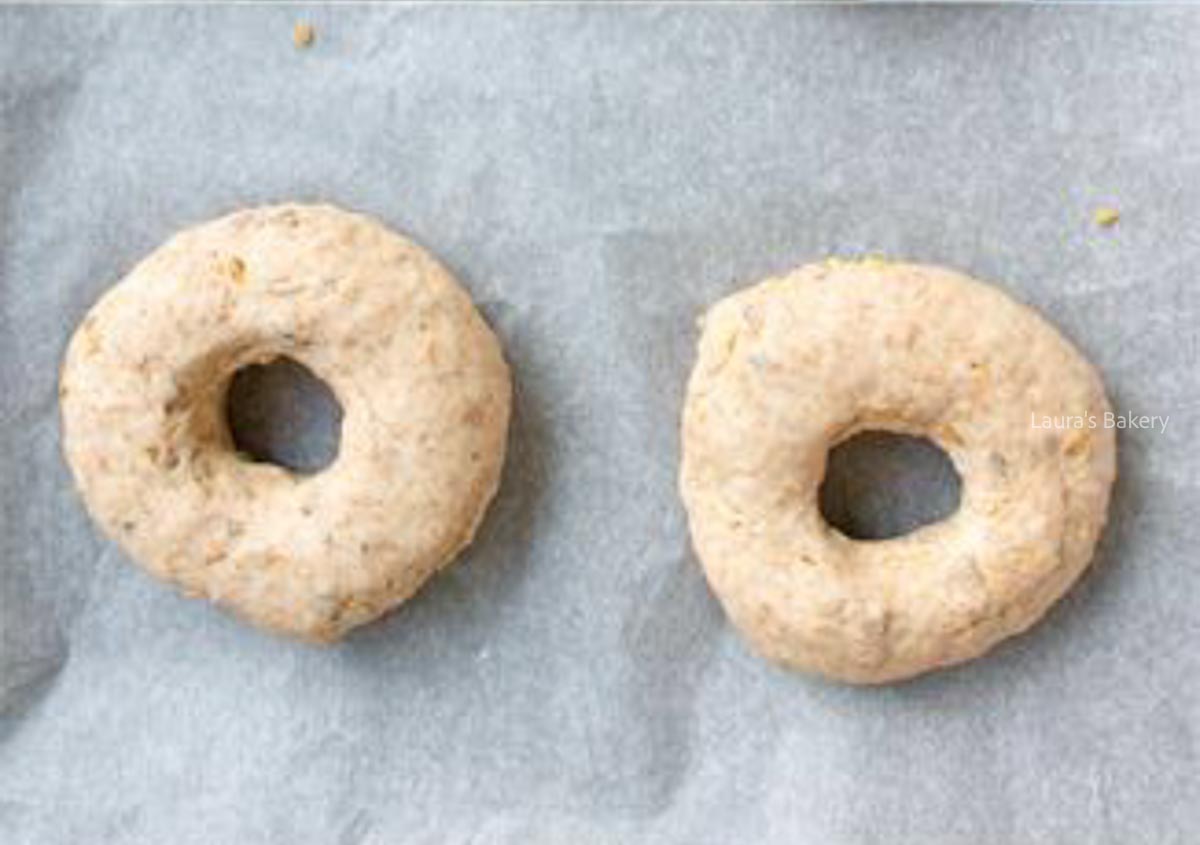
While the bagels are resting, bring a large pot of water to a boil. Carefully lower the bagels into the boiling water, one at a time or two at a time if your pot is large enough. Boil for 45 seconds to 1 minute, then flip and boil the other side for the same amount of time. Once both sides have been boiled, transfer the bagels to a baking sheet lined with parchment paper.
Brush the wet bagels with the beaten egg and sprinkle with sesame seeds.
Bake in a preheated oven at 425°F/220°C (conventional oven) for about 20 minutes, or until golden brown.
Let the multigrain bagels cool on a wire rack, or serve them while they’re still warm.
Notes
Bagels are at their best when sliced in half and lightly toasted. Serve them with cream cheese and smoked salmon, or with ham.
Even though boiling the bagels may seem intimidating, it’s actually one of the most enjoyable parts of making them. Don’t skip this step, it’s what gives bagels their signature texture. Bagels are denser than regular bread, have a subtle sweetness, and develop a distinctive chewy crust.
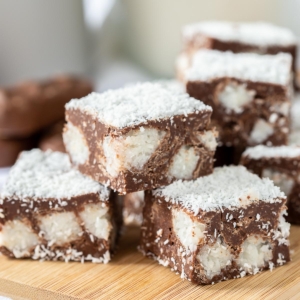
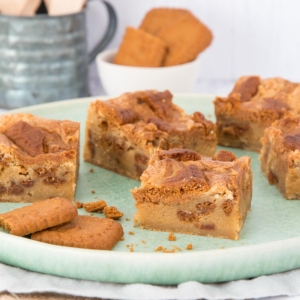
It’s no secret that coconut isn’t exactly my go-to flavor, but keeping this Bounty fudge to myself would be a downright crime. Everyone who’s tried it has been utterly hooked. Plus, it’s such a fun, fuss-free way to turn your favorite childhood chocolate bar into a homemade sweet treat.
Double-Coconut Chocolate Dream Fudge
Forget the store-bought candy bars! This dreamy, coconut-packed Bounty fudge recipe is the ultimate treat for anyone who loves Bounties.
Every bite is loaded with rich chocolate and coconut.
An easy, no-bake treat that anyone can make.
Comes together very quickly; you just need some patience while it sets.
Recipe Ingredients
All it takes is a basic chocolate fudge recipe, a handful of coconut, and chopped Bounties thrown into the mix. Sounds too easy? It really is, but don’t skip the recipe card below for all the details that guarantee perfect results.
condensed milk – You’ll need 1 can. The condensed milk also provides extra sweetness (on top of the chocolate) so no additional sugar is needed. Don’t use unsweetened condensed milk
chocolate – I used half milk chocolate and half dark chocolate, but you can use only milk or only dark chocolate if you prefer
vanilla extract – adds depth of flavor
small Bounty bars – you’ll need 13 pieces (about 1 bag)
grated coconut – plus more for decoration
SERVING TIP: I cut about 20 larger pieces of the fudge, but you can also cut much smaller pieces (as many as 40–60 pieces).
In addition to the ingredients you need a square pan lined with parchment paper to pour the chocolate coconut fudge mixture in.
How To Make Bounty Fudge
Grab a small baking dish (about 20×20 cm/8×8 inches) and line it with parchment paper. Then take your 13 mini Bounty bars and chop each one into six little pieces. Set those aside for now.
In a saucepan over low heat, combine the condensed milk, chocolate, and vanilla. Stir constantly until everything is smooth and fully melted. Don’t walk away during this step, or you could end up with a burnt and sticky mess.
Take the pan off the heat, stir in the shredded coconut, and then gently fold in those chopped Bounty pieces. Make sure they’re evenly spread throughout the mixture.
Pour the fudge mixture into your lined dish and smooth it out. Sprinkle a little extra coconut on top for extra coconut flavor and that Bounty look. Let it cool at room temperature for about 3 hours.
TIP: You can speed up the cooling of the fudge by placing the dish in the fridge, covered.
Once the fudge is completely set, lift it out of the pan, slice into squares, and try not to eat them all in one go!
Storing Chocolate Bounty Fudge
You can store Bounty chocolate fudge in an airtight container in the refrigerator, and it will keep for about a week.
Can I freeze Bounty fudge?
Yes. Wrap the individual pieces of fudge in plastic wrap and store in an airtight container or freezer bag. The fudge will last up to 3 months. If you take it out of the freezer, let it thaw in the fridge and allow it to come to room temperature before serving.
More Fudge Recipes
I adore fudge. It’s the easiest no-bake treat and endlessly adaptable. And if you’re looking for more ideas, don’t miss these other fudge recipes I’ve shared here on Laura’s Bakery:
The recipe makes roughly 20 larger pieces of fudge, but you can also cut much smaller pieces to double the pieces.
Why didn’t my fudge set properly?
This usually happens if the mixture didn’t heat long enough for the chocolate to fully melt and bind with the condensed milk. Make sure everything is completely smooth before pouring it into the pan. Also, chilling it in the fridge helps it firm up nicely as well as speeds up the process.
Do I need to use a candy thermometer?
No, you don’t need a candy thermometer. You’re not boiling sugar to a specific stage, you’re just melting chocolate with condensed milk over low heat until smooth. The condensed milk does the work, so it sets perfectly without any thermometer.
How do I cut the fudge neatly?
Dip a sharp knife in hot water, wipe it dry, and then slice. Repeat between cuts for clean, sharp edges. This is especially helpful in fudge recipes like this Bounty fudge where the fudge includes candy and other mix-ins.
Won't the Bounty pieces melt in the fudge mixture?
The pieces of Bounty may soften slightly from the heat, but they won’t completely disintegrate from being mixed into the fudge mixture. You’ll still get big delicious chunks of chocolate coated Bounty coconut.
Does the combo of coconut, chocolate, and Bounty bars make your heart race? Then you’ve just found your new favorite treat. This Bounty fudge was made for you!
Preparation15 minutesmins
Cooling Time3 hourshrs
Total3 hourshrs15 minutesmins
Servings: 20pieces
Ingredients
1cansweetened condensed milk397 grams/14 oz
340gramschocolateI used half milk chocolate and half dark chocolate
First, line a small baking dish of about 20 × 20 cm (8 x 8-inch) with parchment paper. Cut the Bounty bars into six pieces each and set aside.
Add the sweetened condensed milk, chocolate, and vanilla extract to a saucepan. Heat over low heat, stirring continuously until the chocolate has completely melted.
Remove from the heat and stir the shredded coconut into the fudge mixture, followed by the pieces of Bounty bars. Pour the mixture into the prepared baking dish and sprinkle a little extra shredded coconut over the top.
Let the fudge cool and set for about 3 hours. You can also place it in the refrigerator (covered) to firm up. Once set, cut the fudge into squares.
Notes
You can also make this fudge using only milk chocolate or only dark chocolate.
You’ll see from the recipe images that I cut the fudge into about 20 larger pieces, but you can easily cut it into much smaller squares as well, yielding around 40–60 pieces.
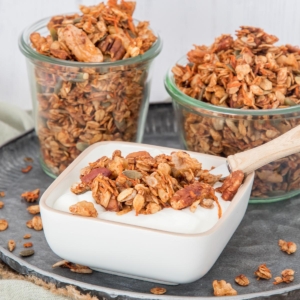
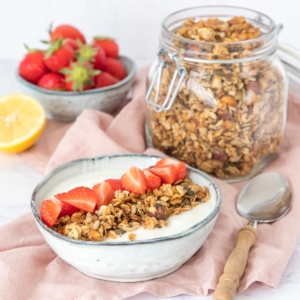
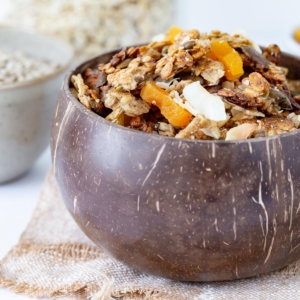
Are you a carrot cake lover? Then you will be pleased to hear that this delicious crunchy carrot cake granola is absolutely delicious and has the classic carrot cake flavors.
Warm Spices and Ultimate Crunch
I’m obsessed with this delicious carrot cake granola, as it is so delicious, easy and has all those warm flavors you know and love from traditional carrot cake. Like all my granola recipes, such as the basic granola or the coffee granola, it is incredibly easy to make and can be customized however you like.
Recipe Ingredients
You might think that it is strange to add carrots to your breakfast recipes but it works great. After all, carrots go into cakes and other sweet treats so why not add them to a healthy breakfast, right? Here’s what you will need. Make sure to double check the quantities in the recipe card below.
oats – for this recipe I like to use old-fashioned rolled oats as in all my homemade granola recipes
nuts – I use a combination of pecans and walnuts, but you could easily swap those for hazelnuts or almonds if you prefer
carrots – I use julienned carrot for this and make sure to chop it finely
seeds – I add an equal amount of pumpkin seeds and sunflower seeds
spices – for creating that classic carrot cake flavor I add nutmeg, ginger and cloves, but if you prefer you can also add a gingerbread spice mix or even a speculaas spice mix. That will change the flavor slightly but will still be delicious
honey – when you want to create that delicious crunch and small clusters of the baked granola, honey works best. It can also be replaced with maple syrup if you prefer to make a vegan granola
oil – I like to use sunflower oil for that crispy finish, but any other neutral vegetable oil will work as well
How To Make Carrot Cake Granola
Whether making any granola and certainly also this carrot cake granola, you need a large bowl and a large baking sheet lined with parchment paper. You can also use two baking sheets if you prefer.
You add all the dry ingredients to the bowl and mix the honey and oil into it. Stir the granola mixture until all ingredients have a thin layer of the oil and honey. Spread them in a single layer on your baking sheet and bake in the oven for about 15 minutes or until the mixture is golden brown. Stir halfway through so it bakes evenly.
Let it cool completely before you store it. After baking you can add extra’s like golden raisins or other dried fruit.
Storing Carrot Cake Granola
You can store the carrot cake granola in an airtight container for up to two weeks. Do make sure to let it cool down completely before you store it or it will loose it’s crunch.
Can I freeze carrot cake granola?
Yes, granola freezes very well. If you do freeze it, it will keep for about 3 months.
More Recipes with a Carrot Cake Twist
I love carrot cake, and luckily those warm, spiced flavors are easy to incorporate into all kinds of baked treats by adding the right balance of carrots and spices. Here are a few more favorites with a carrot cake twist:
Yes. Quick oats will work, but the granola will have a softer texture and won’t be quite as crunchy. Rolled oats are the best choice for classic granola.
Does the carrot become crispy?
No. The grated carrot dries out as it bakes but doesn’t become crispy. Instead, it adds a subtle sweetness and helps create the signature carrot cake flavor.
Can I make this carrot cake granola vegan?
Absolutely. Simply replace the honey with maple syrup or agave syrup for a completely vegan version.
Can I use different nuts or seeds?
Yes! Feel free to swap the pecans, walnuts, pumpkin seeds, or sunflower seeds for your favorites. Almonds, hazelnuts, chopped cashews, chia seeds, or flaxseeds all work well. After baking I like to add things like dried fruits or raisins.
Making granola is incredibly easy. Add all the ingredients to a large bowl and stir until everything is evenly coated and slightly sticky.
Spread the mixture evenly over a baking sheet lined with parchment paper.
Bake for 15-20 minutes at 350˚F/180°C (conventional oven), stirring halfway through.
Let the granola cool completely on the baking sheet before transferring it to a storage jar.
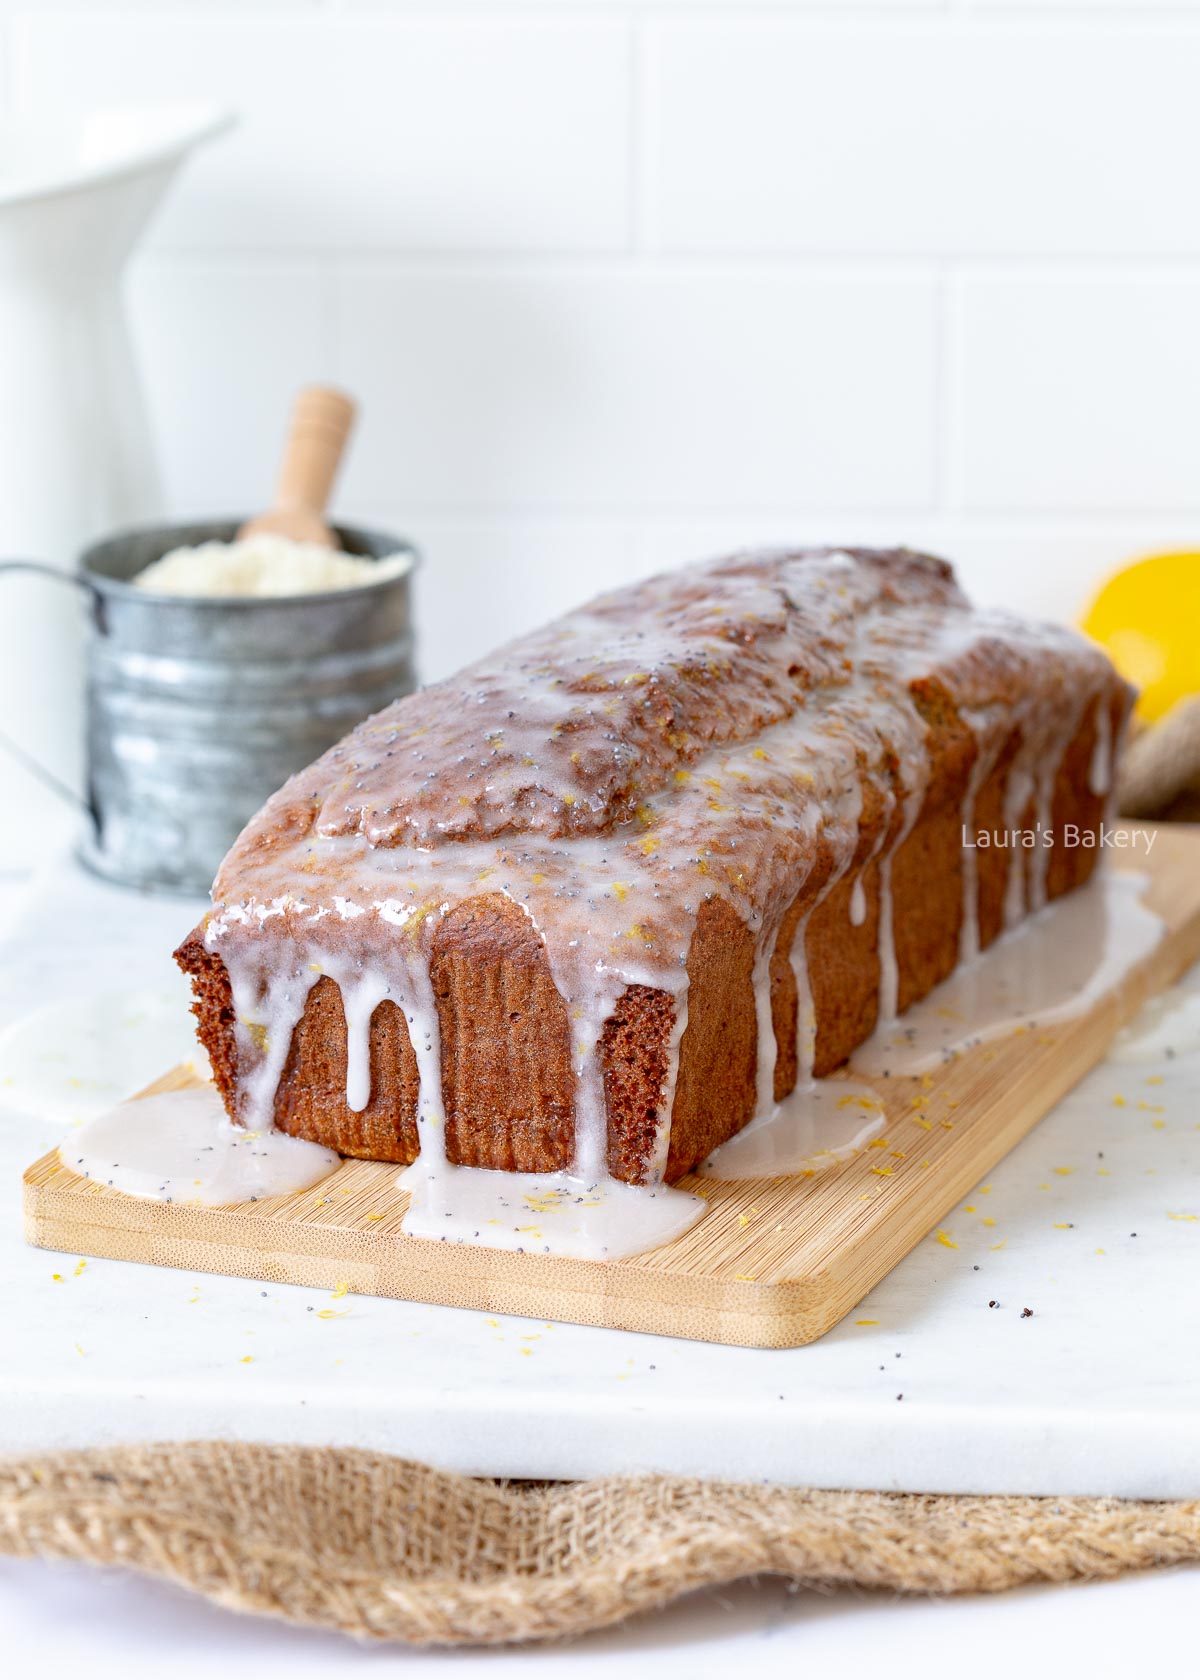
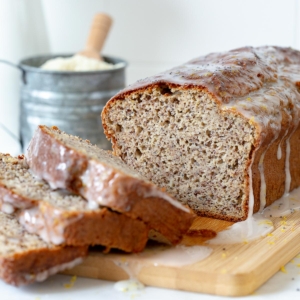
It’s no secret that I have a love for all things banana bread and I decided to make this a special one: lemon poppy seed banana bread. Topped with a delicious (and simple) lemon glaze.
For All Banana Bread Lovers
There is something so satisfying about a really good banana bread. And this lemon poppy seed version is a must try!
natural sweetness and a moist crumb – due to the bananas and the almond flour this banana bread has a beautiful and delicious crumb. Simply irresistable
easy to make – the recipe itself is pretty straightforward and you just need one bowl to make it
Recipe Ingredients
The most important ingredient are the bananas of course and for the rest, the ingredients are pretty simple.
bananas – I used about 3 bananas for this recipe which equals around 300 to 350 grams (10-12 oz). Make sure the bananas are really ripe as that will determine the final result for the cake
eggs – I used three large eggs for the banana bread which provide rise and texture
flour – this recipe uses a combination of all-purpose flour with almond flour which makes it extra moist and delicious
rising agents – baking powder and baking soda provide a rise for this recipe
lemons – you will need 2 lemons for this recipe. Since you also use the zest, make sure to use organic lemons and if you use regular lemons scrub them under running water first
poppy seed – of course some poppy seeds are essential as well
How To make Lemon Poppy Seed Banana Bread
Start by mashing the bananas until smooth. Add the eggs one at a time to the mashed bananas and add the vanilla extract. Add the dry ingredients and mix until it is fully combined.
Zest 1,5 of the lemons and juice half a lemon as well. Add both to the batter along with the poppy seeds.
Pour the batter into a greased and lightly floured loaf pan or line the pan with parchment paper. Spread the batter evenly in the pan.
Add to the preheated oven and bake for about 40 to 45 minutes at 350˚F/180˚C (conventional oven) or until golden brown and cooked through. Test it with a toothpick. When inserted in the center of the lemon banana bread it should come out clean.
Let the banana bread cool down completely.
Adding the glaze
While adding a glaze is totally optional I do highly recommend it for additional deliciousness.
It’s easy to make and you just combine the juice of the other half a lemon with some powdered sugar. You want it to be thick but pourable. Add more juice or more powdered sugar as needed.
Drizzle the glaze over the cooled banana bread and finish with a sprinkle of poppy seeds and some lemon zest.
Storing Lemon Poppy Seed Banana Bread
You can store this delicious lemon banana bread for about 3 days outside of the fridge. Make sure it is properly covered or add to an airtight container.
Can I freeze lemon poppy seed banana bread?
Definitely. This banana bread freezes very well. I do freeze it without the glaze and add the glaze – if using – once the banana bread is defrosted. You can store it in the freezer for up to 3 months. Make sure to check this article on how to store banana bread too.
More Banana Bread Recipes
Whether it’s for breakfast, a snack, or even dessert, I can always enjoy a slice of banana bread. That’s probably why there are already so many banana bread recipes on Laura’s Bakery, in all sorts of flavors and variations. Here are a few favorites from my collection:
I’d love to know which type of banana bread you enjoy baking most. Do you usually stick to the classic recipe, or do you like adding a fun twist?
FAQ Lemon Poppy Seed Banana Bread
Can I leave out or replace the bananas?
No, bananas really are the foundation of banana bread. Even though I’m not the biggest banana fan and you can definitely taste them in the finished loaf, I don’t find the flavor overpowering.
That’s exactly why I love banana bread even though I’m not crazy about bananas themselves. Replacing the bananas with another fruit would require changing the entire recipe. If you’re looking for alternatives, you might enjoy:
Absolutely. The glaze is completely optional. You could also top the loaf with a delicious cream cheese frosting instead.
Can I make a gluten-free version?
Yes. You can replace the all-purpose flour with rice flour or certified gluten-free oat flour. If you bake gluten-free regularly, be sure to use ingredients that are certified gluten-free and suitable for your dietary needs.
Can I bake this banana bread in a different pan?
I baked this loaf in a standard 10-inch loaf pan, but you could also make about 12 muffins with the same batter. For muffins, I recommend using a muffin pan lined with paper liners.
Can I mash the bananas with a fork?
I prefer blending the bananas into a smooth puree with an immersion blender, but a fork works perfectly well too. The texture will be a little chunkier, and the banana flavor will be more noticeable in the finished bread.
Puree the bananas until smooth. Add the eggs one at a time, along with the vanilla extract.
Add the almond flour, all-purpose flour, baking powder, baking soda, and salt. Mix until fully incorporated.
Finely zest 1½ lemons and fold the zest into the batter together with the juice of ½ lemon and the poppy seeds.
Pour the batter into a greased and lightly floured loaf pan, or line the pan with parchment paper. Spread the batter evenly.
Bake for 40-45 minutes at 350°F/180°C (conventional oven), or until a toothpick inserted into the center comes out clean.
Let the banana bread cool completely.
To make the glaze, combine the juice of the remaining ½ lemon with the powdered sugar. The glaze should be thick but pourable.
Add a little extra lemon juice or powdered sugar if needed to achieve the right consistency.
Drizzle the glaze over the cooled banana bread and finish with a sprinkle of poppy seeds and extra lemon zest.
A crispy crust and the topping of your choice. Is there anything better than making your own deliciously thin, crispy pizza? With this easy recipe you can make endless variations! I have included a lot of tips below for you to get everything just right. Still have questions? Let me know in the comments!
Homemade Pizza Dough for Endless Variations
I make this homemade pizza dough recipe all the time, and for good reason. It’s simple, reliable, and delivers a deliciously crispy crust every single time.
easy to make – you really only need a handful of basic ingredients and no special equipment
thin and crispy crust – perfect for that classic pizza taste
fully customizable – you can create a super thin crust or leave it slightly thicker if that is your preference
perfect for any kind of topping – whether you’re a fan of classic pepperoni, vegetable heavy pizza or even a pizza with pineapple, this crust can support it all!
Recipe Ingredients
For making homemade pizza, you really only need a few basic ingredients to get started. I will also give you plenty of options for the toppings, as that is where the real magic happens. Make sure to check the exact ingredients and quantities in the recipe card below.
flour – ideally you want to use pizza flour or 00-flour for this, which is available in most supermarkets. if you cannot find that you can use all-purpose flour
yeast – I use active dry yeast for this recipe. Make sure the date on the yeast is not expired as that will have an effect on the final result
water – make sure you use luke warm water for this so the yeast activates properly
olive oil – for preparing the bowl you will need some oil to prevent the dough sticking to the bowl
salt – don’t skip the salt as that is the final flavor that will bring it all together
How to Make Perfect Pizza Dough
Pizza is always a hit in our house, especially pizzas with a thin, crispy crust. With that goal in mind, I set out to create the best pizza dough possible without making things overly complicated. This easy pizza dough recipe is one you’ll definitely want to keep in your collection.
In this article, you’ll find all my tips for making the best homemade pizza dough and baking the most delicious pizza. With this recipe, anyone can make their favorite pizza!
What Is the Best Flour for Pizza Dough?
The main ingredient in pizza dough is flour. Italians have a clear favorite: 00 flour.
This flour is made from soft wheat and is very finely milled, resulting in an elastic dough. According to Italians, it creates the perfect balance of strength and texture in the pizza crust.
What Can You Use Instead of 00 Flour?
Personally, I don’t usually buy specialty flour just for pizza dough. Instead, I use the closest alternative that’s widely available: all-purpose flour. If you can find pizza flour, that’s even better.
BAKING TIP: If you love crispy pizza as much as I do, bake your homemade pizza on a pizza stone. It mimics the effect of a traditional Italian stone oven and gives the crust extra crispiness.
Pizza Toppings
I make no secret of my love for pizza, and I enjoy making my own pizzas at home. The best part is that you’re completely in charge of the toppings. No one at home will judge you if you load your pizza with pineapple. 😉
Here are some delicious toppings for your pizza crust and tomato sauce before it goes into the oven:
Cheeses
Mozzarella
Parmesan
Gouda
Blue cheese
Vegetables
Mushrooms
Artichoke hearts
Bell peppers
Tomatoes
Onions
Meats
Salami
Pepperoni
Ham
Other Flavor Boosters
Anchovies
Olives
Oregano
Some ingredients are best added after baking, such as:
Prosciutto
Fresh basil – the same goes for other leavy herbs such as parsley or cilantro.
Topping Your Pizza
The golden rule of pizza making is: less is more.
Don’t overload your pizza with toppings. Stick to a few carefully chosen ingredients. Go easy on the tomato sauce as well, since too much can result in a soggy crust. The same goes for mozzarella. Choose a firm variety that doesn’t release too much moisture while baking.
Pizza Recipe Ideas
Since I started making my own pizza dough and crusts, I’ve tried countless delicious combinations. I will be posting more pizza recipes soon, but for now you can enjoy these pizza flavored recipes as well:
These days, I make my own pizza dough all the time and have practiced with this recipe many times. I love being able to decide exactly how thin or thick I roll out the dough. With the tips below, you’ll be baking the perfect pizza crust at home too.
Kneading the Dough
Simply combine all ingredients and knead them into a dough.
You can do this by hand, but I usually use my stand mixer. Knead for about 10-15 minutes, then continue briefly by hand until you can stretch a small piece of dough into a thin membrane.
The dough should stretch without tearing, almost like a piece of chewing gum.
Resting and Rising
Many chefs recommend letting pizza dough rest and rise overnight in the refrigerator. I usually skip this because I’m eager to start making pizza right away.
If you’d like to do this, place the dough in the refrigerator immediately after kneading. It will continue rising until the dough reaches approximately 45°F (7°C), at which point the yeast activity slows dramatically.
When you remove the dough from the refrigerator, it will continue rising. Overall, the dough should still double in size as stated in the recipe.
Shaping the Dough
Want to shape your pizza dough the traditional Italian way?
Generously flour your work surface and gently flatten the dough. Turn it over and use your fingertips to stretch it from the center outward toward the edges.
Rotate the dough between your hands as you work until you’ve reached the desired size.
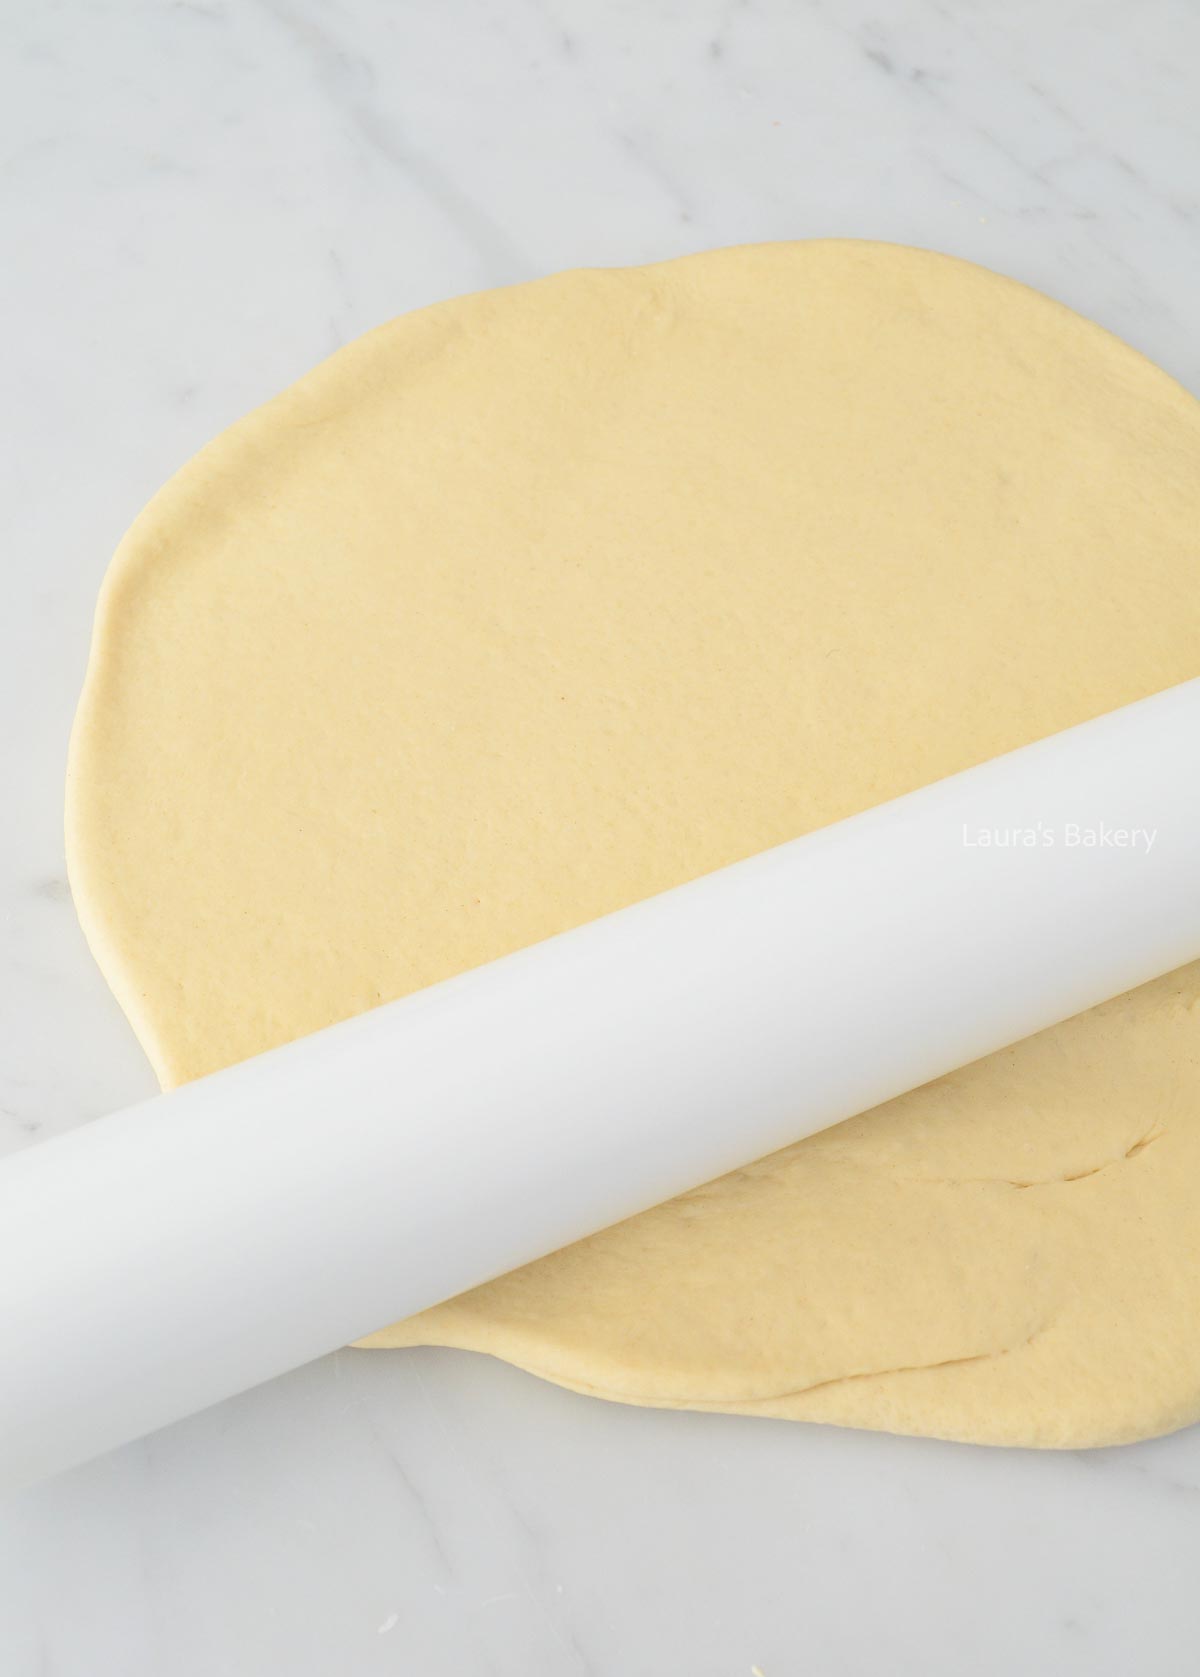
Rolling It Out
Italian pizza makers would never use a rolling pin, but I certainly do.
For me, it’s the easiest and most reliable method, although I’d still love to master the traditional technique someday.
Baking the Pizza
Once your pizza is rolled out and topped, it should go straight into a preheated, hot oven.
A true pizza oven operates between 575–660°F (300–350°C), but most home ovens don’t get nearly that hot.
I bake my pizzas using conventional heat (top and bottom heat), ideally on a pizza stone. The stone absorbs and radiates heat, creating an effect similar to a traditional stone oven.
The result is an extra crispy crust.
A few important notes:
Never place parchment paper on the pizza stone.
The thicker the stone, the longer it takes to heat up.
Once fully heated, you can bake several pizzas in a row.
If you’re using a convection oven, turn off the fan if possible. And remember: the hotter the oven, the faster your pizza will bake. At 575°F (300°C), a thin pizza with minimal toppings can be done in as little as 5 minutes.
Storing Pizza Dough
Planning a pizza party? This dough is perfect for making ahead of time. That way, you can focus on toppings and baking when it’s time to serve.
How Long Does Pizza Dough Last?
Stored in an airtight container, pizza dough will keep in the refrigerator for up to 2 days.
Can You Freeze Pizza Dough?
Absolutely.
The most important thing is to freeze it after it has risen. Once the dough has doubled in size, divide it into portions and shape them into dough balls.
Dust lightly with flour and wrap each dough ball tightly in plastic wrap. I also like to place the wrapped dough in a freezer-safe container.
Frozen pizza dough will keep for up to 3 months.
To thaw, place it in the refrigerator overnight or leave it at room temperature until fully defrosted.
Make Your Own Frozen Pizza
Another convenient option is to assemble and partially bake the pizzas for about 10 minutes.
Let them cool completely, wrap them airtight, and freeze for up to 3 months.
When you’re ready to eat, bake them straight from frozen for 10-15 minutes until golden brown and crispy.
FAQ Homemade Pizza Dough
Should You Use Parchment Paper on a Pizza Stone?
No, absolutely not. It prevents the pizza stone from doing its job properly.
Can I Shorten the Rising Time?
No. The dough really needs the time specified in the recipe.
You can make it a day ahead and let it rise overnight in the refrigerator if that works better for your schedule.
Can I Freeze Rolled-Out Pizza Crusts?
Yes. Wrap them airtight and place a sheet of parchment paper between each crust so they don’t stick together.
Can I Bake Pizza in an Air Fryer?
Absolutely. Pizza works surprisingly well in an air fryer.
Place all ingredients in a bowl and knead for 10–15 minutes until smooth and elastic.
Continue kneading by hand until the dough passes the windowpane test.
Lightly grease a bowl with oil and place the dough inside.
Cover with a clean kitchen towel and let rise in a warm place for 30–45 minutes, or until doubled in size.
Divide the dough into 2 portions and roll each into a thin crust.
Bake on a preheated pizza stone (without parchment paper) or on a parchment-lined baking sheet.
Top with tomato sauce and your favorite toppings.
Bake at 400°F /200°C (conventional oven) for 14-16 minutes, until golden brown and crispy.
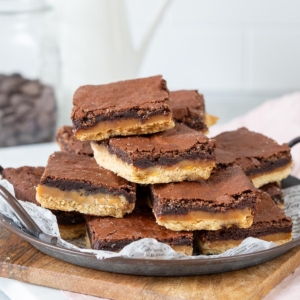
Twix lovers, this one’s for you! Buttery shortbread, gooey caramel, and a fudgy brownie topping all stacked into one irresistible bar. These Twix brownies are everything you love about the candy, but better.
Millionaire's Shortbread Meets Fudgy Brownie
Millionaires shortbread is a longtime favorite of mine, so adding a rich brownie layer on top was the most obvious, and delicious, upgrade.
All the flavors of a Twix candy bar, but even better. Enjoy buttery shortbread, gooey caramel, and fudgy brownie all in one bite.
Skip the store-bought stuff. This silky, homemade caramel is ready in a quick 15 minutes with zero fuss.
The ultimate make-ahead dessert – stays fresh for days and freezes like a dream.
Recipe Ingredients
Recreating the beloved layers of a classic Twix bar, these Twix bar brownies feature a buttery shortbread base, a soft, chewy caramel filling, and a rich chocolate topping. Every texture and decadent flavor you crave, all in one irresistible bar. For best results, be sure to review the full recipe details in the card below.
Shortbread Base
unsalted butter – soften at room temperature for easy creaming
fine granulated sugar – adds sweetness and creates a crisp shortbread crust
pinch of salt – balances the richness and elevates flavors. Leave out if you use salted butter
self-rising flour – the perfect substitute for all-purpose flour and rising agents like baking powder
Caramel Filling
unsalted butter – I prefer unsalted butter for better control of the flavors in the filling and brownies
can of condensed milk – adds a creamy thickness and sweetness when making caramel filling
dark brown sugar – adds to the caramel flavor
Brownie Topping
butter – unsalted butter is my preference for all components of these Twix brownies
fine granulated sugar – creates that delicious crispy topping
dark brown caster sugar – adds depth of rich caramel flavor to compliment the filling
dark chocolate – provides rich chocolate flavor to the brownies in addition to the cocoa powder
syrup – adds to the dense, moist texture, and rich flavor. You can use pancake syrup
egg – I’ve used a large egg
vanilla extract – adds depth of flavor to these Twix brownies
flour – all purpose flour is a sturdy flour for brownie batter
cocoa powder – Dutch processed cocoa is rich with smooth flavor, although you can use regular cocoa too
baking powder – creates a slightly puffier, softer topping
BAKING TIP: When cooking the caramel, pull it off the heat the moment it still looks slightly too thin. It will continue to thicken as it cools, so you’ll end up with the perfect consistency without overcooking.
How To Make Twix Brownies
Shortbread base
Cream the butter, sugar, and salt until smooth, then gradually mix in the self-rising flour until a dough forms. Press the dough evenly into a greased, parchment-lined baking pan, prick with a fork, and bake at 350°F/180°C (conventional oven) for 20 minutes until lightly golden. Set aside to cool.
Caramel filling
Melt the butter in a saucepan, then add the condensed milk and brown sugar, stirring constantly over low heat until the sugar dissolves. Increase the heat slightly and bring the mixture to a boil, stirring continuously with a whisk for about 10 minutes until thickened.
Remove from heat while still slightly runny (it will set as it cools). Pour over the cooled shortbread layer, and chill briefly until firm.
TIP: Be careful not to cool the filling in the fridge for too long as it will harden too much.
Brownie topping
Gently melt the butter, both sugars, chocolate, and syrup in a saucepan over low heat, stirring until smooth (the sugar doesn’t need to fully dissolve).
Let the mixture cool to room temperature, then mix in the egg and vanilla on low speed until combined. Add the flour, cocoa powder, and baking powder, mixing on low just until incorporated (don’t overmix).
Pour brownie batter over the chilled caramel layer and bake at 375°F/190°C (conventional oven) for 15 minutes. Cool completely in the pan before slicing.
Storing Twix Candy Bars
Store these candy-inspired brownies (covered tightly with foil) in an airtight container at room temperature for up to a week.
Do not store the millionaire’s shortbread brownies in the refrigerator, as the caramel will become very hard and difficult to slice and bite through.
Can I freeze Twix brownie bars?
Yes you can freeze millionaires brownies. Properly wrap in plastic wrap to store in a freezer container for up to 3 months.
More Twix-Inspired Treats
If you’re as obsessed with that perfect Twix combination as we are, don’t stop here! Be sure to check out these other Twix-inspired recipes next.
What is the best size baking pan for Twix brownies?
Like other regular brownies, I’ve used an 8×8 inch/20×20 cm square baking pan for this Twix-inspired brownie recipe. It creates the perfect size fudgy brownies and the right doneness with the baking time in the recipe below.
Why are these called Twix brownies?
Instead of being a finger-shaped candy bar encased in chocolate, these are baked as a single, sliceable tray of brownies, so you get all the flavors and textures of a Twix in a fudgy, handheld square rather than a chocolate-coated stick.
Can I make Twix brownies without homemade caramel filling?
Absolutely! You can use a store-bought caramel sauce as long as it is firm enough (not runny). Or you can use dulce de leche as a gooey caramel spread.
How do I cut these shortbread brownies neatly?
Don’t store these Twix brownies in the fridge. The caramel filling becomes very hard and difficult to slice neatly. I always keep these brownies at room temperature and use a large, sharp knife.
For extra clean cuts, you can run the knife under hot water, dry it, and then slice. The knife will glide right through.
My caramel is too hard. What did I do wrong?
Caramel filling that is cooked a little too long or at too high a temperature will turn hard. Cooking times can vary depending on your pan and stove. It’s best to stop just before it seems thick enough. Keep in mind that caramel will firm up more as it cools.
Can I swap the shortbread base for another cookie base?
Yes! If shortbread cookies aren’t your thing, feel free to swap it out. A sugar cookie base works beautifully, or you can use crushed store-bought cookies mixed with melted butter. You might need to play around with the amounts, but I’d love to hear how it goes!
Cream the butter, sugar, and salt together until smooth. Add the self-rising flour in batches and mix until fully incorporated.
Press the dough into a greased baking pan lined with parchment paper. Prick holes in the base with a fork and bake for 20 minutes at 350°F/180°C (conventional oven) until lightly golden and cooked through.
Make the Caramel Filling
Melt the butter in a saucepan. Add the condensed milk and brown sugar. Stir constantly over low heat until all the sugar has dissolved.
Increase the heat slightly and continue stirring with a whisk. Bring the mixture to a boil and let it cook for about 10 minutes while stirring continuously. The caramel is ready once it has thickened enough.
Pour the caramel over the cooled cookie base and spread evenly with a spatula. Place the pan in the refrigerator for a little while so the caramel can cool and set.
Make the Brownie Topping
Add the butter, both sugars, chocolate, and pancake syrup to a saucepan. Heat gently over low heat, stirring until the butter and chocolate have melted. The sugar does not need to dissolve completely.
Let the mixture cool until it reaches room temperature, though slightly warm is fine too.
Using a mixer on low speed, mix the egg and vanilla extract into the chocolate mixture until smooth. Add the flour, cocoa powder, and baking powder. Mix again on low speed until just combined. Avoid overmixing or mixing on high speed, otherwise the brownies will be less fudgy.
Pour the brownie batter over the cooled caramel layer and bake for another 15 minutes at 375°F/190°C (conventional oven).
Let the Twix brownies cool completely in the pan before removing and cutting into pieces. Personally, I think they taste even better the next day.
Crunchy granola but with the added flavors of lemon and ginger. It’s a simple way to make breakfast feel a little bit more special and the ultimate summer granola flavor!
Any granola is a perfect way to add delicious fibre to your breakfast. For this lemon ginger granola you will need the following ingredients. Always make sure to double check the exact ingredients in the recipe card below:
rolled oats – the base of the granola, providing texture and heartiness. I use old-fashioned rolled oats for this recipe
pumpkin seeds – add crunch and a boost of flavor
sunflower seeds – a classic granola ingredient that bakes beautifully
ground flaxseed – adds texture and nutrition
unsalted mixed nuts – use your favorites. Almonds, pecans, walnuts, and hazelnuts all work well
ground ginger – provides warmth and a gentle spicy kick
lemon zest – the star ingredient that gives this granola its fresh citrus flavor
honey – helps create crunchy clusters and adds natural sweetness. You can also add maple syrup if you prefer a vegan version of this granola
sunflower oil – ensures the granola bakes evenly and becomes crisp. It’s also easy to replace with another neutral vegetable oil like canola. Don’t use extra virgin olive oil as that will be too strong in flavor
How To Make Lemon Ginger Granola
As with any granola recipe this lemon ginger granola is also pretty easy to make. The only thing you need is a large mixing bowl and you’re good to go.
Add all the dry ingredients to the bowl and stir it through.
Now add the honey and the oil and stir with a spoon until everything is lightly coated.
Prepare a large baking sheet with a piece of parchment paper and spread it out in one single layer.
Place in the preheated oven for about 15 to 20 minutes and stir it once halfway through the baking time.
Once it is golden brown take it out of the oven and make sure to let it cool down completely before transfering to an airtight container.
Storing Lemon Ginger Granola
Store the cooled granola in an airtight container or jar at room temperature. It will stay fresh for at least 2 weeks (but probably longer than that)
Can I freeze Lemon Ginger Granola?
Yes, granola is very easy to freeze. Store it in a freezer-safe container for up to 3 months. Let it come to room temperature before serving.
FAQ Lemon Ginger Granola
Can I make the ginger flavor stronger?
Absolutely. Add extra ground ginger or grate fresh ginger into the mixture for a more pronounced flavor. And if you’re not a fan of ginger, you can also omit the ginger completely and just go for a lemon granola.
Can I use maple syrup instead of honey?
Yes. Maple syrup works well and makes the granola suitable for a vegan diet when combined with a plant-based oil.
What nuts work best?
Almost any unsalted nuts work well. Almonds, walnuts, pecans, hazelnuts, and cashews are all excellent choices.
Why isn't my granola crunchy?
Make sure you bake it long enough and allow it to cool completely on the baking sheet. Granola crisps up as it cools.
Can I add dried fruit?
Yes. Add dried fruit after baking and cooling so it doesn’t burn in the oven.
This bright and crunchy Lemon Ginger Granola is packed with oats, nuts, seeds, fresh lemon zest, and warming ginger. It’s easy to make and perfect for breakfast or snacking.
Preheat the oven to 180°C/350˚F (conventional oven)
Add all ingredients to a large bowl.
Stir until everything is evenly coated and slightly sticky.
Taste a small amount and add extra ginger if desired.
Spread the mixture evenly onto a baking sheet lined with parchment paper.
Bake for 15-20 minutes until lightly golden.
Stir halfway through baking for even browning.
Allow the granola to cool completely on the baking sheet.
Transfer to an airtight jar or container for storage.
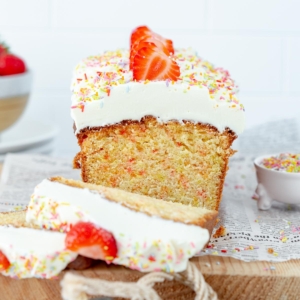
Funfetti loaf cake is not only very festive and cheerful, but also very tasty and easy to make. I’ve combined moist lemon cake with a generous dose of colorful sprinkles, my mascarpone cream, and fresh strawberries.
Birthday Cake Loaf
This funfetti loaf cake brings joy and color to any table. A lemon Greek yogurt base makes it moist, tender, and airy, while the whipped topping, sprinkles, and fresh strawberries turn it into a showstopper.
Perfect for birthdays or any celebration.
Recipe Ingredients
I’ve taken a classic moist yet airy lemon cake base, mixed in some birthday sprinkles, and topped it with a decadent mascarpone whipped cream with fresh strawberries. What do you get? An irresistible funfetti loaf cake! Follow the recipe card details below for the best results.
Cake
unsalted butter – this gives the vanilla cake loaf a lot of flavor but also a crunchy edge. You can use sunflower oil (or another vegetable oil) instead for a soft and creamy cake base
white granulated sugar – not only does it give your cake a sweet taste, but it is also a real structure builder
Greek yogurt – I used Greek yogurt with 10% fat, but 2% will do. I prefer using Greek yogurt over plain yogurt or regular yogurt
fresh lemon – the zest and juice of one lemon adds brightness, balances the sweetness, and reacts with the leavening agents for the perfect rise
eggs – I always use medium sized eggs. Bring them to room temperature for better incorporation
baking powder and soda – I measure these rising agents with an official measuring spoon set. Always use a spoon, never a cup
salt – just a pinch this brings out the sweet taste of the cake loaf
flour – I usually use all purpose flour or wheat flour. You can use self-rising flour instead to replace the all-purpose flour and baking powder. You can read more about replacing all-purpose flour for self-rising flour.
sprinkles – use your favorite bake-stable rainbow sprinkles for this funfetti cake loaf
Topping
mascarpone whipped cream – follow this mascarpone cream recipe to make it from scratch, if you like.
fresh strawberries – a lovely fresh topping that adds a touch of natural sweetness and pop of color
BAKING TIP: I used a 25 cm/10 inch baking pan for this cake, but with the conversion tool on the recipe card, you can very easily convert this recipe to a different size.
What Makes This Different From Classic Funfetti Cake?
Just like my funfetti cheesecake, this birthday cake loaf is also inspired by the classic funfetti cake. I’ve swapped the vanilla cake base for a tangy lemon cake that’s incredibly moist thanks to the addition of Greek yogurt.
Just like the iconic Pillsbury Funfetti cake mix from 1989, this loaf cake is infused with colorful rainbow sprinkles for that celebratory effect. Decorate it with whipped mascarpone cream, extra sprinkles, and pretty slices of fresh strawberries. Piped frosting (cream cheese frosting or buttercream frosting) are other great options too!
How To Make Funfetti Loaf Cake
Start by creaming your butter and sugar together until the mixture gets light and fluffy. This gives the cake a great texture. Then, beat in the Greek yogurt, along with the lemon zest and juice, until everything is smooth and combined.
Now add your eggs, one at a time, mixing well after each one so they fully incorporate. Once that’s done, toss in the baking powder, baking soda, salt, and flour all at once.
Mix just until you have a smooth batter, but don’t overdo it, just until the dry ingredients disappear. Gently fold in about 70 grams (2.5 ounces) of your sprinkles using a spatula.
Pour the batter into your loaf pan, spread it out evenly, and bake at 350°F/175°C (conventional oven) for 55 to 60 minutes. You’ll know it’s ready when it’s golden brown and a toothpick comes out clean.
Let it rest in the pan for about 10 minutes, then turn it out onto a wire rack to cool completely before decorating.
Decorate
While the cake is cooling, whip up your topping ingredients until it gets thick and fluffy. Pop that in the fridge until you’re ready to use it.
Spread the topping on the cooled cake loaf and finish it with a generous sprinkle of the remaining rainbow sprinkles and fresh strawberries for a bright, fresh pop of color and flavor.
This easy loaf cake with fresh whipped topping should be stored in an airtight container in the fridge for 2-3 days, although it can dry out a bit.
You can also make the loaf cake ahead of time and cover it (without the topping) in aluminum foil or in a container outside of the fridge for at least a week. Decorate it with fresh topping, sprinkles, and strawberries just before serving.
Can I freeze this loaf cake?
It can be stored in the freezer (fresh strawberries removed) for up to three months if placed in an airtight container.
Thaw in the fridge to serve again, but keep in mind that the sprinkles may bleed their colors from the freezing and thawing process.
More Scrumptious Loaf Cakes
Loaf cakes are the laid-back, no-stress alternative to fussy layered cakes. But don’t let that fool you, because they can be every bit as delicious. Here are a few more favorite loaf cake recipes to try. Perfect for birthdays, brunches, or just because.
Use bake-stable rainbow strands, although some colors can fade a bit too much for my taste. I prefer using confetti sprinkles for cakes that go into the oven, as they remain the most visible after baking.
Avoid sprinkles that can dye the cake batter. For this reason, I’d stay away from nonpareils (the tiny round ones). Instead, rather use rainbow jimmies and pastel quins, since the quins never bleed color.
Regardless of what you choose, always fold the sprinkles gently into the batter and be careful not to overmix.
What is the best size pan for this funfetti loaf cake?
I used a 25 cm (10-inch) cake pan for this funfetti loaf cake, but you can also make a sheet cake. For example, use a 25 x 25 cm (10 x 10 inch) cake tin for this recipe and keep in mind that the baking time will be slightly shorter, probably 45 minutes.
Always keep an eye on your cake and use a skewer to check that it is done (the skewer should come out clean). You can also use a springform pan but again make sure to check the total baking time.
What can I use instead of Greek yogurt?
While I’ve found that 10% fat Greek yogurt works best, you could also use another full-fat yogurt or quark. Of course, you can always experiment, and keep me updated on your results in the comments!
Is it normal for cake to dry out in the fridge?
Yes, storing cake in the fridge does dry it out. It’s best to store most cakes in aluminum foil or in a tin.
You can also store this cake outside the fridge (without the decoration) and then add the whipped topping just before serving. Although the cake batter contains Greek yogurt, I’ve never had a problem storing it outside the fridge without the creamy topping.
A funfetti loaf cake never fails to bring the party vibes. Follow this recipe, and you’ll have a dessert that delights every single guest. No leftovers guaranteed!
Cream the butter and sugar together until light and fluffy. Add the Greek yogurt, lemon zest, and lemon juice, and mix until smooth.
Add the eggs one at a time, mixing well after each addition until fully incorporated.
Add the baking powder, baking soda, salt, and flour all at once and mix until you have a smooth batter. Stop mixing as soon as the dry ingredients are fully incorporated. Fold in 70 grams (2.5 ounces) of the sprinkles with a spatula.
Pour the batter into the loaf pan and spread it evenly with a spatula. Bake the cake for 55–60 minutes at 350°F/175°C (conventional oven) until golden brown and fully baked through.
After baking, let the cake cool in the pan for about 10 minutes. Then turn it out onto a wire rack to cool completely.
Meanwhile, make the topping: add the heavy cream (unwhipped), vanilla sugar, and mascarpone to a bowl and beat on medium-high to high speed until thick and fluffy. Store the cream in the refrigerator until ready to use.
Once the cake has completely cooled, decorate it with the mascarpone cream, the remaining sprinkles, and fresh strawberries.
Looking for a delicious bread with minimal effort and simple ingredients? My easy 4-ingredient beer bread has you covered. This classic, hearty loaf is perfect slathered with butter, dipped in soups, or enjoyed on its own.
Easy 4-Ingredient Beer Bread
Thanks to its minimal ingredients and straightforward no-knead method, this easy homemade beer bread recipe is a true game changer for bakers of any skill level.
Using white flour gives this loaf an exceptionally tender, fluffy texture.
A simple bread – mix the dough in the evening, let it rise overnight, and bake fresh in the morning.
A fun way to add flavor to savory quick bread. Perfect for Father’s day or whenever you need a delicious twist without the overpowering flavor of beer.
Recipe Ingredients
Beer not only adds flavor to this bread, the fresh carbonation also helps it to rise and become more airy! Other than that, you just need flour, salt, and dry yeast! Despite it being straightforward to make, don’t forget to read the full recipe details in the recipe card for best results.
beer – one bottle of beer is all that’s needed for this easy beer bread recipe. Feel free to use your favorite type of beer. Dark beer like Guinness beer or light beer works.
salt – enhances and balances flavors
instant dry yeast – mix directly into the rest of the ingredients
How To Make Savory Beer Bread
Make the bread dough
Mix all the ingredients in a bowl until fully combined. Cover and let it rise for at least 8 hours (preferably overnight), until doubled in size.
This rising time may go faster on warm days and slower on cold days, so expect anything between 8-18 hours, but don’t go beyond 18 hours.
Shape and bake the bread
Preheat the oven to 425°F/220°C (conventional oven) and place a baking sheet inside to heat.
Once the initial rise is done, lightly flour your work surface and turn the dough out. Gently press out any air and then shape it into a round loaf. Place it on a sheet of parchment paper.
Slide the bread on the parchment paper onto the hot baking sheet and bake for 35-40 minutes, or until golden brown and cooked through.
BAKING TIP: I like to loosely cover the bread at 20-30 minutes of baking so that it doesn’t get too dark.
Storing Beer Bread
This delicious bread can be stored in an airtight bag or container at room temperature for 3-4 days. Keep in mind that the beautiful crust will start to lose its crispy texture while stored.
TIP: Turn stale beer bread into breadcrumbs to add a crispy element to casseroles or as a binder for meatballs. You can also make easy homemade croutons with it.
Can I freeze beer bread?
Absolutely! Once completely cool, wrap the entire loaf or individual slices tightly in plastic wrap and transfer to an airtight bag to store in the freezer for up to 3 months. Thaw overnight on the countertop.
Reheating
You can reheat this savory quick bread in the oven at 400°F/200°C (conventional oven) for 5-10 minutes after lightly dampening the crust with water, which can help to restore a crispy exterior.
Savory Bread Recipes You’ll Love
Whether you want a quick and easy bread recipe or feel up to challenging your bread baking skills, my list of homemade savory breads has something for everyone!
While this is a simple bread recipe, it does require a long, slow fermentation to develop gluten structure and deep flavor. The extended rising time allows enzymes to break down the starches naturally, replacing the need for physical kneading while creating a crisp crust with air bubbles in the crumb.
What pairs well with beer bread?
Due to the bold savory notes in this classic beer bread recipe, consider pairing slices of this beer bread with pesto, garlic butter, Spinach and Feta Hummus, or other savory spreads. I also love pairing it with Cheese Fondue or this cozy Italian Tomato Soup.
How do I make gluten-free beer bread?
You could try substituting a gluten-free flour for the all-purpose flour. Let me know how it works for you since I haven’t tried it myself for this recipe.
What easy variations can I make to this recipe?
Add fresh or dried herbs (rosemary, thyme, and basil) to the beer dough for herbaceous flavor. Grated parmesan cheese is a perfect match for beer bread. Otherwise, add seeds or bagel seasoning on top of the bread loaf just before baking.
Does this beer bread have a strong beer flavor?
No. The flavor of beer doesn’t overpower the final result, which is great for anyone who likes the idea of beer bread but doesn’t really enjoy beer as a beverage.
Add all ingredients to a large bowl and mix until combined. The dough should be wet and sticky. Cover the bowl with plastic wrap and let it rise for at least 8 hours. Overnight is perfect, but don’t let it rise longer than 18 hours.
Preheat the oven to 425°F/220°C (conventional oven) with the baking sheet inside.
Lightly flour your work surface. Turn the risen dough onto the surface and gently press out the air. Shape into a round loaf and place it on a sheet of parchment paper. Carefully slide the bread, including the parchment paper, onto the hot baking sheet.
Bake for 35-40 minutes, or until golden brown and cooked through. Cover loosely with aluminum foil after 20-30 minutes to prevent the top from getting too dark.
These Biscoff Blondies are everything you love about butter cake. They’re soft and fudgy, loaded with crunchy Biscoff cookie pieces and dreamy swirls of creamy cookie spread!
The Ultimate Spiced Blondies with Biscoff
Who invented the blondie? No one knows for sure. But I thank them anyway, every single day. These spiced ones are my newest addition, following my White Chocolate Raspberry, Chocolate Chip, and Easter Egg Blondies. Here’s why you’ll love these, too:
Perfect for freezing – cut the baked blondies into small squares, pop them in the freezer, and you’ll always have a treat ready when the craving hits
Crowd favorite – I’ve yet to meet someone who doesn’t love the gentle warmth of spice and deep toffee sweetness in these blondies.
Easy – Like any good brownie recipe, these Biscoff blondies come together with almost no effort.
Recipe Ingredients
With just a handful of simple ingredients, you can turn buttery brown sugar and spiced Biscoff cookies into the most irresistible blondies you’ve ever made. Check out the recipe card below for full details:
unsalted butter – I prefer unsalted butter when baking
sugar – light brown caster sugar adds to the fudginess of the blondies, but you can also use white sugar
eggs – always use medium unless otherwise stated in the recipe card
vanilla extract – use homemade extract for the best depth of flavor
pinch of salt – enhances flavors
flour – I use all purpose flour, but you could also use regular or pastry flour
Biscoff cookies – depending on where you live also known as Speculoos cookies
Biscoff spread – crunchy or normal
decoration – extra Biscoff cookies
BAKING TIP: Bake these blondies in a square pan lined with parchment paper, with the paper extending well over two sides. This way it’s easy to lift it out once cooled down.
How To Make Biscoff Blondies
Mix the melted butter with the sugar in a large bowl until smooth. Add the eggs one by one and mix with the vanilla extract. The last step is to add the flour and salt and mix until combined.
Fold broken Lotus Biscoff cookies into the batter and then transfer to the prepared pan, spreading it evenly.
Warm up the Lotus Biscoff spread for a slightly thinner consistency and then dollop spoonfuls over the batter. Use a knife to create swirls.
Top with a few extra broken cookies, then bake for 25-30 minutes at 400°F/200°C (conventional oven) until the top develops a thin crust and the center still has a slight wobble. Let the blondies cool, then cut and serve.
Storing Biscoff Blondies
Store these Biscoff blondies in an airtight container for up to 1 week at room temperature.
Can I freeze these Lotus blondies?
Yes, they freeze well for up to 3 months. I like to wrap individual blondie squares in plastic wrap so that I can defrost the exact number of blondies at any given time.
Biscuit-Inspired Baking
Incorporating spiced cookies and cookie spread into your baking is an easy, delicious way to elevate any treat. Here are some of the ways these simple store-bought ingredients add incredible flavor and texture:
Just like brownies, blondies are best baked in an 8×8-inch/ 20x20cm square baking pan. It’s the perfect size for ensuring that they achieve the right doneness.
What's the difference between blondies and brownies?
Blondies are made with brown sugar and vanilla, giving them a butterscotch-like flavor and golden color, while brownies get their taste and deep brown hue from melted chocolate or cocoa powder.
Are Speculoos cookies the same as Biscoff cookies?
Yes, they are essentially the same cookie. Biscoff is the brand name for the specific version of Speculoos cookies made by the Belgian company Lotus Bakeries.
Lotus Biscoff has a strong caramelized, toffee-like sweetness with mild spice, while traditional speculoos often includes more cloves, nutmeg, and ginger for a spicier taste.
How do I know when these gooey Biscoff blondies are done?
The top should be thin and crisp. The edges will be firm, but the center should stay soft. Not wobbly, just tender. They may look a touch underbaked, and that’s perfect. Overbake them, and you’ll lose that fudgy texture.
Allow the blondies to cool completely, ideally overnight, covered in a cool place. That will help them to set properly and taste their best.
Will the bits of broken cookies soften?
Yes, as these Biscoff blondies are stored, the broken pieces of cookies mixed in the baked batter and on top will start to soften. That said, they will still taste absolutely delicious!
Melt the butter in a saucepan and add it together with the sugar to the bowl of a stand mixer. Mix until smooth. Add the eggs one at a time, mixing in between each addition.
Add the vanilla extract and mix briefly. Finally, add the flour and salt. Mix until fully incorporated.
Break the cookies into pieces and fold them into the batter. Transfer the batter to a baking pan lined with parchment paper and spread evenly.
Place the Biscoff spread in the still-warm saucepan from the butter and heat gently until slightly thinner and easier to spoon. Dollop spoonfuls over the batter and use a knife to create swirls.
Break a few extra cookies into pieces and scatter them over the top of the blondie.
Bake the Biscoff blondie for 25-30 minutes at 400°F/200°C (conventional oven). The top should have a thin crisp layer and the center can still have a slight wobble, but it should feel set.
Let the blondie cool completely and firm up before cutting into pieces.
This easy nut free granola is packed with sunflower seeds, pumpkin seeds, coconut flakes and old-fashioned rolled oats. Plus it’s super easy to customize!
Great for anyone with a nut allergy or food allergies
Easy to customize
Recipe Ingredients
I’ll give you the basic ingredients for this granola without nuts, but it is incredibly easy to customize. Let me give you some tips below. Make sure to check exact quantities and ingredients in the recipe card.
oats – I like using old-fashioned rolled oats for this, but quick oats is an option too. Don’t use instant oats as that won’t have the same effect
coconut flakes – this is totally optional. If you’re not a fan of coconut leave them out. I add the coconut flakes after baking
pumpkin and sunflower seeds – these provide a lovely crunch
oil – I prefer using a neutral vegetable oil like sunflower oil. You can also use coconut oil but that will give a coconut flavor to everything
honey – honey creates those lovely sweet clusters of granola once baked. It can be replaced with maple syrup or another liquid sweetener
vanilla – I use the seeds from a vanilla pod for this recipe. A little bit of vanilla extract is an option too
apricots – I add the dried apricots after roasting the granola in the oven. You can swap for other kind of dried fruit as well (raisins, cranberries etc.)
salt – a small pinch of salt brings out the other flavors in the granola
How to Make Nut-Free Granola
For making this homemade nut-free granola recipe you start by taking a large mixing bowl and adding all the dry ingredients (except the coconut flakes and the dried apricots) to it.
Stir it well and add the dry ingredients. Mix it through so all ingredients have a bit of the liquid ingredients.
First toast the coconut flakes separately for just a few minutes. They brown quickly and if you add them to the granola they might become too dark. Set them aside while you toast the granola.
Take a large baking sheet lined with parchment paper and add the granola mixture on top. Spread it out in an even layer that is not too thick.
The granola will take about 15 to 18 minutes to turn lightly golden. Stir it through halfway so it bakes evenly.
Let the granola cool down completely.
Slice the apricots into small strips and stir into the cooled granola along with the toasted coconut flakes.
Variations to Nut-Free Granola
One of the fun things of making this homemade granola recipe is that it is super easy to customize and will be so much tastier than any store-bought granola. But there are endless variations possible so I’ll give you a few suggestions of what to add or extract from the recipe.
flax seeds
chia seeds
chocolate chips (add those after baking!)
banana chips (also add those after baking)
You can leave out the coconut flakes as well as the apricots and replace them with:
raisins
currants
dried cranberries
chopped dried figs
dried prunes
If you love the combination of lemon and ginger, also check out my lemon-ginger granola.
Storing Nut-Free Granola
If you make sure the granola is completely cooled before you add it to an airtight container it lasts surprisingly long. It will last at least two weeks but probably a lot longer than that.
Can I freeze nut-free granola?
Yes. Granola freezes very well. Store it in a freezer-safe container or bag for up to 3 months. Let it come to room temperature before serving.
Tips for the Ultimate Granola Crunch
Everyone wants a crunchy granola to sprinkle over their yogurt. My granola recipes are designed to deliver exactly that, but here are my best tips for making perfectly crunchy granola every time:
Use Liquid Sweetener and Oil – use a combination of honey or maple syrup and a neutral vegetable oil. Personally, I prefer sunflower oil or melted refined coconut oil because they work particularly well.
Mix Thoroughly – make sure all of the oats are evenly coated with the honey or maple syrup and oil mixture. Thorough mixing ensures every oat gets covered, which helps create those crunchy clusters.
Choose Old-Fashioned Rolled Oats – use old-fashioned rolled oats rather than quick oats. They crisp up much better during baking.
Let It Cool Completely – allow the granola to cool completely on the parchment-lined baking sheet after baking. You can remove the baking sheet from the oven and place it on the counter, but don’t disturb the granola too much. Just like cookies, granola becomes fully crisp as it cools.
Add Dried Fruit After Baking – always add dried fruit after the granola has baked and cooled, or even just before serving.
More Fun Granola Recipes
I think you can never have enough granola recipes so check out a few of the below recipes too!
Can I make this granola completely allergy-friendly?
This recipe is naturally nut-free, but always check ingredient labels if you’re baking for someone with a nut allergy. Oats, seeds, dried fruit, and coconut products can sometimes be processed in facilities that also handle nuts.
Is coconut considered a nut?
Despite its name, coconut is technically a fruit, not a tree nut. Many people with tree nut allergies can safely eat coconut, but allergies vary from person to person. If you’re unsure, consult your doctor or allergist.
Can I leave out the coconut flakes?
Absolutely. The coconut flakes add flavor and texture, but you can simply omit them or replace them with flax seeds, chia seeds, banana chips, or chocolate chips.
Can I use maple syrup instead of honey?
Yes. Maple syrup works very well in this recipe and makes the granola suitable for a vegan diet. The flavor will be slightly different but equally delicious.
Why isn't my granola crunchy?
The most common reason is that the granola hasn’t cooled completely. Granola continues to crisp up as it cools. Also, make sure the oats are evenly coated with the honey and oil mixture before baking.
What can I serve with nut-free granola?
It’s delicious sprinkled over yogurt, smoothie bowls, oatmeal, or fresh fruit. You can also enjoy it with milk as a breakfast cereal or simply eat it by the handful as a snack.
Can I reduce the sweetness?
You can slightly reduce the honey or maple syrup, but keep in mind that the sweetener also helps create the crunchy texture and clusters that make homemade granola so delicious.
Toast the coconut flakes or chips in a 350°F/ 180°C oven (conventional oven) for a few minutes, until lightly golden brown. Set aside until the granola has finished baking.
In a large bowl, combine the rolled oats, pumpkin seeds, sunflower seeds, vegetable oil, honey, vanilla bean seeds, and salt. Stir until everything is well coated.
Spread the mixture evenly onto a parchment-lined baking sheet.
Bake at 350°F /180°C (conventional oven) for 15-18 minutes, or until lightly golden. Stir once halfway through baking.
Let the granola cool completely.
Slice the dried apricots into strips and stir them into the cooled granola along with the toasted coconut flakes.
Store in an airtight jar.
Notes
Some dried apricots contain a bit more moisture than others. If they seem too soft, they can make the granola lose its crunch. To prevent this, place the apricot strips in the still-warm oven after baking the granola. Turn the oven off, the residual heat is enough to dry them slightly.
You can also leave the dried apricots out entirely and simply add them to individual servings right before sprinkling the granola over yogurt.
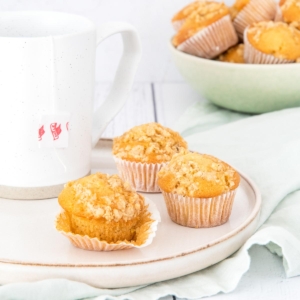
Muffins are one of my favorite things to bake and these moist mini lemon crumb muffins are easy to make and absolutely perfect for brunch or a picnic. If you’re a lemon lover you’ll want to try these!
The Perfect Picnic Size
These mini lemon crumb muffins make a wonderful snack, and if you ask me, they’re also perfect for packing along on a picnic.
Making these mini muffins doesn’t require any machine. Just a few bowls and a whisk is all you need
They’re perfect for freezing if you want to use them at a later stage
The crumb topping gives them a buttery and crunchy texture
Recipe Ingredients
Making these lemon crumble muffins works best if all ingredients are at room temperature. Make sure to double-check the exact quantities and ingredients in the recipe card below.
sugar – I use a mix of regular granulated sugar in the muffins and light brown sugar in the crumb topping
oil – I typically use a neutral oil like sunflower oil for baking
lemon – the lemon flavor for these muffins comes from both a fresh lemon as well as lemon curd
egg – I use a large egg for this recipe
milk – whole milk gives the best flavor, but you can replace it with any kind of milk you prefer, including plant-based
butter – unsalted butter is preferred in this recipe
all-purpose flour – forms the base for both the muffins and is also part of the crumb topping
oats – I used old-fashioned rolled oats, which give a lovely texture to the topping
How To Make Mini Lemon Crumb Muffins
Making the batter for this easy recipe cannot be more straightforward. You ideally use two bowls. In the first bowl you add the dry ingredients (sugar, flour, baking powder, baking soda, salt and lemon zest). Use a spoon to mix it through.
In a second bowl you add the wet ingredients (egg, milk, oil and the lemon curd) and mix it until smooth.
Next you simply add the wet ingredients to the dry ingredients and fold it together. You want any flour streaks to be gone, but it is totally fine if there are still a few lumps visible.
How to make the Crumb Topping
I use a small bowl to make the crumb topping. You add the butter, brown sugar, vanilla, flour, oats and a little bit of salt to the bowl. Use the tips of your fingers to rub it together until a crumbly mixture forms. Don’t overmix it, as you really want that crumbly texture.
Fill your mini muffin cups to about 3/4 with the batter and sprinkle the crumble topping over the top of each muffin,
Bake at 400˚F/200˚C (conventional oven) for about 12 to 15 minutes or until they are lightly golden.
Allow to cool for a few minutes before transferring to a wire rack to cool down completely.
Storing Mini Lemon Crumb Muffins
These mini muffins are perfect for storing as well, making them really versatile and easy to have on hand. Once baked you can store them at room temperature in an airtight container for up to 5 days.
Can I freeze mini lemon crumb muffins?
Absolutely! Let the muffins cool completely, then store them in an airtight container or freezer bag. They can be frozen for up to 3 months. Thaw at room temperature before serving.
More Recipes with a Crumb Topping
I absolutely love a good crumb topping so here are a few favorites!
Can I make these mini lemon crumb muffins in a regular muffin pan?
Yes! This recipe can easily be made as regular-sized muffins. You’ll get about 10-12 muffins, and the baking time will increase to approximately 18–22 minutes. Keep an eye on them and check for doneness with a toothpick.
Can I use bottled lemon juice instead of lemon zest?
For the best flavor, I recommend using fresh lemon zest. The zest provides most of the bright citrus flavor in these muffins. Bottled lemon juice won’t give the same fresh, vibrant result. It will also have an effect on the texture as it introduces more moisture into the muffins.
Why are my muffins dense instead of fluffy?
Dense muffins are usually caused by overmixing the batter. Once you combine the wet and dry ingredients, stir only until the flour is no longer visible. A few lumps in the batter are completely normal.
How do I keep the crumb topping crunchy?
Store the muffins in an airtight container at room temperature rather than in the refrigerator. If the topping softens over time, you can refresh the muffins in a 300°F/150°C (conventional oven) oven for a few minutes.
Small, bright, and bursting with fresh lemon flavor, these mini muffins make the perfect summer treat. With this easy recipe, you can make homemade mini lemon crumb muffins from scratch.
In a large bowl, whisk together the sugar, flour, baking powder, baking soda, salt, and lemon zest.
In a second bowl, whisk together the egg, milk, oil, and lemon curd until smooth.
Pour the wet ingredients into the dry ingredients and gently fold together with a spatula until no dry streaks remain. A few lumps are perfectly fine.
Make the Crumb Topping
Add the butter, brown sugar, vanilla extract, flour, oats, and salt to a bowl.
Use your fingertips to rub everything together until a crumbly mixture forms.
Assemble and Bake
Fill the mini muffin cups about three-quarters full with batter.
Sprinkle the crumb topping evenly over the muffins.
Bake at 400°F/200°C (conventional oven) for 12-15 minutes, or until the muffins are lightly golden and a toothpick inserted in the center comes out clean.
Allow the muffins to cool in the pan for a few minutes before transferring them to a wire rack to cool completely.


