Who doesn’t love a classic red velvet cake? The rich, moist layers of chocolate cake paired with a tangy-sweet cream cheese frosting make this red velvet layer cake absolutely irresistible!

Easy and Impressive

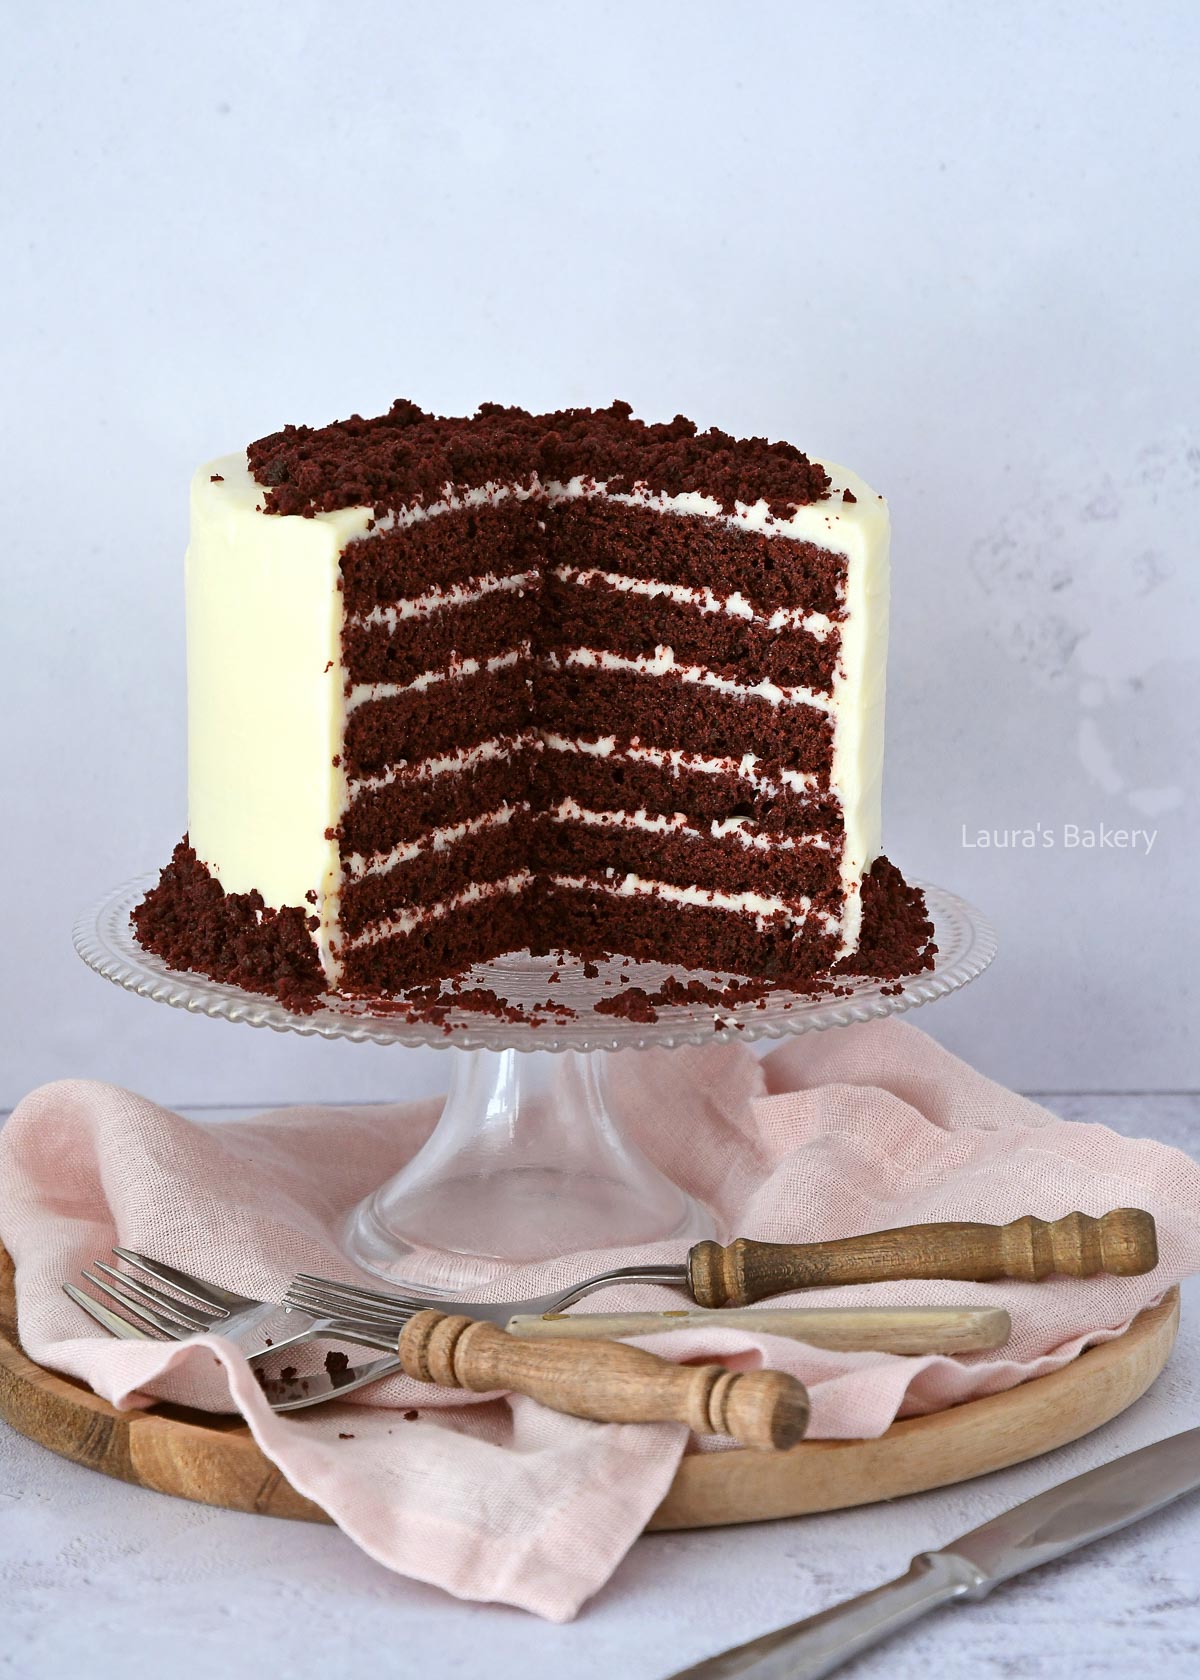
This red velvet cake is one of my favorite impressive cakes to make. I turned it into a layer cake and while I would normally go for 3 layers, I sliced each layer in half. That way you end up with six beautiful cake layers, each separated by a generous layer of cream cheese frosting. The contrast between the deep red cake and the creamy white frosting looks stunning when you cut into it.

Got a birthday coming up? Be sure to check out my collection of the most delicious and show-stopping birthday cakes to surprise the birthday guest!

Recipe Ingredients

For making this impressive red velvet cake you don’t need a lot of fancy ingredients but you do need red food coloring. Check the tips on that below and make sure to double-check the exact ingredients in the recipe card below.

  • butter – to keep salt levels in check I always use unsalted butter
  • eggs – the eggs provide both structure as well as a moist cake
  • sugar – for the best structure I went with granulated sugar
  • cocoa powder – use unsweetened cocoa powder or natural cocoa powder
  • buttermilk – this creates a delicious and airy cake. And don’t worry you will not taste the buttermilk in the end result!
  • red food coloring – I prefer to use a gel-based food color
  • flour – I used all-purpose flour
  • baking soda – to add some more rise to the recipe
  • lemon juice
  • frosting – for the frosting I used my cream cheese frosting recipe.

How To Make Red Velvet Cake

Before you start making this beautiful cake it is a good idea to have all ingredients at room temperature. Making it is done in a few different stages.

Make the cake batter

The first step is to make the cake batter. I do this in the bowl of stand mixer, but a large bowl with an electric mixer will work too. Beat the sugar and the butter together until light and fluffy.

Add the eggs one by one and make sure to mix in between each addition.

Combine the cocoa powder, vanilla extract, food coloring and a splash of the buttermilk together in a small bowl and mix this into a smooth paste.

Now add this to your butter mixture and whisk until combined.

Add the dry ingredients together in another bowl and also mix the remaining buttermilk with the lemon juice. Now alternate between adding dry ingredients and the wet ingredients into the buttermilk mixture until everything is just combined. Stop mixing as soon as it does!

Bake the cakes

I like to use 3 cake pans that are the same size. You can also bake each layer in the same pan one after the other. It just takes a bit more time.

Make sure to grease the cake pans and line the bottoms with parchment paper.

Bake for about 30 minutes at 170˚C/340˚F (conventional oven) until a toothpick inserted into the center comes out clean.

Let them cool in the pans for 10 minutes before turning out onto a wire rack.

Assemble the cake

Now the fun part! Assembling the cake. Make sure that the cake layers are completely cooled down and you have your frosting ready to go. If your cake layers have a dome (and they probably will) trim that off and save those trimmings!

Slice each cake horizontally in half so you have six layers.

Place the first layer on a cake stand or serving plate and spread 2 to 3 tablespoons of the frosting over the layer.

Continue with stacking each layer the same way and and finish with the last cake where you use the bottom of the cake as the top which will create that perfectly flat top.

Frost the top and the sides of the cake with the remaining frosting.

You can use the trimmings you kept for decorating the cake.

Red velvet cake-2

Storing Red Velvet Cake

You can store this cake in the refrigerator for up to 4 days. Make sure it is well wrapped or placed inside an airtight container.

Can I freeze red velvet cake?

You can also freeze the cake properly wrapped for about 3 months.

Why Is Red Velvet Cake Red?

A red velvet cake is essentially a lightly flavored chocolate cake with plenty of red food coloring added to achieve its signature color. After all, turning a brown chocolate cake bright red takes a little help!

Originally, the reddish color developed naturally through a reaction between the acidity of the buttermilk and the cocoa powder. Modern cocoa powder no longer reacts in quite the same way, so food coloring is needed to recreate that iconic appearance.

The coloring doesn’t affect the flavor, so if you prefer not to use food coloring, you can simply leave it out. You’ll still end up with a delicious chocolate cake.

More Red Velvet Recipes

If you love the soft, velvety texture and rich, creamy flavor of red velvet, you’ll definitely want to try these recipes:

Red velvet cake is also a true holiday classic. Looking for inspiration for your Christmas dessert table? Browse my collection of festive Christmas recipes!

Which Food Coloring Is Best for Red Velvet?

When coloring cakes, I always prefer a gel food coloring. Gel colors are highly concentrated, so you need much less than with liquid coloring.

Normally I recommend using food coloring sparingly, but because red velvet is based on chocolate cake, you’ll need quite a bit to achieve a rich red color. I ended up using an entire jar of red gel food coloring.

My cake turned out a deep burgundy rather than a bright red, which I actually loved. If you’d like a brighter red cake, you can either add more red gel coloring or reduce the amount of cocoa powder slightly. Keep in mind that using less cocoa powder will also make the chocolate flavor milder.

Natural Food Coloring for Red Velvet Cake

Yes, I completely understand that this recipe uses a lot of food coloring. Since this isn’t a cake I bake every day, I don’t mind making an exception once in a while. It was absolutely worth it because this cake tasted incredible!

If you’d rather use natural food coloring, I haven’t personally tested that yet, but there are brands that have natural food coloring.

Red velvet cake-3

FAQ Red Velvet Cake

How much red food coloring should I use?

I intentionally didn’t specify an exact amount because it depends on the shade of red you’d like. I used an entire 30-gram jar of red gel food coloring. See the tips above if you’d like an even brighter red cake.

I don't have enough cake pans to bake all the layers at once.

No problem at all. Simply bake the layers one after another. It will take a little longer, but the result will be exactly the same.

What size cake pans should I use?

I use 6-inch (15 cm) round cake pans for this recipe. Make sure your pans are at least 2 inches (5 cm) deep.

Can I bake all three layers in one cake pan at the same time?

I don’t recommend it.

Can I make cupcakes instead?

Absolutely!

I don't like buttermilk. Can I leave it out?

You won’t actually taste the buttermilk in the finished cake, so don’t let that stop you. If you still prefer not to use it, replace it with 1 cup (250 ml) of milk mixed with 1 tablespoon of lemon juice or white vinegar. Stir well and let it sit for about 10 minutes before using.


Red velvet cake

Save
Print recipe

No votes yet

Red Velvet Cake Recipe

Who doesn’t love red velvet cake? Moist layers of red chocolate cake combined with a luscious cream cheese frosting make this cake completely irresistible.
Preparation15 minutes
Cooking30 minutes
Assembling30 minutes
Total1 hour 15 minutes
Servings: 12 people

Ingredients 

Cake

  • 120 grams unsalted butter
  • 250 grams granulated sugar
  • 2 large eggs
  • 50 grams unsweetened cocoa powder
  • 2 tsp vanilla extract
  • Red gel food coloring
  • 250 ml buttermilk
  • 300 grams all-purpose flour
  • 2 tsp baking soda
  • Pinch of salt
  • 2 tsp lemon juice

Filling & Frosting

Equipment

  • 3 6-inch (15 cm) round cake pans

Instructions

Make the Cake Batter

  • Beat the butter and sugar until light and fluffy.
  • Add the eggs one at a time, mixing well after each addition.
  • In a small bowl, combine the cocoa powder, vanilla extract, food coloring, and a splash of the buttermilk into a smooth paste.
  • Add this cocoa mixture to the butter mixture and beat until fully incorporated.
  • In another bowl, whisk together the flour, baking soda, and salt.
  • Mix the remaining buttermilk with the lemon juice.
  • Alternately add the dry ingredients and the buttermilk mixture to the batter, mixing until everything is just combined.

Bake the Cakes

  • Grease the cake pans and line the bottoms with parchment paper.
  • Divide the batter evenly among the pans.
  • Bake for about 30 minutes at 340°F/170°C (conventional oven) until a toothpick inserted in the center comes out clean.
  • Let the cakes cool in their pans for about 10 minutes.
  • Turn them out onto a wire rack and cool completely.

Assemble the Cake

  • Once the cakes are completely cool and the frosting is ready, trim the domed tops off each cake layer. Save the trimmings.
  • Slice each cake horizontally in half to create six layers.
  • Place the first layer on a serving plate or cake stand.
  • Spread 2 to 3 tablespoons of cream cheese frosting over the layer.
  • Continue stacking the cake, frosting each layer as you go.
  • Finish with the bottom of one cake turned upside down for a perfectly flat top.
  • Frost the top and sides of the cake with the remaining frosting.

Decorate

  • Crumble the reserved cake trimmings into fine crumbs by rubbing the pieces together.
  • Sprinkle the crumbs over the top and around the bottom edge of the cake, or decorate however you like.
  • Your red velvet cake is now ready to serve!

Tips

How to store

Store the cake covered in the refrigerator for up to 4 days.

You can also freeze it for up to 3 months when wrapped well.

Links in this article may be affiliate links. If you purchase something through such a link, I will receive a small commission, without you paying anything extra.

Leave a comment

Your email address will not be published. Required fields are marked *

Recipe Rating