Slagroomtaart - Dutch cream cake 4

A slagroomtaart is probably the most popular Dutch birthday cake there is. Want to make your own Dutch cream cake? It is so easy! In this recipe I will tell you exactly how to bake the cake, fill it and decorate it.

Slagroomtaart recipe

I made my first cream cake in 2015, several years ago now. Its recipe has not been published on the blog until today, but has been in my first baking book since 2016. I have been asked for my cream cake recipe quite often.

Fortunately, I know that many home bakers had my book at home and could just make the cake, but now it’s time to share this delicious cream cake on the blog!

About the cake base

The cake base of a slagroomtaart is very light and airy, we also call it ‘biscuit’ or ‘kapsel’. Think sponge cake or chiffon cake. you could use some lemon zest or spices to have some extra flavor in the cake.​

We use this cake base for a lot of Dutch cake recipes, but the cream cake is definitely the most popular one. In this video, you can see how soft and fluffy the cream cake is:

Slagroomtaart - Dutch cream cake 2

Dutch Cream Cake Filling

The base of the cream cake is filled with jam and whipped cream. Optionally, a syrup can be brushed on the cake layers to moisten the cake or add flavor. If you make the cake several days in advance, there is a chance that the cake will get a little dry. The syrup prevents this.

When I make this whipped cream cake for special occasions, I usually make it the night before and don’t use the trembler syrup. Usually friends and family eat the whole cake and there are no leftovers.

And then a little bit more about the cake filling, the jam I mean. If you want to go for the classic flavors, you choose strawberry jam. For the cake in the picture, I had chosen a jam made from several kinds of red fruits, but you can basically use any jam you like.

For the whipped cream I use just normal whipping cream as there aren’t a lot of options in the Netherlands, but if you have access to heavy cream that’s an even better option.

Slagroomtaart - Dutch cream cake 5

Decorating the Cake

To decorate the cake, use hazelnut bresilienne (also known as nougatine). These are toasted pieces of hazelnut with a caramelized layer of sugar around them. Not only beautiful for decoration, but also incredibly delicious. For a change of pace, you can substitute other types of nuts for the crunchy topping. Pecans, for example, are a good substitute.

Another way to decorate a whipped cream cake is to pipe swirls of whipped cream onto the top of the cake and then stick pieces of fresh fruit into them. Kiwi or tangerine slices really belong here. For this version I used kiwi and strawberry, delicious!

Optionally, you can use chocolate decorations (store bought or homemade) to decorate the cake. Or you can order a festive and edible photo print online and stick it on the cake.

How do I cover the cake with whipped cream?

After you’ve filled and stacked the cake layers, it’s time to decorate the sides and top of the cream pie with whipped cream. You can use a piping bag or a spatula, whichever comes easiest. Use the spatula to spread the whipped cream evenly on the outside of the cake. Be sure to save some whipped cream for the swirls on top of the cake.

For the side of the cake, it can be helpful to use a spatula in conjunction with a rotary spatula. You hold the spatula in one place while you gently rotate the turntable.

Finally, decorate the top of the cake with swirls of whipped cream. Fill a pastry bag with the whipped cream and choose a nozzle of your choice (I used a large star nozzle) and hold your piping bag straight over the cake as you start to spray the tufts.

Slagroomtaart - Dutch cream cake 3

Freezing a cream cake

I do not recommend freezing a cream cake. The whipped cream will dry out and won’t taste as good. However, you can make the sponge layers well in advance and freeze them in an airtight container for up to three months. You can also make the jam and nougatine well in advance and store them until you are ready to make the cake.

That way, you have the cake pieces ready to go, and all you have to do is whip the cream and assemble the cake. It saves time!

Questions about Dutch cream cake

How far in advance can I make the cream cake?

I prefer to eat a whipped cream cake the same day or the day after. Whipped cream generally doesn’t get any better, but you can store the cake in the refrigerator for 2-3 days.

Can I make a square cake?

Of course you can! In fact, you can use any shape, round, square or rectangular. I used this round pan for the recipe below, but square pans are also available. Just make sure you get the right size.

You can use the ‘Convert Recipe’ button in the recipe card below to convert the recipe to fit any size pan of your choice.

Can I leave out the nougatine?

Nougatine adds a nice crunchy element to a whipped cream cake, which is necessary because the biscuit, jam and whipped cream are soft in texture. So I would not simply omit the hazelnut bresilienne, but rather replace it. For example, toasted almond slivers, sprinkles or crumbled cookies.

How many eggs do I need to make 175 grams?

A medium egg weighs 50 grams on average, so you’ll need about 4. Beat the eggs and then weigh the mixture on the scale until you have 175 grams.

Slagroomtaart - Dutch cream cake 1


cream cake recipe

Print Recipe

5 of 1 vote

Slagroomtaart recipe (Dutch cream cake)

Here's my recipe for an authentic Dutch cream cake (slagroomtaart). It's a light and airy cake, filled with jam en whipped cream. And don't forget the caramelized hazelnut pieces on the side.
Prep Time1 hour
Cook Time30 minutes
Total Time1 hour 30 minutes
Servings: 10 -12 servings

Ingredients

Cake Base

  • 175 grams of eggs
  • 100 grams sugar
  • 6 grams vanilla sugar
  • 75 grams flour
  • 25 grams cornstarch

Filling and decoration

  • 6 tbsp strawberry jam
  • 100 grams of nougatine
  • 750 ml whipping cream
  • 6 tbsp sugar
  • Several pieces of fresh fruit of your choice

Instructions

Cake base

  • Beat the eggs, sugar and vanilla sugar until light and fluffy. I beat this in a stand mixer on medium-high speed for about 10 minutes.
  • Sift the flour and cornstarch and add to the mixture. Fold this gently into the mixture; you don’t want all the air you whipped in to disappear.
  • Pour the batter into a greased baking pan. Bake the cake base at 180°C/350°F (conventional oven) for 30 minutes. The cake is done when you press lightly on the top and it springs back. Allow the cake to cool in the pan for a few minutes before removing it to a cake rack.
  • Meanwhile, prepare the nougatine and jam according to the recipe if you haven’t already.
  • Let the cake cool completely before you cut it. If, like me, you used a 20 cm/8 inch spring form pan, cut the cake into three layers.

Assemble the cream cake

  • Whip the cream and sugar until you have stiff peaks.
  • Place the bottom layer of sponge cake on a cake stand or plate and spread half the jam on top, leaving about ½ inch of jam around the edges. Place a few tablespoons of whipped cream on top of the jam and spread evenly. Place the second layer of sponge on top and fill in the same way. Finish with the last layer of cake.
  • Spread the sides of the cake with the whipped cream (it does not have to be thick) until it is completely covered, but leave enough whipped cream for the swirls.
  • Cover the sides of the cake with the caramelized hazelnut pieces. To do this, take a handful of hazelnut crunch at a time and press it against the side of the cake. Continue until the entire side is covered with nougatine.
  • Place the remaining whipped cream in a piping bag with a star tip and pipe swirls on top of the cake around the edge. Place a piece of fruit of your choice in each swirl. I used kiwi, strawberry, and blueberry.
Apple loaf cake 1a

What a beautiful and incredibly delicious cake this turned out to be! An apple cake with both apples through the batter and slices on top for decoration. A new favorite among my apple and cake recipes.

Apple loaf cake recipe

This apple cake recipe is just like a regular vanilla cake, but you add apples to it. This not only gives the cake a delicious flavor, but also makes it nice and moist. The apple slices on top are for decoration, but they make the cake even more pleasing to the eye.

For best results, place the apple slices on top of the cake and gently press them into the batter. And don’t you just love it?

Apple loaf cake 2a

Old fashioned apple cake

Whether you can officially call this an old-fashioned apple pie, I dare not say. But just like my grandmother’s apple pie, you may remember this cake, in a slightly different form or not, from back in the day. Old-fashioned or not, it still tastes great!

Baking an apple loaf cake

You don’t need much for this apple cake recipe. You can start with the standard cake ingredients and some apples. I prefer to use Jonagold or Goudreinet apples for baking. They have a great flavor and texture for baking. Of course you can use other apples, but the result may be slightly different.

apples for apple cake

slice of apple cake recipe

More baking recipes with apples

In the fall and winter, I always have plenty of apples around the house to bake with. An apple cinnamon cake remains a favorite, but there are other delicious apple recipes. As you will see, I like to combine apples with cinnamon in my recipes, a perfect flavor combination.

These are some of my favorite apple baking recipes:

Apple loaf cake baking tips

Apple pieces and flour

I mix the apple pieces that go through the cake with a little flour before they go through the batter. This keeps them from sinking to the bottom too quickly.

Which loaf pan?

You can make this apple cake in a standard loaf pan. I personally like to use this rectangular pan. Of course, you can make it in any other shape. The baking time may vary slightly.

Storing apple cake

You can keep the apple cake outside the refrigerator for about a week if wrapped properly. You can also freeze the cake and it will keep for 3 months.

Apple loaf cake 3a


the best apple loaf cake

Print Recipe

5 from 2 votes

Apple loaf cake recipe

A delicious apple loaf cake with apple pieces in the batter and apple slices on top for decoration. A beautiful and incredibly tasty cake recipe.
Prep Time20 minutes
Cook Time1 hour
Total Time1 hour 20 minutes
Servings: 12 servings

Equipment

Ingredients

  • 200 grams unsalted butter
  • 200 grams fine granulated sugar
  • 2 tsp vanilla extract
  • 4 eggs
  • 200 grams self-rising flour
  • Pinch of salt
  • 1.5 apples Jonagold or Goudreinet

Instructions

  • Cream together butter and sugar. Add vanilla extract and eggs one at a time, beating until smooth.
  • Add the self-rising flour and salt and mix until the dry ingredients are incorporated.
  • Peel one apple, remove the core and cut into cubes. Mix in a bowl with a little flour. The flour will prevent the pieces from sinking to the bottom during baking.
  • Using a spatula, mix the apple pieces into the batter. Pour the batter into a greased and floured baking pan.
  • Slice half of the apple and place them on top of the cake, pressing them lightly into the batter.
  • Bake the cake at 175 ℃/345 ℉ (conventional) for about 65-70 minutes until done and golden brown.
  • After baking, insert a skewer into the center of the cake and if it comes out clean, the cake is done. Allow to cool briefly in the pan before transferring to a wire rack to continue cooling.
Strawberry tiramisu-1

I made this strawberry tiramisu with whipped cream and mascarpone in individual servings. That way, you can serve everyone their own small dessert for dinner. How cute and convenient too!

Making Strawberry Tiramisu

Don’t let the Italians see how I like to make my strawberry tiramisu: no raw eggs, no alcohol, and no coffee. Instead of coffee or alcohol, I soak my lady fingers in orange juice (strawberry juice works too!). It works great with the fresh strawberries.

As key ingredient I use a mixture of mascarpone cheese and heavy whipping cream. That is a great combination if you don’t want to use raw egg yolks.

By leaving those out this is safe to eat for everyone. Pregnant women and children included. Of course it doesn’t resemble a traditional tiramisu recipe. This classic Italian dessert has pretty strict guidelines as to what goes into a tiramisu.

To make extra pretty single portions, I decided to make the tiramisu into a layered version. A small tower of tiramisu!

You can serve it right away after you’ve made it or you can leave it in the fridge overnight to set. In either case it is a lot of fun to serve this when you have guests for dinner.

BAKING TIP: If you clean your strawberries, do so before removing the crowns. Otherwise, the strawberries will soak up the water and your strawberries will have less flavor.

Strawberry tiramisu-2

How to make the stack of tiramisu

Now you might think that this is a complicated dessert but it really isn’t. I would say this is the perfect no bake dessert!

You just make a single layer of ladyfingers, add a tablespoon of apricot jam on top and pipe some of your mascarpone filling followed by some sliced strawberries. And repeat for a second layer.

Now a few things to keep in mind. Don’t go overboard when creating your layers. You want it to be small as it is for one person after all.

Three lady fingers is enough for one layer, or maybe even two if you want to make smaller portions.

Adding the layers of mascarpone cream is easiest with a piping bag. You can use a smooth nozzle as I did here or use a special one.

Instead of the apricot jam you can use another jam like homemade strawberry jam. Finish the stack with some juicy strawberries and you’re ready to serve your perfect dessert.

A little sprinkle of powdered sugar on top of the tiramisu is always a good idea too.

Strawberry Tiramisu

Desserts, I love them. We used to have a standard bowl of yogurt for dessert after every meal at home. Nowadays, I don’t do that very often, although sometimes it would be good maybe against a sweet craving in the evening.

Now, when I make dessert, I like to make an impression. Without too much time and effort. This easy strawberry tiramisu is a good example: little effort, big effect.

By the way, this tiramisu with strawberries, orange juice and apricot jam is also a big hit with the kids!

It is one of my favorite strawberry desserts. Check the recipe card for the full instructions.

Strawberry tiramisu tips

Can I substitute other red fruits for strawberries?

Absolutely you can. You may also want to adjust the apricot jam to match the flavor of the fruit you use. I’ve made tiramisu with blackberries, blueberries, and raspberries, so I know it works well and is very tasty.

What can I use instead of orange juice?

Basically, you can use any fruit juice of your choice as long as it matches the flavor of the strawberries and apricot jam. Strawberry syrup is usually a bit too sweet but if you want to use a strawberry sauce you can thin it a bit with lemon juice or orange juice.

Can I make this tiramisu in a larger dish?

Yes, you can. In that case, use a little more ladyfingers (225 grams/8 oz) and possibly a little more orange juice to dip the cookies in. This way you can make the tiramisu in a 20 x 20 cm (9×9 inch) baking dish.

How do I keep the lady fingers crispy?

This is not the intention of tiramisu. If you want to, it’s best to make the dessert just before serving. It is possible to make the mascarpone cream mixture the day before (and keep it refrigerated, covered with plastic wrap) to save time during the rest of the preparation.

Can I use freeze-dried strawberries?

You can, but while they might look pretty I would recommend making this with fresh strawberries. If you crumble the freeze-dried strawberries they would look good sprinkled on top though.

Can I make more layers of ladyfingers?

If you want you can make more layers but keep in mind that it might become unstable. Two layers is probably high enough.


Strawberry tiramisu

Print Recipe

No votes yet

Strawberry Tiramisu Recipe

A delicious strawberry tiramisu served as individual portions. Deliciously fresh with strawberries and apricot jam.
Prep Time15 minutes
Cook Time10 minutes
Total Time25 minutes
Servings: 4 portions

Ingredients

  • 250 ml mascarpone
  • 125 ml heavy cream
  • 2 tbsp granulated sugar
  • 1 tbsp lemon juice
  • 24 sponge fingers
  • 4 tbsp apricot jam
  • 200 grams strawberries
  • orange juice

Instructions

  • Beat the mascarpone, cream, sugar and lemon juice in a large bowl until stiff peaks. Use either a food processor or an electric mixer.
  • For each pastry, dip 3 lady fingers in the orange juice and place on a plate. Spread a tablespoon of apricot jam on top. Fill a pastry bag with the cream filling and pipe some of the cream onto the lady fingers in a zigzag pattern.
  • Slice some strawberries and place on top of the filling. Dip the last lady fingers in the juice and place on top of the pastry, followed by another layer of cream. Just before serving, decorate the tiramisu with the last strawberries.
  • You can serve the tiramisu right away or put it in the fridge to let the lady fingers soften a bit more, as they should with tiramisu.
Carrot cake recipe-2

Want to make carrot cake? This easy recipe makes a creamy, fluffy and spiced carrot cake. The best carrot cake recipe I’ve ever had! So if you’re a carrot cake lover I would urge you to try this recipe!

The best carrot cake ever

Here it is at last: a recipe for carrot cake! And if I may be so bold, this really is the most delicious carrot cake ever. I had eaten a lot of carrot cakes and had a clear idea of what I wanted my version to be. The result was even more delicious than I had hoped, so you can understand how happy I am with this easy carrot cake recipe.

This carrot cake is airy, creamy, and has just enough spices. It’s perfect on its own, but when paired with the cream cheese frosting, it’s a real party. I made a layer cake out of it myself, but hesitated for a long time about whether to bake it in a bundt. I’m sure it would also look great with cream cheese frosting and walnuts on top.

Baking tip: Did you know that you can make carrot cake in an air fryer? I’ll share the recipe for that soon too.

Carrot cake recipe-1

What is a carrot cake?

A carrot cake is a cake in which grated fresh carrots are mixed into the batter. This not only gives the carrot cake a beautiful color, but also gives it a slightly sweet taste and a nice smoothness.

In addition, carrot cake always contains a special spice mixture consisting of at least cinnamon and ginger, but preferably also nutmeg and cloves.

Before the recipe came to Holland, it was already very popular in England and later in America. That is why we have so many words for this delicacy. Think worteltaart (in Dutch), carrot tart or carrot pie, depending on which country you live in.

Personally, I like to stick to the official English name carrot cake as most people would refer to it that way. Even most people in The Netherlands.

Carrot cake topping

One final element that a carrot cake is known for is the topping. A carrot cake topping is usually called a frosting, a cream cheese frosting to be exact. This is my favorite cream cheese frosting recipe. This is a mixture of cream cheese, butter, powdered sugar and vanilla.

It seems that this frosting is a modern addition, not found in old recipes. Whoever came up with it, I am very grateful, because the sweet and creamy addition of the frosting completes a spicy carrot cake!

Carrot cake recipe-5

Carrot Cake Recipe

In my opinion, a carrot cake should have a deliciously creamy base, but the layers should also be nice and fluffy and with moist crumbs. To get both that creaminess and lightness in this carrot cake, I played around with the ingredients. Below I will tell you a bit more about the role of the ingredients in this layer cake:

  • Eggs provide the binding, structure, and rising of the batter.
  • Sunflower oil has a neutral flavor and also gives the cake a creamy and smooth texture, even when cooled. You can substitute for another vegetable oil. You can substitute unsalted butter or melted coconut oil, but it will make the cake a bit firmer.
  • Vanilla extract is a subtle flavoring and can be substituted with other types of vanilla if desired. Or check how to make your own vanilla extract.
  • Light brown sugar adds extra flavor and contributes to the cake’s creamy texture.
  • All purpose flour is the base of the cake.
  • Baking agents, including baking powder and baking soda, also make the cake rise. Read more about why I combine these two baking ingredients.
  • Spices (ground cinnamon, nutmeg, ginger, cloves, and salt) are the real flavor makers and, in the right proportions, provide the real carrot cake flavor.
  • Of course, carrot is a must and is traditionally added to make the cake sweeter. The moisture from the grated carrots also makes this a deliciously moist cake. I like to use a coarse grater or box grater to grate the carrots. You can also use a food processor if you prefer.
  • Walnuts taste great in a carrot cake, but if you don’t like them, you can just leave them out of the recipe.
  • Cream cheese frosting seems to be a fairly recent addition to the classic carrot cake recipe, but it makes it irresistibly delicious, if you ask me. Still, I can’t imagine the cake without the frosting.

As always make sure all ingredients are at room temperature before you start baking your homemade carrot cake recipe.

Carrot cake recipe-6

Making Carrot Cake

What kind of carrots do you use?

I personally used baby carrots, but you can also use winter (big) carrots.

How finely or coarsely do I grate the carrots?

Don’t grate the carrots too coarsely (like julienne), but certainly not so finely that they come out as a mush. You want small, thin strands of carrot. That’s what tastes best in the cake. I like to use a coarse grater to grate the carrots.

If you do have julienne cut carrots, make sure to chop them into smal pieces before adding the carrot to the batter.

Can I bake the carrot cake in a bundt pan?

You certainly can, but I haven’t done it myself (yet!). I read in the comments that someone has already baked this carrot cake recipe in this Nordic Ware cake pan with a baking time of 60 minutes.

What kind of pan do you use?

This cake has three layers and I prefer to bake them in the oven at the same time. I use three of these 9-inch cake pans around the house. By greasing and dusting them with flour, the cakes come out perfectly after baking.

I only have one 20 cm (9 inch) pan, can I still make this recipe?

Yes, you can. The only thing you need to be aware of is the effect of the baking soda on the dough, as the baking soda is activated when it comes into contact with the light brown caster sugar or baking powder. Therefore, divide the carrot cake batter into three bowls (just weigh it out) and add the baking soda just before you pour it into the prepared pans and put it in the oven.

Can I bake the cake in a springform pan?

If you do it in 3 separate layers, yes. But not if you want to bake all of the batter in one big cake. I do not recommend it for this recipe.

You bake the cake in 3 separate layers because you get a better result than if you bake it as 1 big cake and cut it later.

Do you want to bake it in a larger springform pan and serve it as a single layer cake? Use a 24 cm (9.5 inch)  or 26 cm (10 inch) pan. The bake time will need to be longer, so it’s best to experiment. Use a skewer or a cake tester in the center of the cake to check if the cake is done (it should come out clean) before you remove it from the oven.

Can I make carrot cake cupcakes with this recipe?

Haven’t done that myself, but it’s definitely possible. The best thing about this carrot cake recipe is that it is pretty flexible. Cupcakes usually take 18-20 minutes to bake.


Carrot cake

Print Recipe

No votes yet

Carrot Cake Recipe

This carrot cake is airy, creamy, just enough spices, and topped with a delicious cream cheese frosting. It may be the most delicious carrot cake ever!
Prep Time20 minutes
Cook Time20 minutes
Decorating20 minutes
Total Time1 hour
Servings: 14 servings

Equipment

  • 20cm/9 inch round baking pan

Ingredients

Carrot Cake

  • 4 eggs M
  • 250 ml sunflower oil
  • 2 tsp vanilla extract
  • 250 grams light brown caster sugar
  • 300 grams flour
  • 2 tsp baking powder
  • 1 tsp baking soda
  • Pinch of salt
  • 2 tsp cinnamon
  • 0.5 tsp nutmeg
  • 0.25 tsp ginger
  • 0.25 tsp cloves
  • 400 grams grated carrots
  • 125 grams walnuts finely chopped

Carrot Cake Topping

Instructions

  • Start by grating the carrots, then set aside.
  • In a large bowl (you can use a stand mixer if you want), whisk together the eggs, sunflower oil and vanilla extract. Then stir in the sugar. Flour, baking powder, baking soda, salt and spices can be added at the same time and stirred into the batter.
  • Once these dry ingredients are incorporated, add the grated carrot and walnuts and stir them evenly into the batter with a rubber spatula.
  • Bake the cake in 3 separate layers, you will get a better result than if you bake it as 1 big cake and cut it later. If you have 3 20cm/9 inch pans, you can divide the batter evenly between them, otherwise use bowls so that the layers are the same size (see tips above the recipe).
  • Grease the pan(s), dust with flour and place a baking sheet on the bottom so that the pan(s) come out easily. Pour the batter into the pan(s).
  • Bake at 180°C/350˚F (conventional oven) for 15-18 minutes.
  • Allow the cake to cool briefly in the pan before transferring to a wire rack to cool completely. When cooled, wrap the cake layers in foil if you are not going to finish the cake right away. You can make the cakes a day or 2 ahead.

Carrot Cake Topping

  • When the cakes are completely cooled, make the cream cheese frosting according to the recipe. Then start building the cake.
  • Place the first slice of cake on a plate or cake stand and spread a layer of frosting on top, I personally like thin layers of frosting. Place the second slice of cake on top and frost it in the same way. Finish with the third and final slice of cake, making sure the flat bottom is now the top.
  • Before frosting the cake, first fill all the cracks on the side with frosting and apply a thin layer to the top. Then use a palette knife to spread the frosting all around the cake. Clean your plate or tray all around with a slightly damp paper towel.
  • Place the remaining frosting (without crumbs!) in a pastry bag with a round piping tip. Make a circle of frosting swirls on the top of the cake. Decorate the swirls with the extra walnuts.
Dutch bokkenpootjes recipe - almond meringue cookies 3

Dutch Bokkenpootjes; it doesn’t get more typical Dutch than these delicious cookies. They are essentially two almond meringue cookies, filled with a cream filling and then dipped in dark chocolate. You’ve never heard of this delicious Dutch treat? They are worth making!

What is a Dutch bokkenpootje?

In the Netherlands these cookies are pretty well known and I don’t think anyone ever questions why they are called “bokkenpootje”. Literally translated that would be “goat’s feet”. Sounds a bit odd for a cookie right? But if you think about it and with a little bit of imagination, they do resemble goat feet.

But the name is actually a little bit more sinister. It represents the feet of the devil. And eating one such bokkenpootje would protect a recently deceased loved one from evil in the afterlife. But no worries, you can eat these any time of day (or night) and no need for anyone to die either.

Baking Dutch bokkenpootjes had been on my baking list for a long time. I love them! If you’re a fan of almond flavor these almond meringue cookies will be your new favorite. For each cookie you need two almond meringue cookies and they are then sandwiched with a cream in the middle. The outside of the meringue cookies get a thin layer of flaked almonds and the ends of the cookies are dipped in melted chocolate.

The almond meringue cookies you buy in the grocery stores are usually a little smaller than the ones I have made. Making them a little bigger is extra tasty and easier to work with too.

Dutch bokkenpootjes recipe - almond meringue cookies 1

What do you need for baking almond meringue cookies?

In order for the best cookies you need to make sure all your ingredients are at room temperature to start with. You need the following ingredients for the cookies:

  • egg whites
  • granulated white sugar – make sure you use fine sugar
  • almond flour – almond meal
  • all purpose flour
  • flaked almonds

First you whip the egg whites with the 125 grams of sugar to stiff peaks. Now add the almond flour and the regular all purpose flour (pass through a sieve if you want to make sure there are no lumps) and gently fold it through the egg whites until it is well combined.

Now fill a piping bag with a large plain tip of around 1 cm Ø (0.4 inch) attached with the almond mixture. Take a large baking sheet with parchment paper and pipe almond meringue cookies which measure roughly 9 centimeter (or 3.5 inch). Keep in mind that you will need 24 cookies to make a final 12 Dutch bokkenpootjes.

Once you have piped all your almond mixture, sprinkle the flaked almonds over the top. Rub them between your fingers to make them slightly smaller and sprinkle over the cookies. Bake in the oven at top- and bottom heat for around 20 minutes or until lightly golden. The oven temperature should be at 350˚F (180˚C).

Making the cream filling

Once the almond meringue cookies are made it is time to move on to making your cream filling. For this you whip soft butter, vanilla extract, icing sugar and a little bit of double cream together. Whip till it is smooth and creamy. Transfer to a piping bag and cut the tip of the bag. Or alternatively use a small nozzle.

Assemble the cookies you baked and make sure you select them by size. Placing the equally sized cookies together. Pipe some of the cream onto one half of the cookies and place the other half on top.

Dutch bokkenpootjes-1

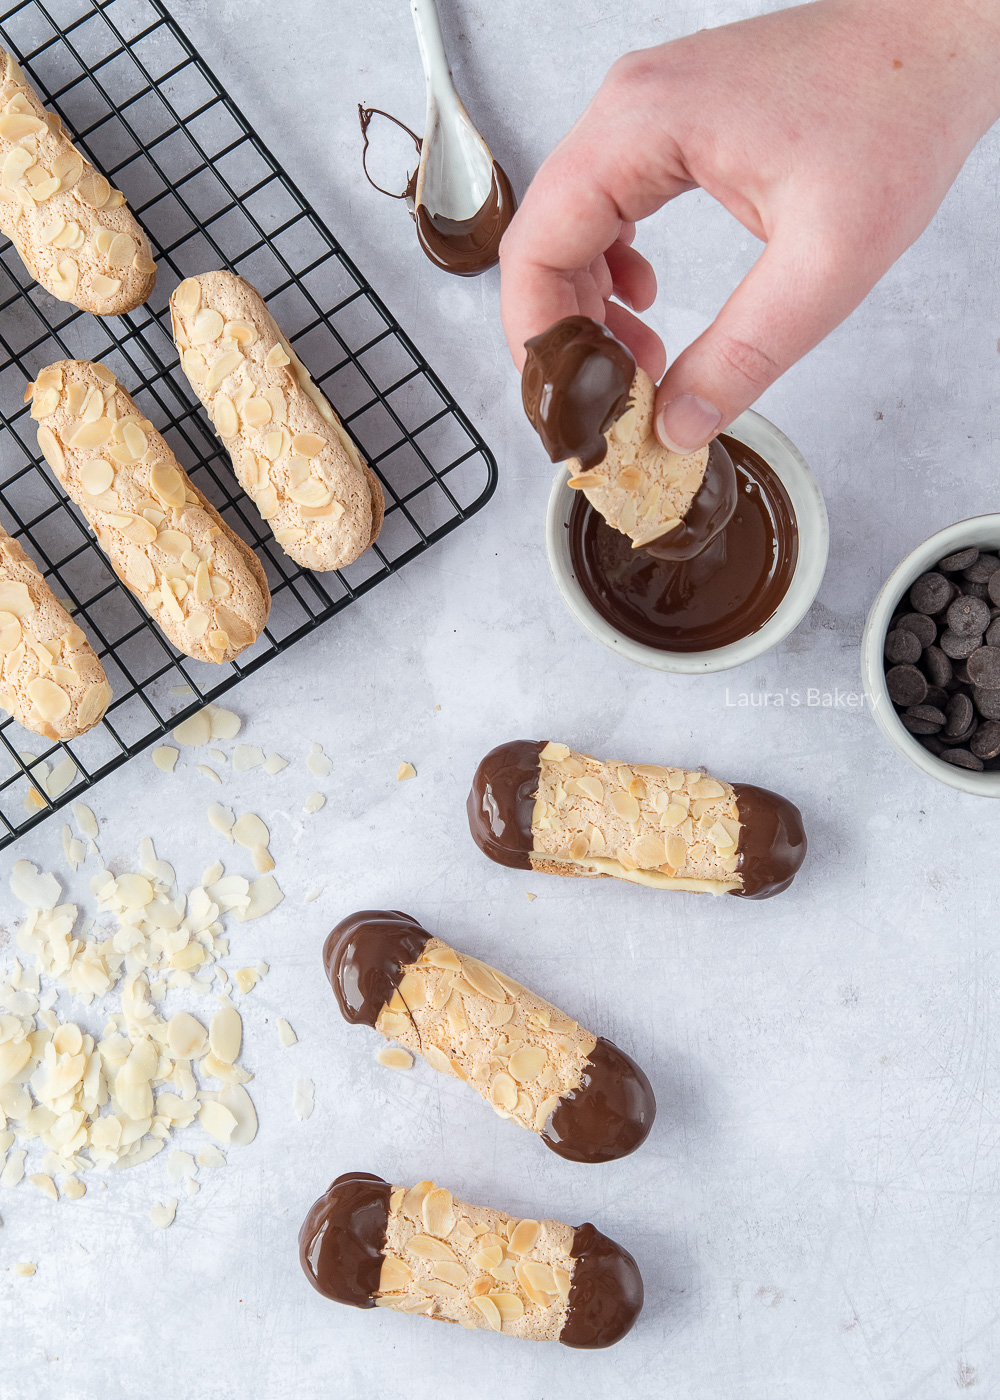
Dipping biscuits in chocolate

Now in order to make the final bokkenpootje, you need to dip it in melted chocolate. If you know anything about chocolate, you know that it is very important to temper the chocolate first. If you don’t, you will end up with a white film on top of the chocolate. They will still taste good but it is just not so appealing.

Some other advantages of tempering the chocolate; it’s super crunchy and has that beautiful ‘crack’ when you bite into a cookie. It is glossy and beautiful, it shines and – even better – you can hold the chocolate without it melting. Obviously you can’t hold it forever, but it does prevent chocolate fingers.

How to temper chocolate

In a nutshell, tempering chocolate involves heating the chocolate (which breaks down the sugar and cocoa butter crystals) and then lowering the temperature of the chocolate (which repairs those crystals). This gives you a chance to dip a tasty almond meringue cookie in the chocolate in the meantime, like these pretty Dutch bokkenpootjes.

Chocolate should always be tempered with a thermometer, so you can be sure it’s done right. But there is a way to do it without a thermometer, called the inoculation method. And this is my favorite method, because it allows anyone to temper chocolate at home.

You divide the amount of chocolate you want to melt into three parts. You melt two of these at a time in a double boiler (au bain marie).

When the chocolate is completely melted, add the last bit of chocolate. This will melt from the heat of the chocolate that has already melted, immediately bringing the temperature back down (and repairing the crystals).

Upper lip

Once the chocolate is melted, check the temperature. Since you won’t be using a thermometer, you’ll have to rely on yourself with a simple trick. Dip your finger into the chocolate and dab it on your upper lip. Your skin is much more sensitive here, so it acts as a thermometer. Does the chocolate feel slightly cool? Then it’s good and you can keep working with it! If it is still a little warm, continue to stir gently, checking the temperature of the chocolate from time to time.

Some chocolate connoisseurs will raise their eyebrows and call me crazy (or maybe they will anyway) because this is not the official method. To be absolutely sure, use a thermometer. However, I learnt this trick from a chocolatier at the Baking Museum and it works every time (after practicing a few times). And since not every home baker has a (sugar) thermometer in the kitchen drawer, I am happy to share this tip with you!

BAKING TIP: To melt the chocolate au bain-marie (in a double boiler), you will need a heat-resistant bowl. A glass or metal mixing bowl will work well.

Dutch bokkenpootjes recipe - almond meringue cookies 4

Baking Dutch Bokkenpootjes: Tips!

Can you store bokkenpootjes outside the fridge?

Yes, as long as they are well packaged (in an airtight container) and in a spot that is not too warm.

My almond cookies flatten in the oven, help!

There can be two reasons for this:

  • The egg whites were not whipped stiff enough.
  • Too much air has escaped from the batter when you folded it in.

My cream is too liquid, how do I solve this?

If you’ve followed the steps in the recipe card and used the right ingredients, this shouldn’t happen. Have you let the cream set in the fridge? If so, the butter will continue to set, just make sure it’s not too firm to spread on the biscuits.

You may have used a little too much cream. In this case, you can add some extra butter and icing sugar to make the cream a little firmer.

Can I just use flour instead of almond flour?

No, unfortunately you can’t in this recipe for Dutch bokkenpootjes. The almond meringue cookies is what makes a bokkenpootje so typical and delicious. Without almond flour it would just be another cookie.

Can I use other types of chocolate?

Absolutely! You can really give your Bokkenpootjes a personal touch. Personally, I prefer to use Callebaut chocolate because I like the quality best. There are many different types: dark chocolate in many different shades, milk chocolate, white chocolate, gold chocolate, ruby chocolate. And on and on!

If you use white chocolate, you can also give it a color of your choice. In that case, make sure you use an oil/fat based food coloring.

Dutch bokkenpootjes recipe - almond meringue cookies 5

More Dutch cookies

Of course, there are many more typical Dutch cookies at Laura’s Bakery. Have a look at these recipes as well:

Or check out all the Dutch recipes.


Dutch bokkenpootjes

Print Recipe

No votes yet

Dutch bokkenpootjes – Almond meringue cookies

These famous Dutch cookies are called bokkenpootjes and are a delicious treat!

This recipe makes for 24 single layer cookies, but for 12 finished Dutch bokkenpootjes

Prep Time40 minutes
Cook Time20 minutes
Total Time1 hour
Servings: 12 cookies

Ingredients

  • 3 egg whites
  • 125 grams granulated sugar fine
  • 100 grams almond flour
  • 25 grams all purpose flour
  • 50 grams almond shavings

Cream + Dipping

  • 50 grams unsalted butter
  • 120 grams icing sugar
  • 1 tbsp vanilla extract
  • 1-2 tbsp double cream
  • 150 grams dark chocolate

Instructions

  • Whisk the egg whites with the sugar until it forms stiff peaks. Add the almond flour and all purpose flour and gently fold into the egg whites with a spatula.
  • Fill an icing bag with a round, smooth nozzle (approx. Ø 1 cm or 0.4 inch) with the almond mixture and pipe almond meringues about 9 cm (3.5 inch) long. Note: You will need 24 to make 12 meringue cookies.
  • Once all the meringues have been piped, you can cover them with almond shavings. Rub the almond slivers between your fingers and sprinkle them over the meringues.
  • Bake the meringues for 20 minutes at 350˚F/180°C (conventional oven).
  • When they have cooled, remove the meringues from the parchment paper and divide them into groups of equal size. Make the cream by mixing the butter, icing sugar, vanilla extract and whipping cream in a bowl until creamy. Fill an icing bag with the mixture.
  • Cut off the tip of the piping bag (or use a nozzle with a small hole) and pipe a thin layer of cream on half the meringue. Place the remaining meringue on top of the cream so that it looks like a bokkenpootje or goat's feet.
  • Put the meringues in the fridge for a while, while you melt the chocolate. Melt two thirds of the chocolate in a double boiler (au bain-marie), when melted remove the bowl from the heat and add the remaining chocolate. Continue to stir until all the chocolate is melted.
  • Remove the bokkenpootjes from the fridge and dip the ends in the chocolate. Place on a sheet of baking paper to allow the chocolate to set.
mini easter egg blondies WM-4

It’s almost Easter! And I love creating fun and surprising variations of some of my favorite recipes. Today I’m sharing my take on Easter egg blondies. Blondies are one of my favorite takes on brownies. And these are not only fun to serve at Easter but they’re also great for using leftover easter candy.

Easter egg blondies

For making these chewy blondies I use Cadbury mini eggs. You can’t actually buy those where I live (the Netherlands) but I got a good supply of the mini cadbury eggs last year when I was in Chicago.

I was there around the same time of year and so the stores where packed with all sorts of Easter goodies. I packed a good portion of my suitcase full of the mini cadbury eggs as well as the pastel m&m and other sweet treats.

With the cute mini eggs I made these delicious blondie bars and I also made my new favorite chocolate chip cookies. (recipe will be up soon!)

mini easter egg blondies WM-2

What do you need for Easter blondies

Making this easy blondie recipe is not complicated. In case you don’t know the difference between blondies and brownies…. it’s pretty self explanatory.

Brownies are brown and blondies are blond. The color speaks for itself. But basically blondies are brownies without the chocolate. You can make white chocolate blondies of course, but the basic blondie does not need chocolate for the batter.

Blondies are a perfect treat and the best part is that adding the cadbury eggs gives the blondies an extra bit of crunch.

For full details check the recipe card but you will need the following ingredients at room temperature:

  • unsalted butter
  • light brown sugar – don’t go for dark brown sugar as that will impact the look of the blondies (unless you want them darker, then go ahead).
  • eggs
  • vanilla extract
  • all purpose flour
  • cadbury mini easter eggs – you can also replace these with M&M (easter eggs) or your favorite type of easter eggs. Make sure to leave some extra for decoration
mini easter egg blondies WM-1

How to make the mini egg blondies

To make the blondies you start by melting the butter. Add the melted butter with the sugar into a large bowl or use a stand mixer. Mix it with an electric mixer until smooth and creamy.

Now add the eggs one by one, mixing in between. Mix the vanilla extract in and the last step is to add the rest of the dry ingredients (flour and salt).

Next up: you will want to chop the eggs a bit smaller. Even though they are already small, it’s easier to eat and cut if you break them up a bit. Fold them into the blondie batter with a rubber spatula.

Now pour the blondie mixture into a square baking pan lined with parchment paper and use the spatula – if needed – to spread the mixture evenly. Sprinkle a few more of the eggs on top of the blondie batter and place in the preheated oven.

Now bake the blondies for approximately 25-30 minutes. The top should have a crisp thin layer and the inside can still be a bit wobbly. Always make sure to let it cool down completely before slicing.

A good blondie (or brownie) is crispy on the outside and fudgy on the inside.

mini easter egg blondies WM-3

Tips on baking the perfect blondies

Can I use a cake tester to check if the blondies are cooked through?

No you can’t. While you can use a cake tester for a regular cake recipe, in this case you don’t want the tester to come out completely dry as that will mean the blondies are overcooked. So you will have to use your eyes and common sense for deciding if they are cooked enough. The top should feel dry and if you hold the pan it shouldn’t wobble excessively if you’re shaking it (gently!)

How long should I mix the blondie batter?

Not too long! You want it to just come together and that’s enough mixing. You could even use a spatula.

How long can I store the easter egg blondies?

You can store them in an airtight container for about a week. Make sure to not put them into a fridge. That will dry out the blondies. Freezing is also an option for up to three months.


Mini Easter egg blondies

Print Recipe

No votes yet

Easter Egg Blondies

These cute Easter egg blondies are the perfect treat to serve during Easter or use them to get rid of leftover Easter treats.
Prep Time15 minutes
Cook Time25 minutes
Total Time40 minutes
Servings: 16 pieces

Equipment

  • 20 x 20 cm baking tin 8 x 8 inch

Ingredients

  • 225 grams unsalted butter
  • 350 grams light brown sugar
  • 2 eggs M
  • 1 tbsp vanilla extract
  • Pinch salt
  • 275 grams flour
  • 160 grams Cadbury Mini Easter Eggs
  • Extra Cadbury Mini Easter Eggs for decoration

Instructions

  • Melt the butter in a saucepan and place with the sugar in the bowl of a stand mixer. Blend butter and sugar until smooth. Add the eggs one at a time, beating in between.
  • Add the vanilla extract and mix for a while. Finally, add the flour and salt. Mix until completely incorporated.
  • Chop the chocolate eggs into smaller pieces and fold them into the batter with a spatula. Pour the dough into a baking pan lined with baking paper. Spread evenly.
  • Sprinkle a few more chocolate egg pieces over the top of the blondie.
  • Bake at 200°C/400˚F (conventional oven) for 25-30 minutes until golden brown. The top should have a thin crispy layer and the inside may still be a little wobbly, but firm to the touch.
  • Allow the blondie to cool and set completely before cutting into pieces.
Lemon raspberry tiramisu

Let me start by saying that you must try this tiramisu at least once. Whether that’s this weekend, next month, or during the holidays in December, you’ll want to taste this lemon raspberry tiramisu.

It’s easy to make and absolutely delicious. Although it doesn’t contain alcohol or raw eggs, you wouldn’t know it because it tastes like a real tiramisu. I decided to make the traditional tiramisu version (in terms of presentation not in terms of flavor!) because we’ve never done that before on the blog. The mascarpone set well, and the pieces were easy to cut. It’s a perfect tiramisu to serve and turn your plate into a party.

Why this recipe works

  • Refreshing – yes a tiramisu can be refreshing! With the delicious combination of raspberry and lemon this is one of my favorite tiramisu flavors
  • No eggs – I like to make my tiramisu without raw eggs. That makes it perfectly suitable for anyone!

Recipe ingredients

  • mascarpone – mascarpone cream is the essential young cheese to use for tiramisu. It’s just not the same without it.
  • heavy cream – or whipped cream. That gives the lemon-raspberry tiramisu it’s light and fluffy end result
  • lemon curd – the lemon curd flavors the mascarpone in a big way! You can add a bit of lemon zest if you want for added lemon flavor
  • ladyfingers – no tiramisu would be complete without a layer of the lady fingers
  • raspberries – this raspberry version uses fresh berries but you can also use frozen berries if you want. If you do make sure they are defrosted and that any excess juices are drained. You can definitely use the frozen raspberries for the sauce.
  • chocolate – for the topping I’ve used white chocolate but feel free to use any other kind of chocolate you like.

More tiramisu recipes

lemon raspberry tiramisu 3

How to make the lemon raspberry tiramisu

Step 1: Mix the mascarpone

In a mixing bowl of the stand mixer with a whisk attachment add the mascarpone cheese, heavy cream, lemon curd, and one tablespoon of sugar. Whisk this until you have stiff peaks and the mixture is smooth and creamy.

Step 2: Make the dipping mixture and build the layers

For the raspberry dipping sauce you mash the thawed raspberries with a little bit of water. Dip each ladyfinger into the mixture and place them in a single layer at the bottom of a serving bowl. Spread a little less than half of the mascarpone mixture over the cookies and smooth the layer.

Add a few fresh raspberries, flatten them a little with your hand before adding so they merge with the layers more easily. Instead of mixing the raspberries with water you can also use a bit of orange juice instead. Now repeat this step and finish all your ingredients.

Step 3: Add a topping

The last step is to scatter the remaining raspberries over the top of the tiramisu. Crumble one of the ladyfingers and sprinkle that over the berries. Refrigerate the tiramisu for at least an hour.

Step 4: Make the raspberry sauce

This tiramisu recipe is already delicious as it is but you can enhance it further by including the raspberry sauce. Add the frozen raspberries to a small saucepan and add the sugar. Bring to the boil. Mix the cornstarch with a bit of water to smooth out any lumps and add to the pan. Simmer until the sauce thickens. Pour into a small bowl and let it cool down.

Step 5: Serve

Once the tiramisu has set slice it into 4-6 pieces and serve with the raspberry sauce. Scrape a sharp knife over a chocolate bar and sprinkle those on top.

​Storing the lemon raspberry tiramisu

You can store the raspberry tiramisu in the fridge covered with plastic wrap for about 2-3 days.

It’s best not to freeze the tiramisu as the structure of the cream will change. It’s best eaten from the fridge!

Lemon raspberry tiramisu 2

FAQ lemon raspberry tiramisu

Can I use store-bought lemon curd, or should I make it from scratch?

Yes, you can use store-bought lemon curd for convenience, but homemade lemon curd offers fresher flavor and better control over sweetness and tartness.

What kind of raspberries should I use—fresh or frozen?

Both work!

  • Fresh raspberries give the best texture and appearance.

  • Frozen raspberries are fine, but thaw and drain them well to avoid watering down the dessert.

What type of ladyfingers should I use—soft or crisp (Savoiardi)?

Use crisp Savoiardi ladyfingers. They hold up better when dipped and layered, absorbing flavor without turning mushy.

How far in advance can I make it?

Tiramisu is best made at least 4–6 hours in advance (or overnight) to allow the flavors to meld. It keeps well for 2–3 days in the fridge.


lemon raspberry tiramisu

Print Recipe

No votes yet

Raspberry-Lemon Tiramisu

A deliciously flavorful and refreshing twist on the classic tiramisu. This tiramisu is sure to bring smiles to the table!
Prep Time20 minutes
Cook Time2 hours
Total Time2 hours 20 minutes
Servings: 6 people

Ingredients

  • 125 ml heavy cream
  • 250 grams mascarpone
  • 100 grams lemon curd
  • 1 tablespoon fine granulated sugar
  • 1 package ladyfingers
  • 50 grams frozen raspberries thawed
  • 250 ml water
  • 125 grams fresh raspberries
  • White chocolate bar

For the raspberry sauce:

  • 100 grams frozen raspberries
  • 25 grams of fine granulated sugar
  • 1 tablespoon cornstarch
  • 1 tablespoon water

Instructions

  • In a bowl, mix the whipping cream, mascarpone, lemon curd, and tablespoon of sugar for about 3-5 minutes until the mixture is creamy, firm, and smooth.
  • Mash the thawed raspberries in a small bowl, then add water.
  • Stir well. Dip the ladyfingers in the mixture. Arrange about 14 ladyfingers in a rectangular dish to form a base. Spread just under half of the mascarpone mixture over the ladyfingers. Take a few fresh raspberries, flatten them, and arrange them over the mascarpone.
  • Spread a little more of the mascarpone mixture over the raspberries, then place the remaining ladyfingers on top to form a new layer. Dip each ladyfinger in the raspberry water again. Spread the remaining mascarpone mixture over the tiramisu, then scatter the remaining fresh raspberries on top.
  • Crumble a ladyfinger and sprinkle the crumbs over the top. Refrigerate the raspberry-lemon tiramisu for at least one hour.
  • To make the raspberry sauce, strain the remaining raspberry water through a sieve. Pour it into a small pan. Add the frozen raspberries and sugar. Bring to a boil. Mix the cornstarch with water, then add it to the pan. Simmer until the sauce thickens. Pour the mixture into a small bowl or dish and let it cool.
  • Remove the tiramisu from the refrigerator and cut it into four to six equal pieces. Place the pieces on a cake plate and decorate with raspberry sauce. Run a sharp knife along the back of a chocolate bar to make chocolate curls, then sprinkle them over the tiramisu.
Vanilla cupcakes no milk -3

The perfect base recipe for vanilla cupcakes. With this easy cupcake recipe you have the perfect starting point for all your cupcakes. Add a vanilla frosting or any other kind of topping to your liking.

What are cupcakes?

Cupcakes are simply small (one-person) cakes baked in cupcake liners or in a cupcake tin. In the past, cupcakes were served at high tea and baked in teacups, which is probably where the name ‘cupcake’ comes from.

Instead of a scale most people also used a measuring cup, which is another reason for the name. While a lot of people still use cups for measuring dry and wet ingredients, for the most accurate result I would always suggest using a weighing scale instead.

Cupcakes are the perfect little treat to bake for many different occasions. From baby showers to birthday parties and whenever you feel like having a small treat. Decorating them in a variety of different ways is also great and a fun activity with kids (or adults!) as well.

Remember, cupcakes and muffins are not the same. You can read al about the difference between cupcakes and muffins here.

Vanilla cupcakes no milk -2

How to make cupcakes?

Making a basic vanilla cupcakes recipe is a good start if you want to learn how to make the perfect cupcake. This cupcake recipe makes exactly 12 cupcakes in a regular cupcake tin. I used my vanilla loaf cake recipe as the base of this recipe but I have adjust the quantities to match the tin and changed some of the proportions.

Another change is the fact that these vanilla cupcakes use less sugar. While you will eat your regular loaf cake usually without frosting, most cupcakes will contain a frosting like a vanilla buttercream frosting or a chocolate frosting. Since those are also quite sweet, it makes sense to make the cupcake batter less sweet.

What ingredients do you need?

The recipe calls for simple ingredients which you will be able to find in most grocery stores. I list them below for easy reference:

  • Self-raising flour – This is essentially all purpose flour combined with baking powder.
  • Granulated sugar – I like to use a superfine sugar.
  • Vanilla extract – can be replaced by vanilla bean paste or vanilla sugar.
  • Unsalted butter – at room temperature.
  • Eggs – 4 medium sized, which weighs about 50 grams each.

Other than that you need a large mixing bowl or use a stand mixer to mix the batter. An electric mixer will work as well.

Vanilla cupcakes no milk -4

The process

You start by adding the butter, sugar and vanilla together in the bowl of the stand mixer or whatever other large bowl you’re using. Mix this together until the color starts to get light and the texture creamy.

Now add the eggs one by one and make sure to mix the batter in between until the egg is fully absorbed into the batter. Now add the self-raising flour and the salt bit by bit until fully mixed. And that’s it. Batter is ready!

Now all you have to do is to add the vanilla cupcake batter into the cupcake liners. You can scoop the batter into the liners with a spoon but an ice cream scoop is a handy accessory to use for equal measured cupcakes.

Pop them into the preheated oven (350˚F or 175˚C. Top and bottom heat/conventional oven) for around 20 minutes and they are ready! Keep the oven door closed until they are baked.

Make sure to place them on a cooling rack before adding buttercream or another frosting.

What other cupcake flavors can I make?

As far as cupcake recipes go, this is the perfect base recipe with which you can create endless flavors. Think about adding some chocolate chips to the batter or a tablespoon of cocoa powder for a chocolate batter.

Or vary the flavor by adding a different kind of sugar, like brown sugar or coconut sugar. The fluffy texture of these cupcakes is perfect for many different variations. I will soon be sharing lots of different flavors.

Decorating the cupcakes

Baking the vanilla cupcakes is step 1 of the process. Step 2 – and the most fun – is to decorate them. You don’t need to decorate them if you don’t want to. They are delicious just as they are but any cupcake will look better with a pretty frosting on top. How the frosting looks is also greatly depending on which frosting tip you use. So you can definitely vary that as well.

And who doesn’t love a pretty decorated cupcake? You can decorate with buttercream, vegan buttercream or with fondant or marzipan. You can fill them with jam or fruit or decorate them in another way.

The most basic frosting is simply a glaze of icing sugar combined with a little bit of lemon juice (or water). Takes no time at all and is always tasty. Just drizzle it over the cooled cupcakes Or try and make these strawberry cupcakes. Adding some fresh fruit on top of the frosting is delicious and looks good too!

Vanilla cupcakes no milk -1

Some easy tips for the perfect vanilla cupcakes

Which cupcake tin should I use?

This recipe makes exactly 12 cupcakes, so it is handy to use a muffin & cupcake tin that holds 12 cupcakes at a time. Of course if you have other cake pans you can use those as well. Keep in mind that different shapes of cake pans or cupcake pans might mean that the total baking time can vary.

How do you get the cupcakes nice and flat?

The rule I always follow is to fill the moulds two-thirds with batter, this way I always get a good height. However, I usually have a little dome on top of my cupcakes. If you don’t want this, you can put a cutting board on top of the cupcakes after baking. This only works if you have baked them in a cupcake tin.

Why is there a crack in my cupcake?

The oven temperature was too high. Due to the temperature being to high, the batter will rise too fast causing it to crack. I will explain more about this in a future article.

Where can I buy the best cupcake liners?

You can buy cupcake liners just about anywhere. From the grocery stores to specialty baking stores. Both online and offline. I have an enormous amount of colorful cupcake liners in stock. I like my paper liners to be a bit firmer than the really cheap ones. I do always place them in a muffin tin to make sure they don’t fall apart when baking in the oven.

Why does my cupcake collapse?

Baked cupcakes are supposed to sag (or shrink) a little as they cool. But if they collapse too much, it could be because you over-mixed the batter, the batter was too moist, or the cupcakes just weren’t ready. Make sure to always test if they are done before taking them out of the oven.

How long should cupcakes be left to cool?

When your cupcakes are done (always check that a skewer or cake tester comes out clean), you can remove them from the oven. Leave them to cool in the tin for a few minutes, then take them out and place them on a wire rack to cool completely. This also works for cakes and biscuits.

How long to cool cupcakes before frosting?

If you want to add a buttercream to the vanilla cupcake it is essential that the cupcakes are completely cooled. Imagine adding butter(cream) to a warm cupcake. You can probably see what would happen.

Can you put cupcakes in the fridge?

The environment in the fridge is not ideal for cupcakes. It is best to keep them outside of the fridge in an airtight container for up to a week. If you have ‘wrapped’ your cupcake in fondant you can keep them even longer, as the wrapping ensures the cupcakes stay moist and delicious for longer.

How long are cupcakes good for?

As per above you can keep cupcake for about a week. But you can also add 3 to 4 cupcakes together in a freezer bag and freeze them. That way you can keep them for three months. Check this article on how to store cupcakes.

How can I make the vanilla cupcakes dairy free?

If you want to make dairy-free vanilla cupcakes you can simply replace the unsalted butter for a plant-based alternative. Since these are already vanilla cupcakes without milk that is an easy fix. The flavor of the final cupcakes will be slightly different but no less delicious.


Vanilla cupcakes no milk

Print Recipe

5 from 2 votes

Basic Vanilla Cupcake Recipe

The perfect basic recipe for vanilla cupcakes. With this cupcake recipe you can vary the flavors endlessly and with or without buttercream!
Prep Time15 minutes
Cook Time20 minutes
Total Time35 minutes
Servings: 12 cupcakes

Equipment

Ingredients

  • 180 grams unsalted butter
  • 135 grams (superfine) granulated sugar
  • 8 grams vanilla sugar
  • 4 eggs
  • 180 grams self-raising flour
  • Pinch of salt

Instructions

  • Cream together the butter, sugar and vanilla sugar in a bowl. Add the eggs one at a time, beating until well incorporated.
  • Gradually add the salt and self-raising flour, beating until the dry ingredients are incorporated.
  • Pour the mixture into the tins and bake for 18-20 minutes at 175°C/350℉ (conventional oven) until cooked through. Use a cake tester to check that the muffins are cooked before removing from the oven.
Ferrero rocher cupcakes-2

These Ferrero Rocher cupcakes will steal the show, that’s for sure. Not only that, they are delicious too. Not surprising, as I love chocolate cupcakes on their own, but add a chocolate buttercream and Ferrero Rocher chocolates and they literally take my breath away. It’s just the perfect match. I am very curious to hear what you think.

I would like to add that these cupcakes are a big bite and not light by any means. There is a Ferrero Rocher hidden in the center of each cupcake cupcake, and of course, as you can see, there is one on top of the buttercream for decoration. Delicious, but something to keep in mind if you are planning to make other tasty snacks.

What do you need to make these Ferrero Rocher cupcakes?

The basis of this cupcake recipe is a chocolate cupcake batter and you will need the following ingredients to make them. In addition you will also need cupcake liners, a piping bag and a muffin pan to place the cupcakes in. Also keep in mind that it helps to have all ingredients at room temperature before starting.

  • unsalted butter
  • granulated sugar
  • vanilla extract
  • large eggs
  • all purpose flour
  • cocoa powder
  • baking powder
  • And of course Ferrero Rocher candies – you will need a total of 16 for these 8 cupcakes

And for the Nutella buttercream you also need Nutella and extra cocoa powder. For making the Nutella frosting I used this basic buttercream recipe.

Ferrero rocher cupcakes-3

Making the cupcakes

The process for making the Ferrero Rocher cupcakes starts with creaming the butter and the sugar until light and airy. You can do this the easiest way in a stand mixer with the paddle attachment. Or use a large bowl with a hand mixer. Takes a little more effort but totally do-able.

Once the butter and sugar mixture is creamy you add the vanilla extract and the eggs one by one. Make sure that the first egg is fully incorporated before adding the next one! Lastly you add the flour, baking powder, cocoa powder and salt and mix until all the dry ingredients are incorporated into the wet ingredients and you have a smooth batter.

Now divide the batter over the 8 cupcake liners (placed in the cupcake tin) and place a Ferrero Rocher candy in all cupcake cases. Just press one in the center of the cupcake and cover with a little bit of batter on top. You can make a small hole with a small spoon before doing so but the batter should fold around the Ferrero Rocher chocolate easily.

Bake the Ferrero Rocher cupcakes in the oven in about 18 minutes. Once golden brown and cooked through let them rest in the tin for a little bit before taking them out of the muffin tray and letting them cool completely on a cooling rack.

Ferrero rocher cupcakes-1

Finishing and decorating

While the cupcakes are cooling down you can make your Nutella buttercream. Once the cupcakes are cooled completely you can make a lovely swirl on top of each cupcake and place an extra Ferrero Rocher chocolate on top of the cupcake. The perfect cupcakes for all special occasions. For an extra festive look you can add some gold sprinkles as well.

If you don’t want to add another Ferrero Rocher to the cupcake you can add some chopped chocolate instead. They also taste good with just a bit of chocolate ganache or whipped heavy cream.

Undecorated cupcakes can be kept in an airtight container. Keep in mind that you should keep it outside of the fridge. Placing them in the fridge will result in dry cupcakes.


Ferrero rocher cupcakes

Print Recipe

No votes yet

Ferrero Rocher cupcakes

Put these Ferrero Rocher cupcakes on the table for a festive chocolate treat with a surprise inside!
Prep Time10 minutes
Cook Time20 minutes
Total Time30 minutes
Servings: 8 cupcakes

Ingredients

CHOCOLATE CUPCAKES

  • 90 grams unsalted butter
  • 70 grams fine granulated sugar
  • 1 tsp vanilla extract
  • 2 eggs M or L
  • 80 grams all purpose flour
  • 10 grams cocoa powder
  • 1 tsp baking powder
  • Pinch salt

CHOCOLATE BUTTER CREAM

  • 0.5 portion buttercream according to recipe
  • 5 tbsp Nutella hazelnut paste
  • 1.5 tbsp cocoa powder

EXTRA

  • 16 Ferrero Rochers

Instructions

  • Cream together the butter and sugar. Add the vanilla extract and the eggs one by one. Do not add the next egg until the first one is fully incorporated.
  • Finally add the flour, cocoa powder, baking powder and salt and mix until the dry ingredients are incorporated into the batter.
  • Take a stainless steel muffin tin and place cupcake liners in the baking pan, divide the batter between the moulds. Press a Ferrero Rocher into each cupcake and place a little of the batter on top to cover it. The batter will continue to rise in the oven.
  • Bake for about 18 minutes at 180°C/350˚F (conventional oven).
  • Leave the muffins to rest in the tin for a while, then place them onto a wire rack to cool completely.
  • Make the buttercream according to the instructions. Mix in the Nutella spread and cocoa powder at the last minute. Taste to see if the chocolate flavor is strong enough, if not you can add more cocoa powder.
  • Take an icing bag with a star nozzle (I used a Wilton 2D) and pipe nice low swirls onto the cupcakes. Press a Ferrero Rocher onto each swirl and your cupcakes are ready to steal the show.
Cheesecake filled easter eggs 3

Today’s recipe is super fun. It’s a cheesecake filled Easter egg! Delicious creamy no bake cheesecake with homemade lemon curd inside of a chocolate egg.

The idea is to make the eggs look like ‘real’ eggs with a bit of egg yolk in the middle, that’s what the lemon curd is used for. It’s super easy to make, fun to present and very tasty too. What more can you want?

Cheesecake filled easter eggs

I initially made this recipe for one of my books, but because it is such an easy and fun recipe I figured I should share it here as well. I love simple recipes like this.

It’s good to know that my chocolate easter eggs where roughly the size of a regular medium egg. Of course you can use any shape and size of egg you want. You could even use one half of an chocolate egg.

There will be more fun easter recipes coming up in the next couple of days so be sure to check them all in the easter recipes category.

Cheesecake filled easter eggs 1

What do you need to make chocolate easter egg cheesecake

As always make sure the ingredients are at room temperature and double check the recipe card for the full details and instructions. This is a no bake cheesecake filling. Obviously as baking a chocolate egg would result in a melted chocolate puddle 😉 . Not exactly what we’re going for.

  • chocolate eggs – the color or flavor of chocolate doesn’t make a difference. You can use dark chocolate, milk chocolate or white chocolate. Arguably the white chocolate would look most like a ‘real egg’ but it really doesn’t make a huge difference.
  • cream cheese – go for full-fat cream cheese as the fat content will make the cream cheese firmer. I like using Philadelphia cream cheese but any brand that has firm cream cheese will do.
  • sugar – I used regular granulated white sugar
  • vanilla extract – you can also use vanilla essence or vanilla paste
  • whipping cream – or use heavy cream
  • lemon curd – either make this yourself or go for store bought

No special equipment is needed for this, but a food processor or electric mixer would come in handy for whipping the cream and the cream cheese.

How to make this fun easter treat

Making this easter egg recipe is super simple. You start by heating a large sharp knife in hot water. That is essential as you need a warm knife to easily slice through the chocolate eggs without breaking them. You only want to slice the top of.

While your knife is warming, remove all the wrappings of the eggs. Take your knife, dry it and immediately cut the top of the eggs. You might have to dip the knife back into the hot water when necessary. And that is the hardest part of this recipe. Easy right?

Next you add the cream cheese to a large mixing bowl and you add the sugar. Mix it with a whisk until creamy. Add vanilla extract and whip again.

Whisk or mix the heavy cream in another bowl until it has formed stiff peaks. Add the cream cheese mixture in and blend it together while the mixer is on low speed.

Add your cream cheese mixture into a piping bag and do the same with the lemon curd in another piping bag.

Cheesecake filled easter eggs 2

Making the actual filled eggs

Now take your egg cups and pipe the cream cheese in. Don’t fill all the way up as the lemon curd still need to go in as well.

Cut of a small bit of the piping bag holding the lemon curd. You do not want it to be too big. Insert the piping bag in the middle of your chocolate egg. Gently squeeze the lemon curd out and pull the piping bag upwards.

You want to end with some lemon curd on top of the cheesecake filling, so it looks like egg yolk.

It actually helps if you place the chocolate eggs in a fridge egg holder or something similar. Maybe you have an old egg carton you can use to hold the chocolate shells.

Tips on making the cheesecake filled easter eggs

I don't like lemon curd can I use something else?

Sure. You can use a bit of apricot jam for instance and insert that into the centre of each cheesecake egg. You might want to do that with a very small spoon instead of a piping bag as the jam would be a bit harder to use

How long can I store the cheesecake eggs?

You can store them in an airtight container in the fridge for 4-5 days. They will also be a little firmer once chilled properly. It does help to store them in the fridge using an egg holder too, otherwise they might tip over.

What size of chocolate eggs should I use?

You can use any kind of size you like. It all depends on how you want it to look. You can use a large chocolate egg or go for mini size. But keep in mind that you will need either more or less of the cheesecake mixture. I used eggs that were the same size as a medium ‘real’ egg.


Chocolate filled easter eggs

Print Recipe

No votes yet

Cheesecake filled Easter Eggs

Cheesecake in a chocolate egg? Why not! This vanilla cheesecake with lemon curd works great with chocolate, let me tell you. The fact that it looks like a boiled egg just makes it perfect.
Prep Time10 minutes
Cook Time10 minutes
Total Time20 minutes
Servings: 14 pieces

Ingredients

  • 14 hollow chocolate eggs
  • 150 gram cream cheese
  • 40 gram granulated sugar
  • 2 tsp vanilla extract
  • 100 ml whipped cream
  • 50 gram lemon curd

Instructions

  • Take a glass of hot water and put a sharp knife in it. In the meantime, remove all the wrappings from the eggs. Take the knife out of the water and dry with a towel. Now, carefully cut the top off the eggs. Dip the knife back into the hot water now and then.
  • In a bowl, beat the cream cheese with the sugar until creamy. Add the vanilla extract and mix. In a separate bowl, beat the heavy cream until stiff. Add to cream cheese mixture and mix on low speed.
  • Fill a pastry bag with the cream cheese mixture. Cut off the tip and fill the eggs with the cheesecake mixture. Don’t fill to the brim; you’ll need to add some lemon curd.
  • Put the lemon curd into a separate piping bag. Cut off a small tip, insert into the cheesecake and gently squeeze to fill. Gently pull the piping bag up until you can see some lemon curd coming out of the top.
Easy lemon bars recipe 4

For anyone who loves the fresh flavors of summer, you’ll want to make these easy lemon bars! These fresh summer cookie bars with a lemon curd-like layer are impossible to resist.

Best Lemon Bars

As early as spring, I start to crave summer flavors and use lemon in many of my recipes. Lemon bars are the perfect recipe to make at this time of year. And in the fall, I still can’t quite let go of those summer flavors. For those who want to hold on to that summer feeling a little longer, or for those who just love anything with lemon flavor, you have found the perfect recipe.

I first came across the concept of lemon bars years ago on Pinterest. After trying several recipes, I finally created my own version. In this recipe, you make a layer of shortbread with a fresh, creamy lemon layer on top that is reminiscent of lemon curd. If you love lemon curd as much as I do, you will definitely approve of these lemon bars! Because you bake the lemon layer in the oven with the pre baked shortbread, it blends in with the cookie base, making it incredibly delicious.

Easy lemon bars recipe 3

Lemon cookie bars

Do you love lemon? Then these lemon bars are sure to please. The cookie base is shortbread, and on top of that is a creamy lemon filling that tastes like lemon curd, but is a little different in terms of ingredients.

For example, there is no butter in the lemon filling, but there is a good amount of eggs, which provide the binding and firmness. The result is a delicious lemon bar that is perfect for high tea, a picnic or as a dessert. Also great for bake sales with a nice glass of lemonade.

About the ingredients

You don’t need much to make these classic lemon bars, but sometimes when a recipe is easy, you’ll want to be extra sure if you use the right ingredients. So I’ll make a quick list of the ingredients for this lemon bar recipe.

  • Unsalted butter: I always use unsalted butter for baking recipes. This way you can decide for yourself how much salt is needed in a recipe. And don’t forget: unsalted butter makes a perfect buttery shortbread crust for this recipe.
  • Sugar: You need this for the shortbread and the lemon layer. I always use fine granulated sugar for baking. It dissolves quicker than regular granulated sugar and it gives the perfect structure to the end result. If you can’t find fine granulated sugar, it’s perfectly fine to use regular sugar. The fine sugar just has my preference.
  • Flour: Also for the shortbread and a small bit for the lemon layer. You’re perfectly fine with all purpose flour for this recipe. You could use a gluten free flour if you want to make gluten free lemon bars, but I haven’t tested this myself. But I do know some of my follower did and were very pleased with the result.
  • Eggs: For the lemon layer I used 4 medium eggs. A medium eggs weighs about 50 grams without their shell.
  • Lemons: The most important part of this recipe. I just use regular fresh lemons, no need for special types of lemon. You will need the lemon zest and the fresh lemon juice of both lemons for the lemon layer in this recipe.
  • Powdered sugar: For the finishing touch: sprinkle some powdered sugar on top of the lemon bars right before you serve them.

At last: all ingredients need to be on room temperature before you start making this easy recipe.

Easy lemon bars recipe 2

More Recipes with Lemon

As I mentioned before, I love to bake with lemon. If you love lemon bars, you will love my lemon curd! Everything is delicious with homemade lemon curd. I use it in a lot of desserts to, I really love lemon desserts.

Another delicious recipe is my perfect lemon loaf. I love this recipe and make it every summer, preferably several times.

Questions about Lemon Bars

How to freeze Lemon Bars?

Store them in an airtight container and place a sheet of parchment paper between the lemon bars to keep them from sticking together. They will keep fresh for up to 3 months in the freezer.

What is the difference between Lemon Bars and Lemon Squares?

There is no difference, both lemon squares and lemon bars are American names for the same thing: a shortbread cookie base topped with a creamy lemon layer.

Can I use store-bought lemon curd?

No, the preparation of the two lemon fillings is different and store-bought or homemade lemon curd will not work in this recipe.

My lemon bars are soft and not crunchy, how can that be?

They’re not supposed to be. The lemon layer somehow melts into the crunchy shortbread base and loses its crunch. That’s part of the charm of this recipe, a creamy lemon cake.

Can I substitute the butter?

According to other readers, you can use vegan butter/(hard) margarine to replace the butter to make dairy free lemon bars, but there will be a change in flavor.

Which baking pan did you use?

I used a baking pan, which is about 20 x 30 cm, but you can also use a 25 x 25 cm baking pan. You can use a metal pan, but a stoneware baking dish works too.

Easy lemon bars recipe 1


stacked lemon bars

Print Recipe

4.67 from 9 votes

Easy Lemon Bars

This recipe for easy lemon bars will appeal to almost anyone. These deliciously creamy lemon bars are perfect for high tea, a picnic, or just as a lemon dessert.
Prep Time15 minutes
Cook Time45 minutes
Total Time1 hour
Servings: 15 servings

Ingredients

​Shortbread

  • 240 grams unsalted butter
  • 100 grams fine granulated sugar
  • 260 grams flour

Lemon layer

  • 300 grams fine granulated sugar
  • 30 grams flour
  • 4 eggs M
  • 2 lemons: you'll need juice and zest (100-120 ml lemon juice)

Decoration

  • Powdered sugar

Instructions

  • Start with the cookie base. Combine the butter, sugar, and flour in a large bowl and mix until you have a firm dough. Line your baking pan with parchment paper and spread the dough as a even layer on the bottom of the prepared pan. Press firmly.
  • Bake for 25 minutes at 180°C/350°F (convention oven) until golden brown.
  • While the shortbread base is in the oven, you can start making the lemon layer right away. Put all the ingredients -sugar, flour, whole eggs, lemon juice and lemon zest- in a medium bowl and whisk until the sugar is dissolved. Let the mixture stand until the cake is ready.
  • Remove the golden brown cookie layer from the oven and pour the lemon mixture over it. Put your baking pan back in the oven.
  • Bake the lemon bars at 180°C/350°F for 20-25 minutes. The lemon layer should be firm but not rock hard. It’s okay if it’s a bit jiggly right out of the oven. It will set when it cools.
  • Allow the lemon bars to cool completely before cutting them into bars with a sharp knife. Sprinkle some powdered sugar on top of the bars before serving, it makes them look so pretty.
Laura Kieft   I

If you enjoy baking savory pies, a basic quiche and savory pie dough recipe is an absolute must-have in your repertoire. Crispy dough makes a savory pie even more delicious. That’s why I’m sharing an easy, basic recipe for a shortcrust pastry with you today.

Why this recipe works

  • Easy recipe – making this shortcrust pie recipe is super easy to do and super versatile too.
  • Endless options – once you know how to make a buttery quiche crust, the possibilities are endless.
  • Freeze the pastry – if you love baking savory pies and quiches, make the quiche dough in advance and freeze in portions so you’re never without.
  • Superior flavor – compared to a store-bought version a homemade quiche crust is so much better. It’s flaky, delicious and always the better option.

Ingredients for shortcrust pastry

The ingredients for the perfect quiche crust are very basic.

  • flour – I use regular all-purpose flour for making the crust
  • butter – it helps to use cold butter. Always unsalted by the way
  • egg – I use one egg which binds the pastry together
  • water – you need about 2-3 tablespoons of ice water

It helps to bake the quiche crust with a pie dish with a removable bottom.

Savory pie crust how to-1

The difference between quiche and savory pie

Both quiche and savory pie are savory, not sweet. The difference between these two savory pies is in the crust. A quiche is always made with a non-sweet shortcrust pastry crust and filled with a cream and egg mixture (+ additional ingredients).

A savory pie can be made with either shortcrust or puff pastry. This gives you more variety and allows you to experiment with different ingredients.

I previously shared the sweet shortcrust pastry, which you can find here. The biggest difference between the two is that one uses sugar and the other one doesn’t.

The difference between puff pastry and savory pie dough:

The recipe below is for a quiche with savory pie dough, which is a shortcrust pastry. Almost everyone is familiar with its sweet counterpart, which is used for instance for these cute little mini lemon meringue tartelettes.

This savory version results in a crispy, crumbly base and is easy to make. Simply mix all the ingredients and knead them into a ball. You don’t need a food processor to do this, although you can if you want to.

Puff pastry is a different story. For example, it contains a lot more butter. This gives it a different taste and texture. Puff pastry is lighter because it flakes when baked.

To make puff pastry, you have to laminate it by folding the butter into the dough several times. This technique is more labor-intensive and requires more resting time in between.

I never use puff pastry for large savory pies, but I do use it for small savory tarts and flat tarts.

More reading:

Pizza salami quiche

Tomato quiche

Storing the shortcrust pastry

Storing in the fridge

You can store the short-crust pastry in the fridge for up to 3 days. Make sure to wrap it tightly in plastic wrap to prevent drying out.

Storing in the freezer

Storing the pie crust in the freezer is a great way to make sure you always have supply. You can even freeze the crust in tin, place it in a freezer bag, and bake the frozen pie crust straight away from the freezer. Otherwise defrost it first and roll dough so it can fit into a pie plate or tart pan.

In the freezer, the dough keeps up to 3 months.

Quiche crust and shortcrust pastry: tips

How do I prevent a soggy bottom?

There are several tricks to ensure that the base of your savory tart is cooked through. One method that always works is blind baking the base, which gives it a head start before the quiche filling goes in. The filling always cooks faster than the base. You can read more about blind baking here. You can use pie weights or dry beans to blind bake the quiche.

If you often have trouble cooking the base, it helps to cover the top of the quiche and place it as far down as possible on a closed baking sheet (to conduct heat). After the specified baking time, remove the quiche from the tin and bake it again for 10–15 minutes so that both the top and bottom are browned and cooked through.

This last step always works very well for me. I usually bake a quiche well in advance, and this is how I reheat it. I bake it without the pan, directly on the baking tray with parchment paper underneath. The result is always an evenly browned quiche with a delicious flaky crust.

What kind of quiche pan do you use?

I prefer not to use a ceramic quiche pan, even though I think they’re beautiful, because they take longer to conduct heat, making it more challenging to cook and crisp the crust.

One last tip is to use a quiche pan with holes in it. This allows the crust of your quiche to bake better and become crispier. A removable bottom is always a bonus.

Can I freeze this savory pie dough?

Absolutely! Just wrap it tightly in an airtight container, and store it in the freezer for up to three months.

How should I reheat a savory pie?

I prefer to reheat it without a baking tin, placing the tart directly on a baking sheet lined with parchment paper. Once the top is browned, cover it with aluminum foil. Bake the quiche for 10–15 minutes at 180˚C/350˚F.

How should I reheat a frozen savory tart?

If you choose to defrost the tart first, do so in the refrigerator or using the defrost setting on your microwave. Then, follow the steps above. The same applies to a frozen quiche or savory pie, but bake it for 10 minutes longer.


Savory pie crust - shortcrust pastry

Print Recipe

No votes yet

Quiche crust (shortcrust pastry) recipe

Ready-made tart shells are a thing of the past. With this basic recipe for savory shortcrust pastry, you can make the most delicious quiche and tart crusts yourself!
Prep Time15 minutes
Cooling time30 minutes
Total Time45 minutes
Servings: 1 pie

Equipment

  • 28 cm quiche pan (11 inch)

Ingredients

  • 300 grams all purpose flour
  • 150 grams unsalted cold butter
  • pinch salt
  • 1 large egg
  • 2-3 tablespoons cold water

Instructions

  • Combine the flour, butter, salt, egg, and two tablespoons of water in a bowl. Mix until a smooth dough forms. If the dough is still crumbly, add a third tablespoon of water. The dough should be firm but not too dry.
  • Wrap the dough in plastic wrap and let it rest in the refrigerator for half an hour. In the meantime, start preparing the filling for your quiche.
  • Roll the dough out on a floured surface until it is slightly larger than your quiche pan. To line the pan, I roll the dough around my rolling pin and then place the pan on top, carefully rolling the dough out over the pan.
  • Press the dough firmly into the corners of the pan, then trim off the excess edges. Prick the bottom of the dough with a fork. Always do this, even if you are blind baking the quiche.
  • Baking time and temperature can vary depending on the quiche. However, you can use this basic recipe for any quiche or savory tart filling. After pricking holes in the bottom, follow the recipe steps for your quiche or savory tart.
  • As a general rule, I usually bake a quiche with a crème fraîche and egg filling for 30-35 minutes at 200°C/392˚F (conventional oven).