


How to freeze Lemon Bars?
Store them in an airtight container and place a sheet of parchment paper between the lemon bars to keep them from sticking together. They will keep fresh for up to 3 months in the freezer.


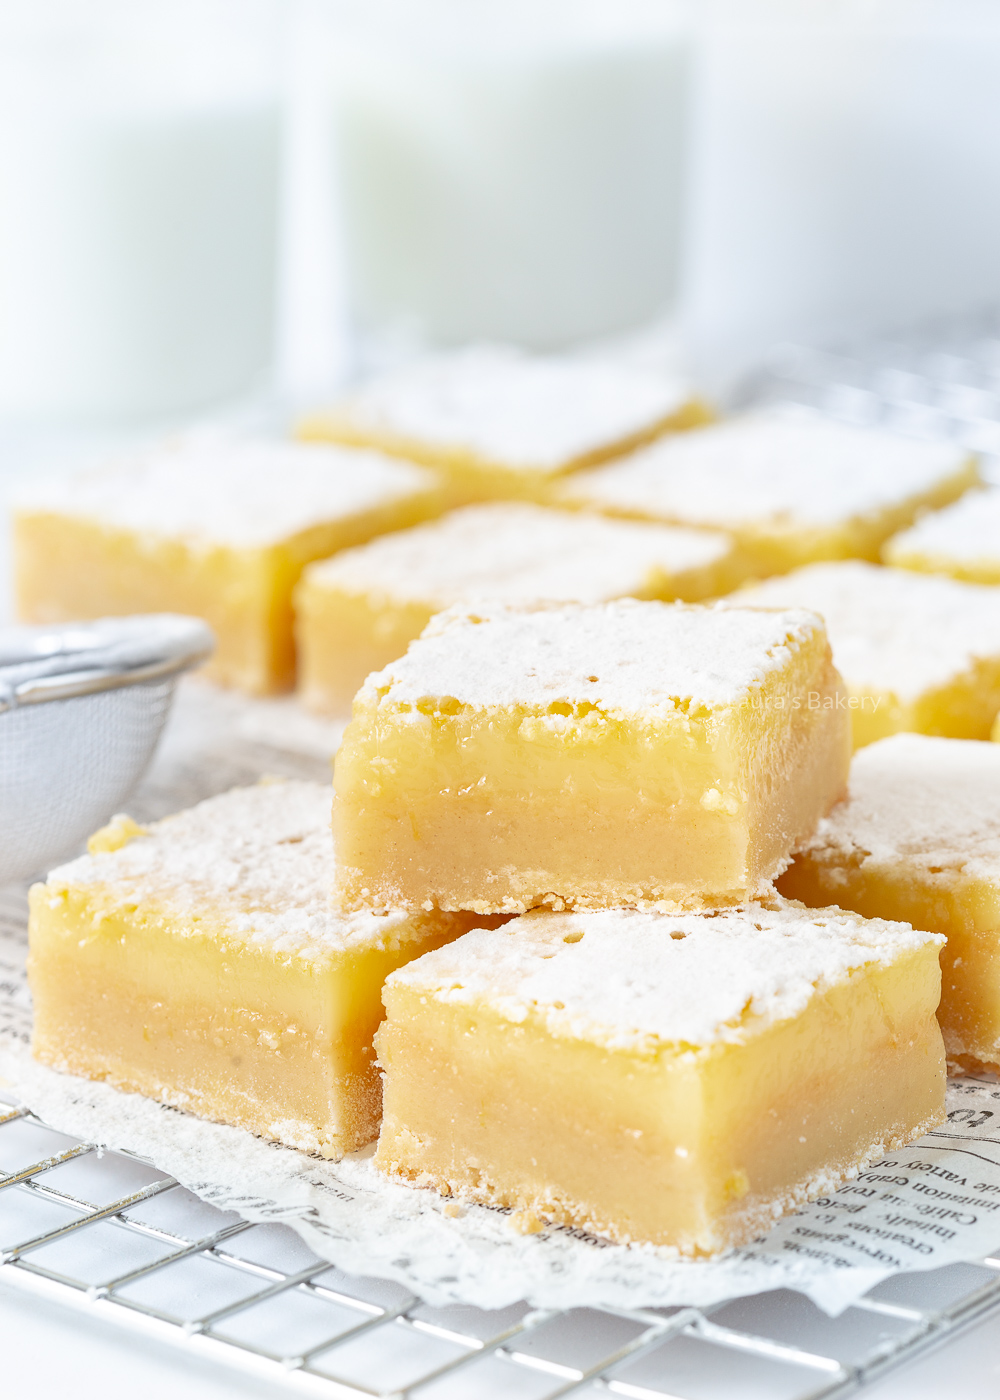
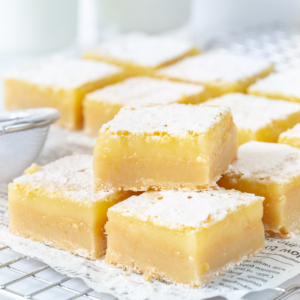
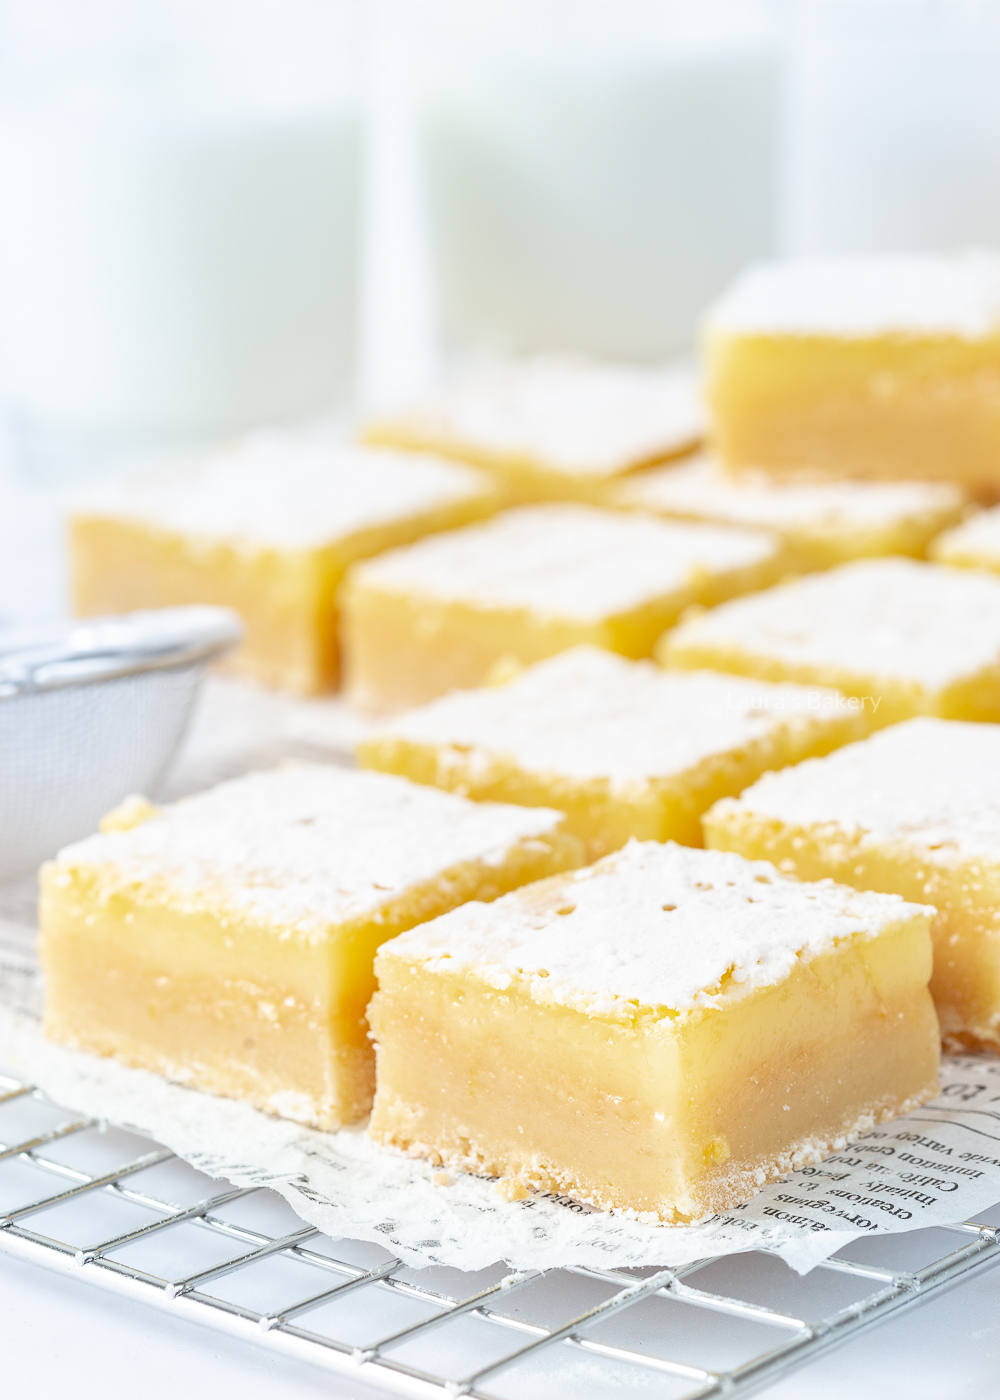
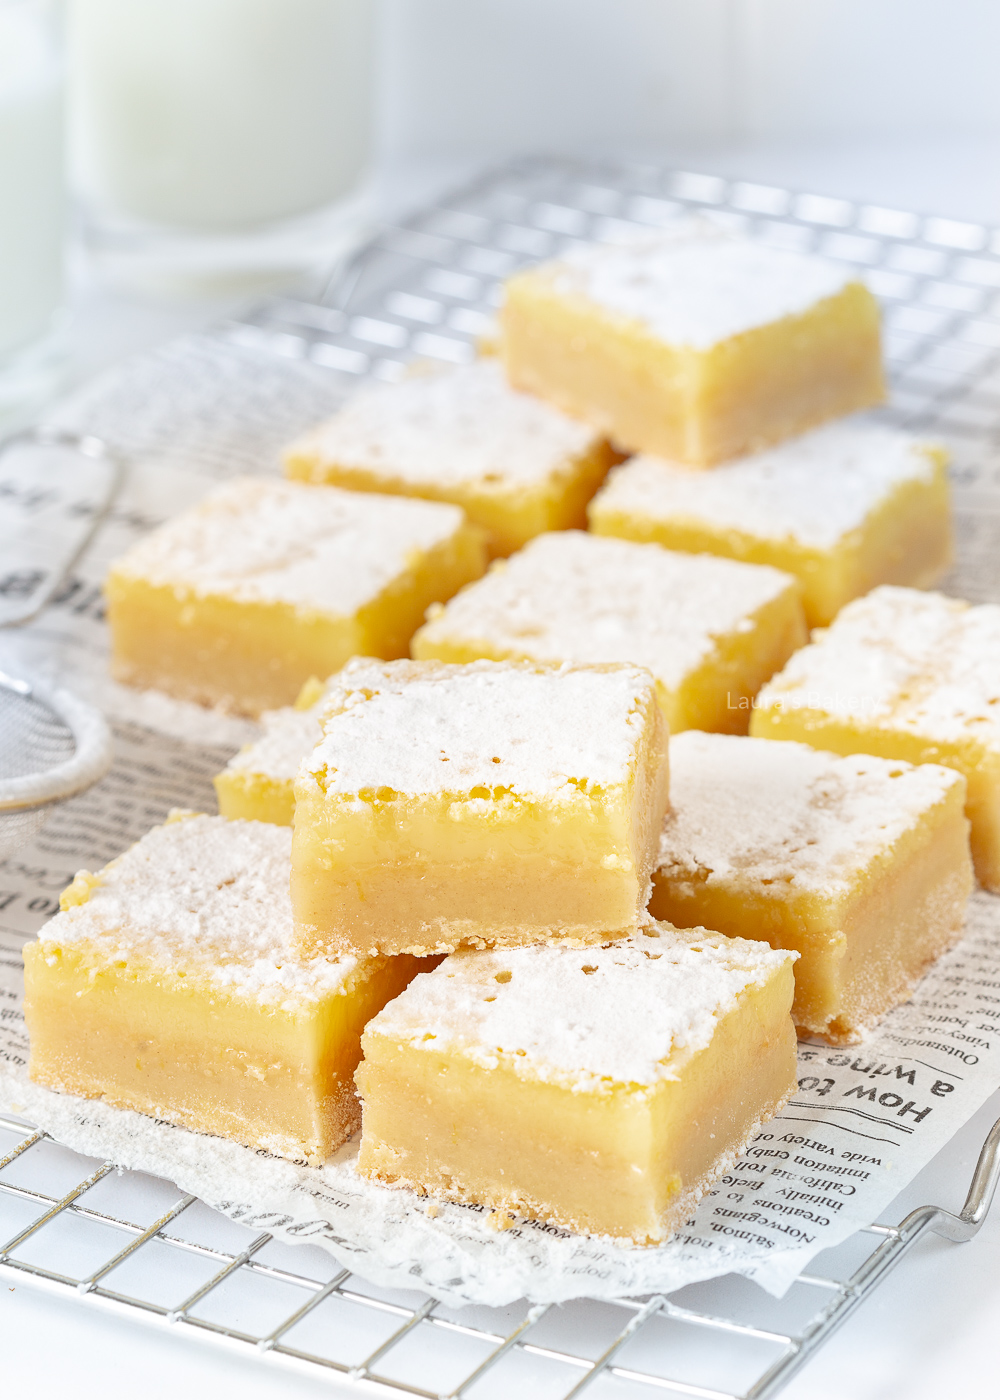
For anyone who loves the fresh flavors of summer, you’ll want to make these easy lemon bars! These fresh summer cookie bars with a lemon curd-like layer are impossible to resist.
As early as spring, I start to crave summer flavors and use lemon in many of my recipes. Lemon bars are the perfect recipe to make at this time of year. And in the fall, I still can’t quite let go of those summer flavors. For those who want to hold on to that summer feeling a little longer, or for those who just love anything with lemon flavor, you have found the perfect recipe.
I first came across the concept of lemon bars years ago on Pinterest. After trying several recipes, I finally created my own version. In this recipe, you make a layer of shortbread with a fresh, creamy lemon layer on top that is reminiscent of lemon curd. If you love lemon curd as much as I do, you will definitely approve of these lemon bars! Because you bake the lemon layer in the oven with the pre baked shortbread, it blends in with the cookie base, making it incredibly delicious.
Do you love lemon? Then these lemon bars are sure to please. The cookie base is shortbread, and on top of that is a creamy lemon filling that tastes like lemon curd, but is a little different in terms of ingredients.
For example, there is no butter in the lemon filling, but there is a good amount of eggs, which provide the binding and firmness. The result is a delicious lemon bar that is perfect for high tea, a picnic or as a dessert. Also great for bake sales with a nice glass of lemonade.
You don’t need much to make these classic lemon bars, but sometimes when a recipe is easy, you’ll want to be extra sure if you use the right ingredients. So I’ll make a quick list of the ingredients for this lemon bar recipe.
At last: all ingredients need to be on room temperature before you start making this easy recipe.
As I mentioned before, I love to bake with lemon. If you love lemon bars, you will love my lemon curd! Everything is delicious with homemade lemon curd. I use it in a lot of desserts to, I really love lemon desserts.
Another delicious recipe is my perfect lemon loaf. I love this recipe and make it every summer, preferably several times.
Store them in an airtight container and place a sheet of parchment paper between the lemon bars to keep them from sticking together. They will keep fresh for up to 3 months in the freezer.
There is no difference, both lemon squares and lemon bars are American names for the same thing: a shortbread cookie base topped with a creamy lemon layer.
No, the preparation of the two lemon fillings is different and store-bought or homemade lemon curd will not work in this recipe.
They’re not supposed to be. The lemon layer somehow melts into the crunchy shortbread base and loses its crunch. That’s part of the charm of this recipe, a creamy lemon cake.
According to other readers, you can use vegan butter/(hard) margarine to replace the butter to make dairy free lemon bars, but there will be a change in flavor.
I used a baking pan, which is about 20 x 30 cm, but you can also use a 25 x 25 cm baking pan. You can use a metal pan, but a stoneware baking dish works too.
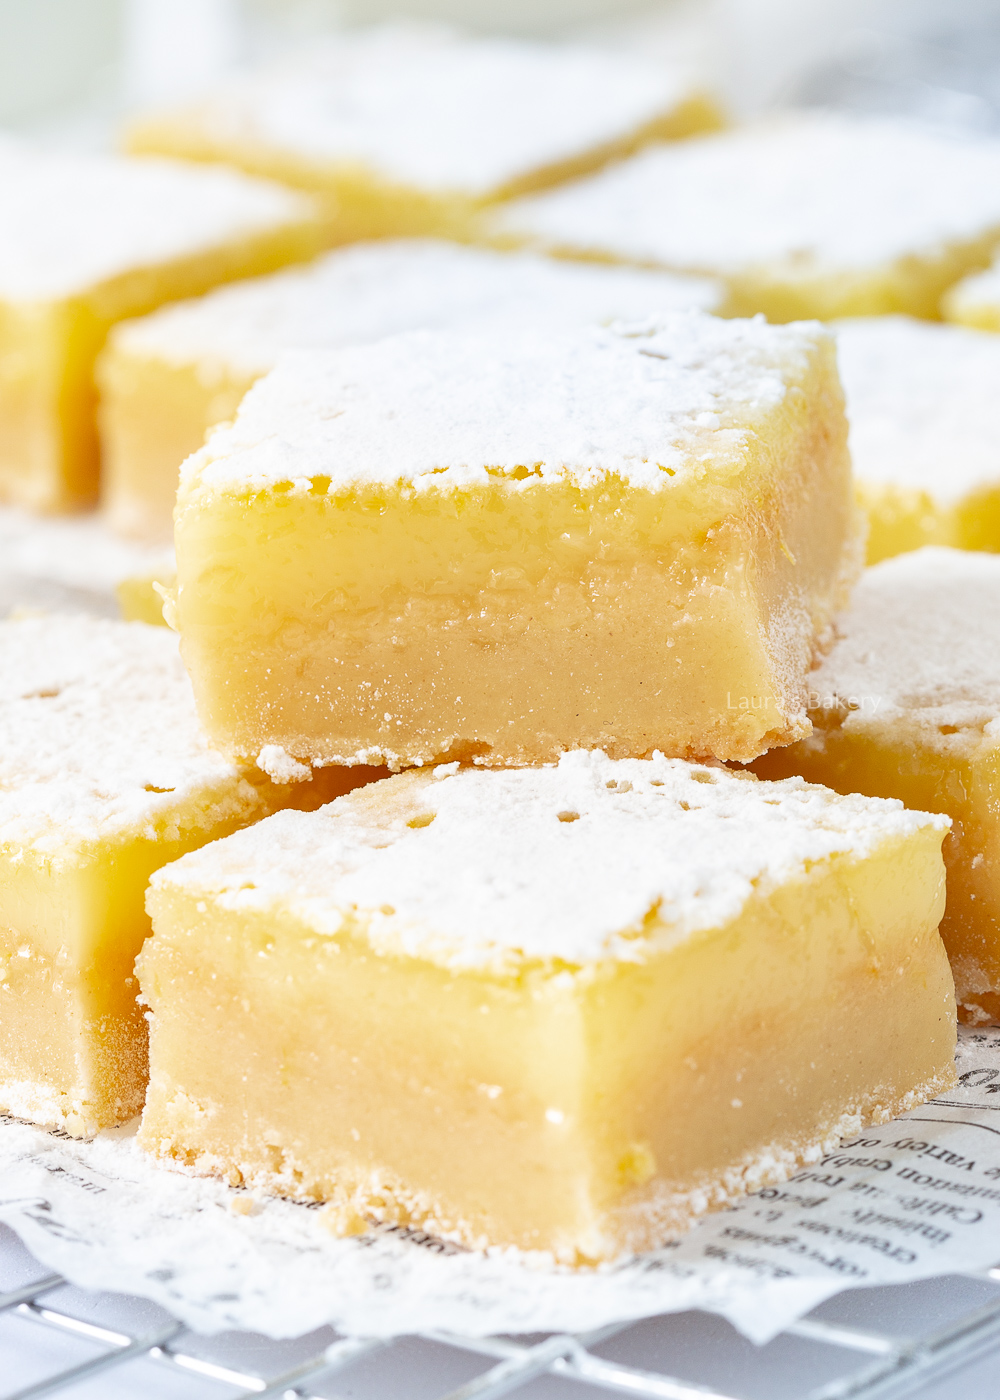

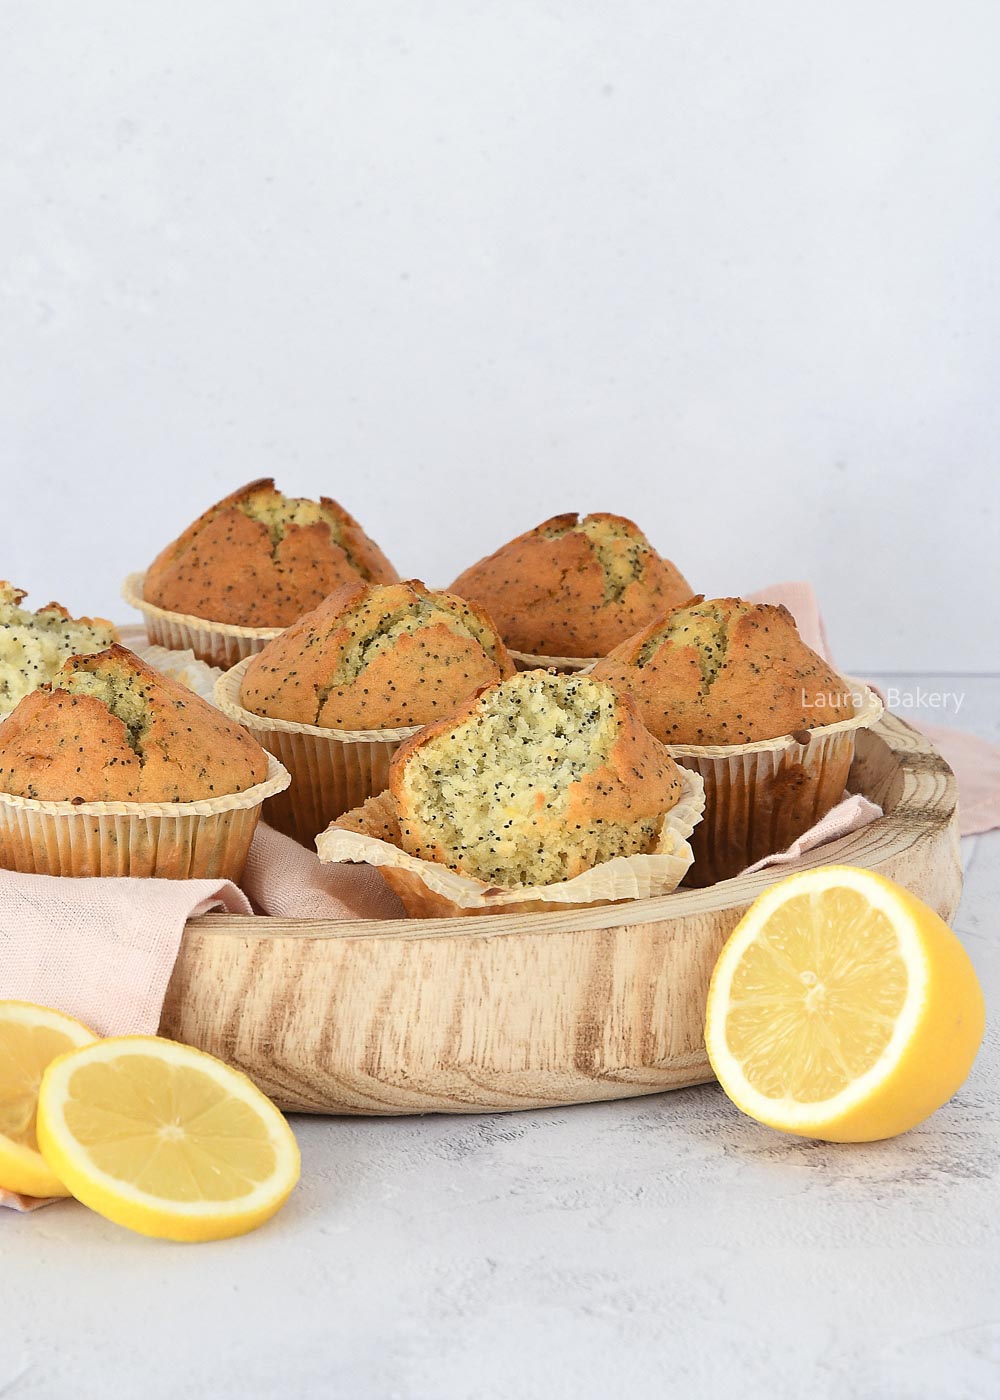
I have another delicious recipe with a perfect flavor combo: lemon poppy seed muffins! They are fluffy, moist, easy to make and one of my favorite muffin recipes.
These delicious lemon poppy seed muffins where first made for a photo shoot I did a few years back. At the time I wrote a weekly column for a Dutch magazine which always featured a new recipe plus a photo of me. Because we needed a few new head shots I figured it would be nice to make these lemon poppy seed muffins.
People often look at me a little crazy when I say I put poppy seeds in a batter (at least they do here in the Netherlands), but after they taste it, they are convinced.
I think the best example of this was when I was at a food market with the lemon poppy seed cake from my second book. I encouraged everyone with raised eyebrows (poppy seeds, in a cake? Why?!) to try a piece, and it was so funny to see everyone start laughing as they chewed. They loved it!
Since I like the combination of lemon and poppy seeds so much, I decided to combine them again, this time in muffins. I love muffins. In a few minutes they are in the oven and before you know it you are enjoying delicious muffins.
Making this lemon poppy seed muffins recipe is really super easy to do. I always love how easy it is to make muffins, and the lemon flavor in this muffin recipe is just so delicious! I love all things lemon, it’s my go to ingredient in spring and summer.
You need the following ingredients:
In addition to the above you will also need paper muffin cups, a muffin tin and a wire rack to cool down the muffins once baked.

The good thing about making any kind of muffin is that the batter is usually simply a matter of combining the dry ingredients with the wet ingredients.
You also don’t need to whip it for very long so a large bowl is usually enough. No need to use a food processor either.
Just mix the flour, sugar, baking powder, baking soda, salt, lemon zest and poppy seeds. Use a whisk to mix it through and use a separate bowl for mixing the wet ingredients. It’s ok if there are a few streaks of flour in the batter. And that’s all there is to it.
Place each muffin liner inside of your muffin pan and fill with the batter. You want the batter to be just below the rim of the paper so you will get nice round muffin tops.
Bake in the preheated oven until golden brown and cooked. The baking time is roughly 12-18 minutes.
I love making a quick batch of these muffins and freeze them for later use. Perfect to include in your weekday breakfast or as a snack and even better for lemon lovers!
For all my lemon lovers, here are a few recipes you might like:
What are your lemon recipes? Let me know in the comments below!
You can store these in an airtight container outside of the fridge for about 5 days. You can also freeze them for up to three months.
You can also use melted butter instead of the sunflower oil but the muffins will be a bit firmer as the butter solidifies at room temperature. But you can use it.
A lot of muffin recipes use sour cream or greek yogurt. They can pretty much be replaced in equal ratios. The flavor will be subtly different though.
Sure! If the crunchy poppy seeds are not enough you can add something like chocolate chip or add additional flavor to the batter by adding some vanilla extract or a teaspoon of lemon extract. You could even add pieces of candied lemon peel or a nice lemon curd swirl.
You can if you want to, but keep in mind that this recipe is called lemon poppy seed muffins so leaving them out would give you just lemon muffins. The closest in looks would be to use chia seeds. These do absorb a bit more moisture so you might want to add a bit extra of that.

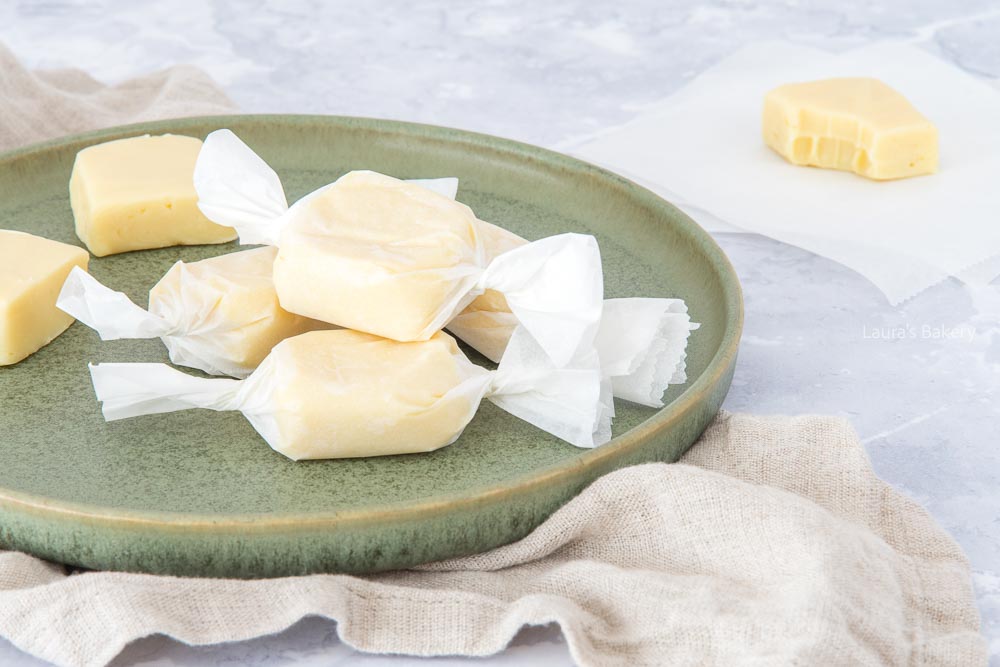
While I love being in the kitchen for more elaborate recipes, I also love the baked goods you can make in a pinch. Take lemon fudge, for example! Basically, this is a chocolate fudge made with white chocolate.
I also added lemon extract and lemon curd to make a deliciously fresh lemon fudge. Because of the additions, the fudge is a little softer and has a creamy texture, but that actually makes it even more delicious. I wrapped the pieces of fudge in sheets of parchment paper for storage.
Apart from being absolutely delicious, these also make a great gift to someone who loves that zesty lemon flavor. You can fill a bag, a tin or a jar with some wrapped pieces of the creamy lemon fudge and you’ll make someone really happy.
This recipe makes more than enough to fill your own candy jar. Plus it’s super easy and you need just a few simple ingredients.
In addition to the ingredients you need a square or rectangle pan lined with parchment paper to pour the fudge mixture in.
There are several methods for making fudge. A traditional fudge recipe would require the use of a candy thermometer and can be a bit more fiddly to get right.
I personally love easy fudge recipes and this lemon fudge is really quite simple. No need for thermometers or other fancy equipment.
Just melt, stir and cool. That’s basically all it takes. As always make sure to check the full details in the recipe card.
You only need a large saucepan where all the ingredients would easily fit in. Place the pan on low heat to maximum medium heat (you don’t want it to get too hot) and gently melt the chocolate.
Once the mixture is smooth and creamy you pour the fudge into your prepared pan or baking dish. Spread evenly with a spatula, cover with aluminum foil and place in the fridge for at least 4 to 6 hours to set.
Now if you are thinking of making this sweet treat into a lovely gift you can wrap each piece in a bit of parchment paper.
Wrapping also helps in storing it, because the lemon fudge is a little softer than normal fudge. So wrapping it makes it easier to handle.
When you’re cutting your fudge, do this straight from the fridge with a sharp knife. Don’t leave it at room temperature and then cut it as that will be more difficult.
I know I’m not the only one that loves those fresh lemon recipes. I share a few of my favorites, but know there are many more lemon recipes on the blog:
The recipe makes roughly 35 pieces of fudge, but that obviously depends on how big you cut it. Keep it small as it can be quite filling.
You can store the lemon fudge for 1-2 weeks in an airtight container in the fridge or freeze for up to three months
You can, but keep in mind that changing the ratios of the recipe might result in a different texture. Lemon extract is stronger but with less liquid. If you want to replace with lemon juice stick to only 2 teaspoons to keep the ratios equal.
Absolutely. Have some poppy seed leftover? (maybe after making my lemon poppy seed pancakes!) That would be a great addition. But you can also add crushed cookies or coconut flakes.
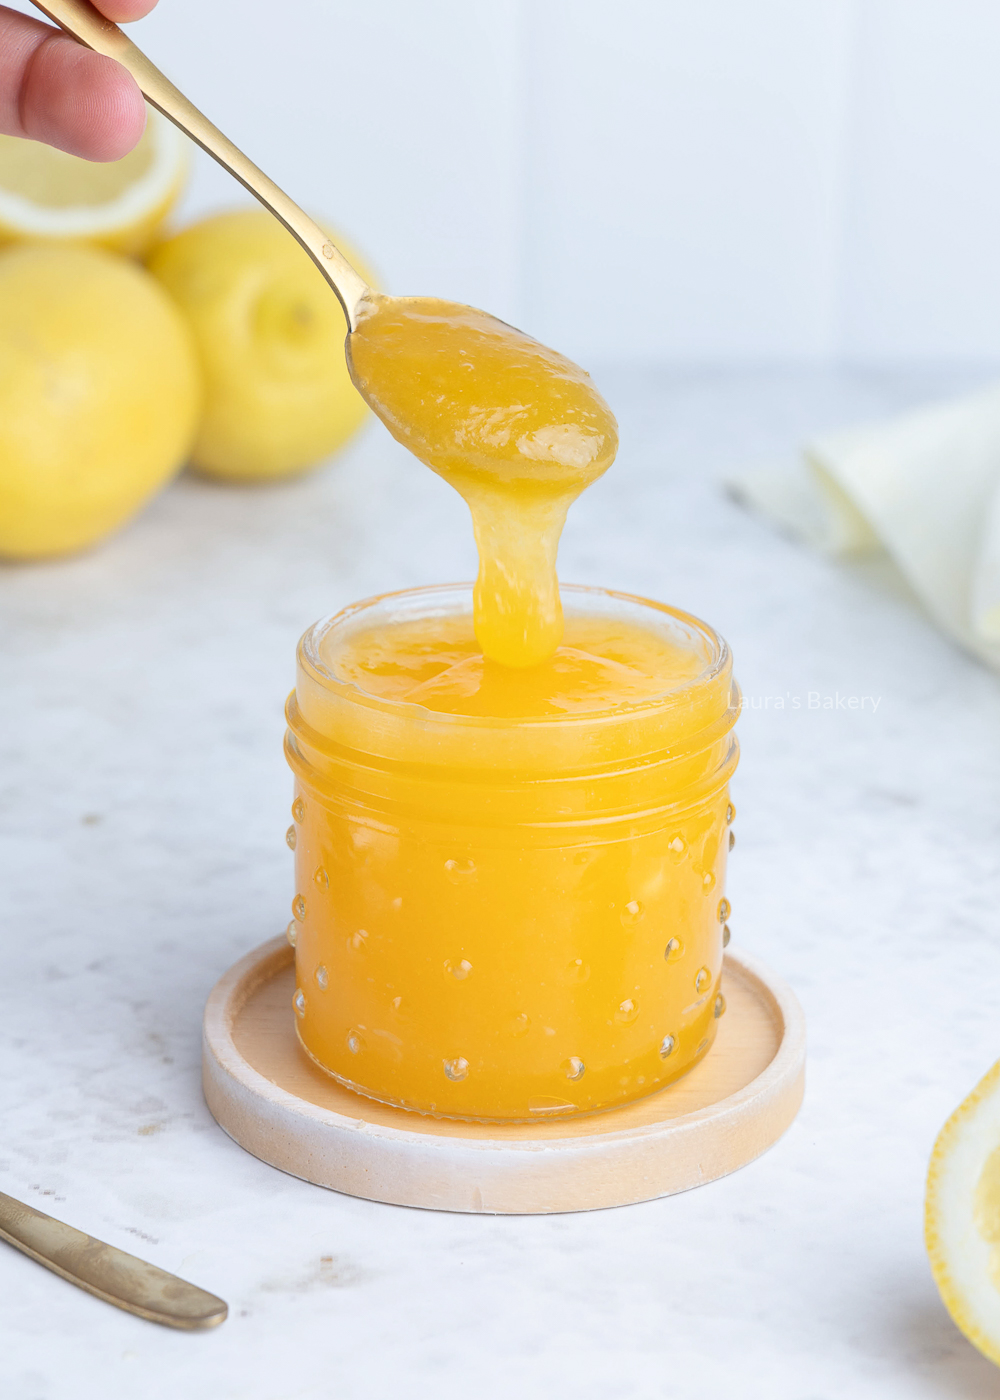
Making your own lemon curd is not difficult at all. With just a few ingredients, you can make your own fresh curd to use in a delicious lemon meringue pie, for example.
On my baking weekend last month, I made lemon curd for the first time. I have no idea why I hadn’t done it before. Since I was so eager to make lemon meringue pie, I wanted to get it right the first time and make the curd myself.
I made a big batch so I could make more recipes with it and make sure I had some left over to put in the yogurt (very tasty!). I didn’t think it would be so easy to make my own curd from lemons and a few other ingredients.
Baking tip: When you make a curd, you can store it in a sealed jar. I usually use glass mason jars.

The possibilities are endless with this delicious curd. Put a little in your yogurt, a scoop over an ice cream dessert, spread it on a cracker, and of course: serve it on homemade scones with clotted cream. Yes, it really is all delicious!
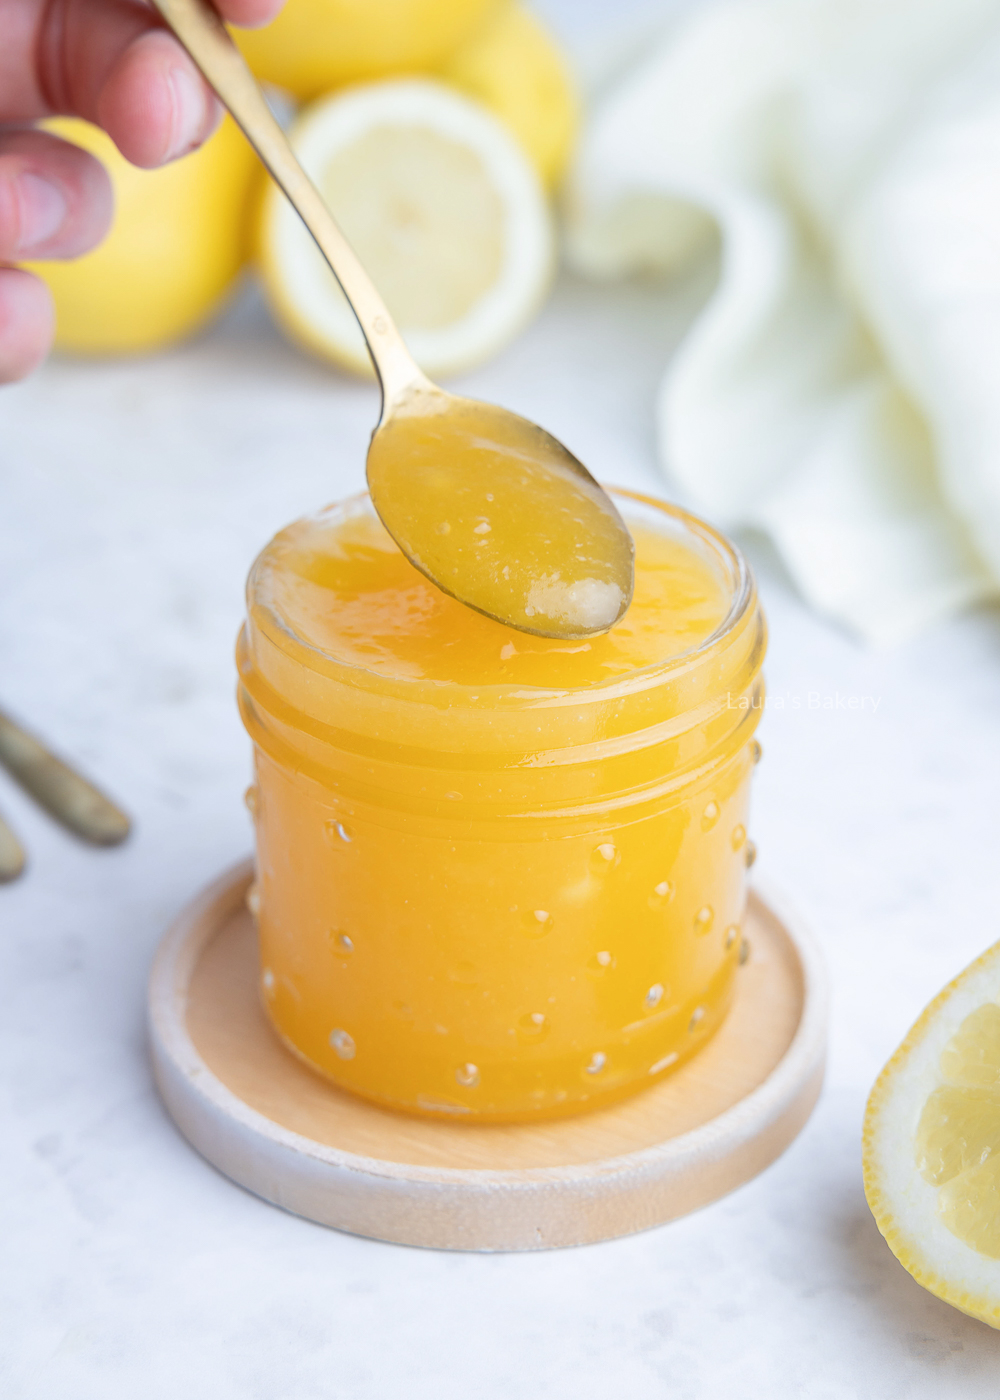
Other popular recipes with this curd are, of course, any recipes that combine the curd with meringue. Like lemon meringue pie. I also love lemon curd cookies, like thumbprint cookies with the curd in the center. I will post a recipe for those soon.
Lemon curd cake is also very tasty. For example, you can use this recipe for lemon loaf and serve it with whipped cream and your homemade curd. Or with ice cream, which is also very tasty!
BAKING TIP: Love lemon curd? Then you will also LOVE these easy lemon bars!

Yes, you can freeze any homemade curd! Once your curd has cooled, simply place the airtight, freezer-safe container in the freezer. You can store lemon curd in the freezer for up to a year.
Yes, you can. The au bain-marie process ensures that the curd does not get hotter than 100 degrees Celsius (the boiling point of water). Fortunately, harmful bacteria are killed above 70 degrees Celsius.
The curd has not been cooked long enough and needs to be heated au bain-marie longer. How long this takes can vary depending on the heat source and the thickness of the bowl (I never use a thick bowl). Also remember that the curd will continue to thicken as it cools.
If your curd is still not the right thickness after more than half an hour au bain-marie heating? Then you can add half a beaten egg (maybe your eggs were on the small side) or add some gelatin to the mixture and let it cool.
These are pieces of coagulated egg white, and you shouldn’t find them in your curd. It’s best to strain your curd to get rid of the white bits.
To prevent this from happening next time, make sure the heat is not too high when you add the egg and immediately stir it well, preferably with a whisk. Once the egg is incorporated into the mixture, it will no longer set. If the heat is too high and you don’t stir the egg immediately, it may solidify.
You probably used the white part of the lemon peel when you grated it. When using lemon zest, you want to use only the yellow part of the zest because the white part is very bitter and will give your curd a bitter taste.

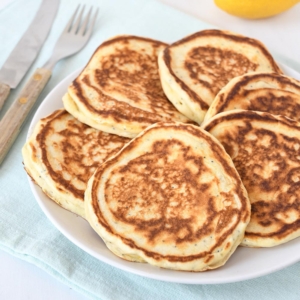
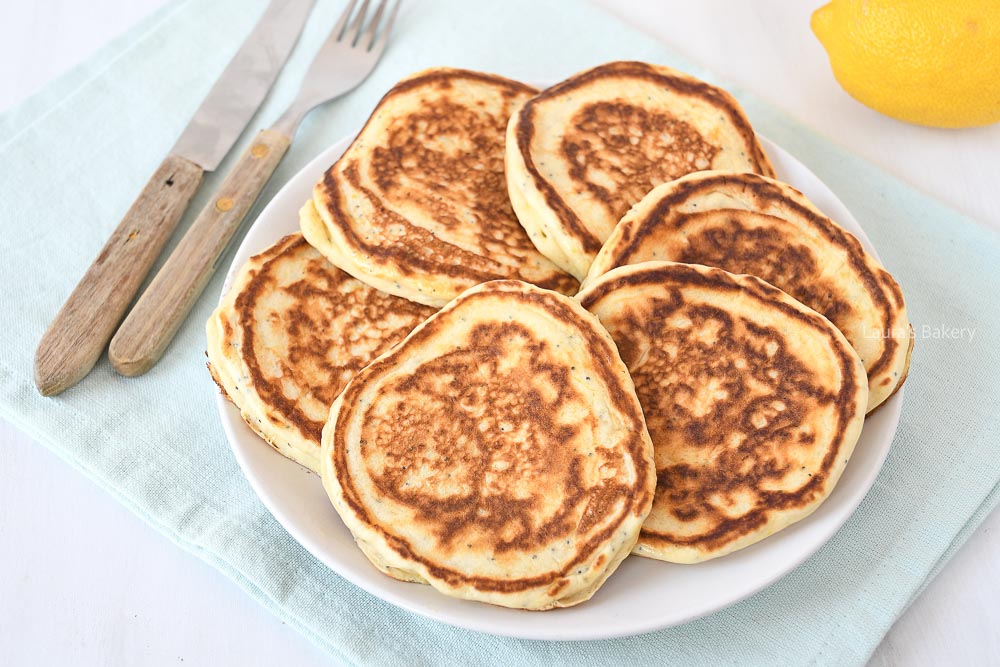
If you love pancakes, you’re going to adore these delicious fresh lemon poppy seed pancakes. Delicious for breakfast or lunch or a lazy Sunday morning, this easy recipe for homemade pancakes will get you started right away!
Poppy seed for baking may sound strange, but it is surprisingly delicious! Lemon poppy seed combinations are quite common in the US (not so much in The Netherlands, although it’s a bit more common now).
Think about lemon poppy seed muffins (my favorite muffin!) or lemon poppy seed bread. The list of recipes goes on and on!
Ever since I created a lemon poppyseed yogurt cake for one of my books, I am addicted to this delicious combination. So I wanted to do more with these two ingredients.
Be prepared for more recipes with these ingredients coming up soon. It’s that bright lemon flavor that does it for me every single time.
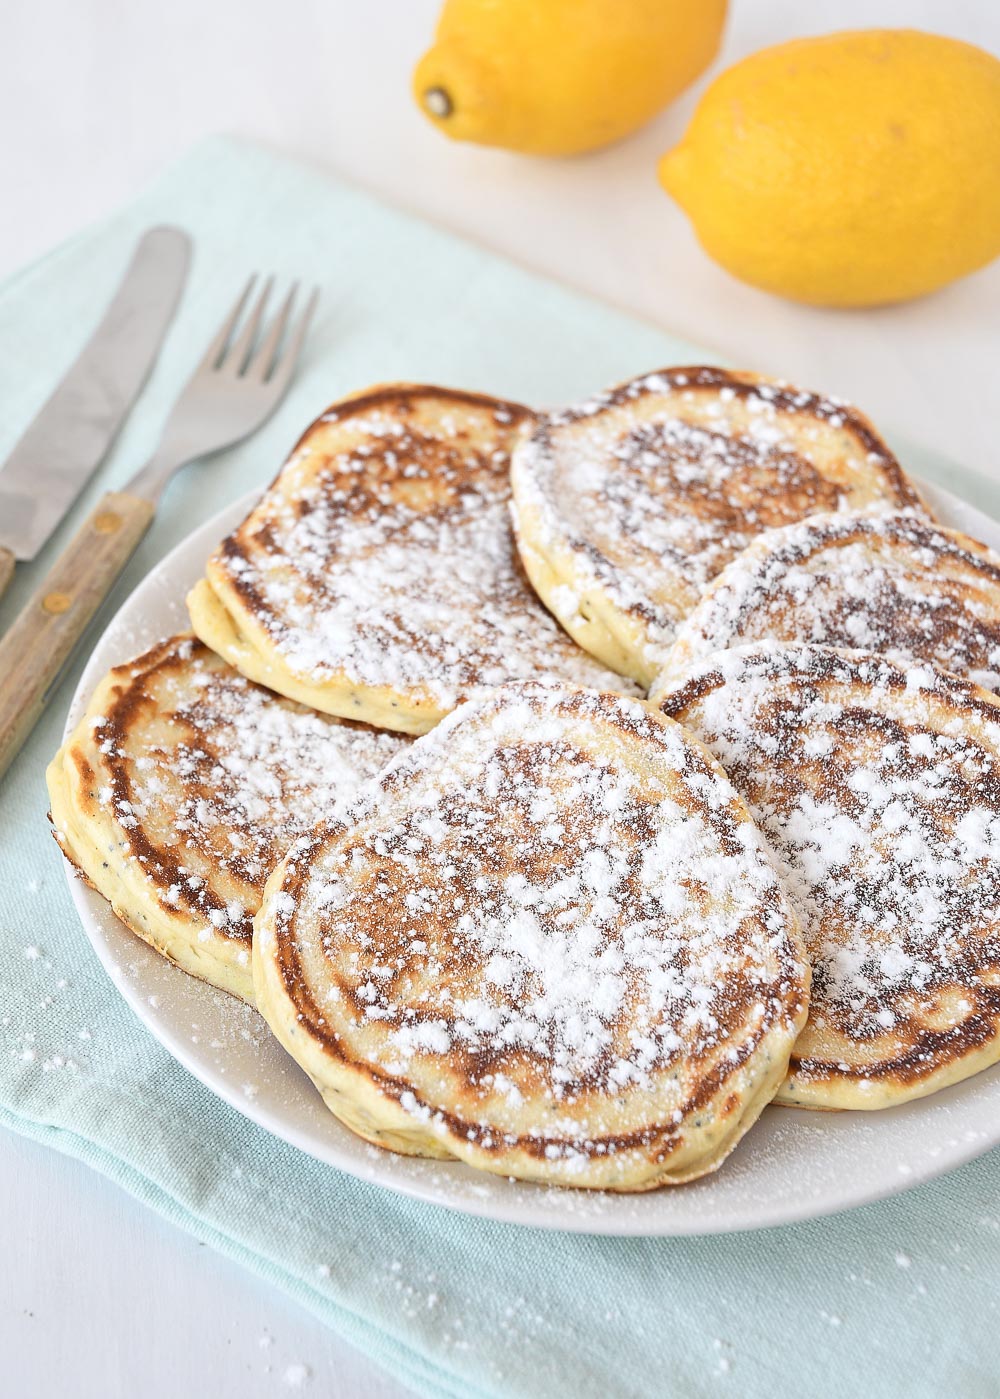
These fluffy pancakes are not difficult to make. You will need the following:
For baking these pancakes I use melted butter, but you can also use oil if you prefer. I like the butter better as it browns all pancakes recipes better in my opinion.
Take a large bowl and add the dry ingredients into the bowl. Mix it for a bit before adding the wet ingredients. Mix it all through. A few lumps is not a problem, it doesn’t have to be super smooth.
Now add enough butter into a large skillet (on medium heat) and add about a quarter of a cup of batter into the pan. I also like to use an ice cream scoop to pour batter into the pan.
Let it gently simmer on medium-low heat until the top of the pancake gets a bit dry and bubbly. At that point you can flip the pancakes and bake the other side until both sides are golden brown.
Add a little butter and repeat these steps with the remaining batter until all pancakes are done. You can serve the pancakes with fresh fruit, some warm maple syrup or a dusting of powdered sugar.
There will be more lemon and poppy seed recipes coming up soon but for now I do already have a few delicious lemon recipes lined up for you:

I use my homemade almond paste recipe in my baked goods a lot and it’s really easy to make this paste yourself. I love baking with this delicious ingredient, especially during the holiday season. Recipes with this almond filling are very popular for Christmas and the Dutch holiday ‘Sinterklaas’.
The almond paste recipe is very simple because it has a fixed ratio of almond flour to sugar. The amount of sugar and almond flour are always the same. Add a little egg and possibly some lemon zest to make it complete. I like the addition of lemon zest, but it’s optional. I share the simple steps in the recipe card down below, but first want to share some more information about the ingredients.
As you will see, my recipe has gram measurements. I did include a converter so you can see the ingredients in ounces. But I would advice to invest in a good scale, they aren’t expensive. It makes baking so much easier.

I’ve seen that American recipes for almond paste are sometimes a bit different than the Dutch recipes, so I thought it would be helpful to tell a bit more about the ingredients and why some things are different. Both recipes are similar enough to use interchangeable. Let start with the simple ingredients in my recipe:
And that’s it. Simple isn’t it? But now for the differences according to the American recipes for almond paste I’ve seen:
That’s all you need to know to make this homemade version of almond paste. The taste is amazing and way better than the packages of paste you can find in the baking aisle at your local grocery store.
Both in terms of ingredients and equipment, this recipe is simple. A bowl and a (wooden) spatula are all you need. And maybe a food processor or stand mixer if you want. Remember: make sure your ingredients are on room temperature before you start.

Almond paste is simply a mixture of mostly almonds and sugar. These are mixed together in equal parts with lemon zest and a little egg. The lemon zest is a flavoring and the egg ensures that the almond paste remains creamy and holds together well during baking.
The paste is used a lot in Dutch desserts. Think of Christmas cake, filled speculaas or cookies filled with almond paste. These are all delicious, typical Dutch treats with an almond paste filling.
But there’s more! I love a good almond cake myself. Oh, and have you tried almond croissants?! Make them at home with your homemade paste!
In my recipe you can read that for best results you should let the almond paste mature overnight in the refrigerator. By letting it ripen, the flavor becomes stronger and better. So if you start on time, it would be even better to let it mature in the fridge for a few days. No time at all? Just use the paste right away after you’ve made it, no problem at all.
No, it is not the same. Marzipan contains proportionally more sugar, and the recipe calls for icing sugar instead of granulated sugar.
It’s pretty obvious the recipe calls for almonds, but maybe you’re allergic to almonds or just don’t like them very much. Fortunately, you can make an alternative paste without almonds. For example, you can replace the almonds with pecans, macadamia nuts, or pistachios.
If you’re making almond paste, you probably also need a recipe that uses almond paste. I have a few of those recipes which I will share with you. Most of them are Dutch recipes, we somehow love to bake with it.
Homemade almond paste contains egg and is therefore not vegan. However, you can easily replace the egg in my recipe below with 30 ml almond milk or applesauce.
If you don’t have the time to make it yourself, you can of course buy it. You can find it in the baking section of any supermarket or in baking and cooking stores.
Yes, my recipe for homemade almond paste is gluten-free. Even store-bought should be gluten-free. Always check all packaging in the store if you want to bake gluten-free, sometimes cross-contamination can happen in a factory and this should always be mentioned on the packaging.
I’ve seen people use honey or even date syrup. So it’s possible, but I’ve never tried this myself. I’ve read that corn syrup can be used as well.
Depending on how much egg you knead through it, you can easily pipe the almond paste onto a pie base or cookie. In the case of a cookie, I would suspect that it is frangipane (almond cream), which also contains butter and is therefore a little softer and smoother. It’s perfect for fruit tarts for example.
I prefer fine granulated sugar.
Almond paste should not be eaten raw, it is always baked. Therefore, you can eat it as normal when you are pregnant.

Sometimes a question gets asked little or not at all, and then suddenly you get it several times a week. It is as if everyone suddenly has the same idea. I always find that rather peculiar. In this case, I’m talking about flavored buttercream or more specifically; how to flavor buttercream.
I think my basic buttercream recipe is absolutely fantastic but it is a basic recipe for a good reason. You can vary it endlessly! And with buttercream you can not only vary the flavor but also the color.
In terms of the different colors, you can simply use a gel food coloring, which is the easiest thing to do. But you can also use different ingredients for creating that effect while some methods also introduce a flavor along with the color. Another super easy way to do this is to add different extracts (like vanilla extract) to the buttercream.
So flavoring buttercream is not difficult but there are few things to consider.
There is a lot you can do when introducing different flavors into your buttercream, but also a few things you need to be aware of.
Depending on what you’re adding you could run the risk of the buttercream becoming too liquid or thin. Which is obviously something you don’t want.

The two most important things to consider are moisture and temperature. Butter does not mix well with (too liquid) moisture, so neither does buttercream. A small amount of liquid is still an option, but it is wise to add this in portions.
Temperature is also really important. Make sure your flavor ingredients are at the same temperature as your homemade buttercream. If the temperatures are too different you run the risk of your buttercream splitting. Same goes for adding too much liquid.
Probably the most popular buttercream flavor is chocolate. And with good reason as chocolate buttercream frosting is easy to make and can be done in two different ways. The easiest way is to add unsweetened cocoa powder. Just add the powder to taste and you have the best buttercream frosting in chocolate flavor.
Another way to add chocolate is to add melted chocolate to the cream. Make sure you let the chocolate get to room temperature (just like the cream) and then fold it into the cream. You can use the bowl of a stand mixer if you want and do this at low speed with the whisk attachment. Although doing this by hand is just as easy.
You can make white chocolate cream this way (so good! I’ll share my recipe soon!) Or use your favorite chocolate bar, the sky’s the limit!
Using fruit to flavor your buttercream is also very good, but can sometimes be a bit tricky. You can put pieces of fruit through the cream, which is easy (and tasty!). But if you don’t want pieces of fruit, but a fruit flavor, you have to be a bit more careful.
You will be using fruit puree or fruit juice, which brings me back to the question of moisture. In order to avoid the risk of the mixture splitting you can boil down your (for instance) strawberry puree for making strawberry buttercream to reduce the amount of liquid in the puree.
This way you have evaporated most of the moisture and you’re left with a more concentrated flavor and a thicker liquid. You want the right consistency between the frosting recipe and the flavor you’re adding.

An alternative is to use jam, which can also be used to flavor your buttercream. However, do not add too much. There will be a tipping point where your mixture becomes runny and it is difficult to predict when this will happen. So keep adding small amounts and test in between to see if the flavor is right. That is the best way to avoid having the mixture split.
Now I have given you the tips for the requests I receive most often, but there is so much more you can do. Think about adding lemon curd for instance for a lemon flavor, nut pastes (peanut butter, almond paste and such) are also a great idea for a more nutty end result. Use a delicious caramel sauce (or dulce de leche!) for a caramel buttercream, sprinkle bits of cookies through it or make a chocolate cream with bits of fresh fruit.
The possibilities are endless, and that’s the fun part!
And perhaps most importantly, here is my basic buttercream recipe which is an ermine frosting recipe that is perfect for adapting to your needs! You can use this base for all kinds of flavor combinations.
If you accidentally added large amounts of fruit puree into your buttercream a bit of powdered sugar might solve the issue. There is also a difference in how an ermine frosting recipe reacts as compared to an American buttercream recipe. Try and fix it by adding 2-3 tablespoons of icing sugar at one time. If the buttercream has gotten too warm placing it back in the fridge might also solve the issue.
Vanilla is the perfect cake to hold most flavor combinations. You can go classic and use strawberry but you can also make a classic vanilla buttercream frosting by using vanilla extract.
The perfect flavor to add to pumpkin would be to add some pumpkin spicemix. You could also use my own Dutch speculaas mix or just go for some cinnamon, ginger, nutmeg and/or cardamom. Those will all work well in the buttercream and give it a great taste (and smell!) also great for using on carrot cake.