


Can I also make this ice cream in an ice cream maker?
Absolutely. That will make it even faster as you only have to wait for the ice cream to churn.


Baking and using a type of cream pretty much go hand in hand. There are the types where the word cream is literally in the name, but there are also different types of cream where it is not immediately obvious that it is a cream.
And then you have the difference between the names used in different countries and different types of creams mentioned in foreign recipes. It’s no surprise that a lot of people get confused and we’re often asked what the difference is and what can be substituted for what. To shed some light on the cream situation I will explain it in this article. Where possible I will also give the Dutch name for the cream.
Perhaps the most helpful place to start is by explaining what cream is. Cream is a dairy product made from cow’s milk. When the whole milk sits for a while, a layer of fat rises to the top, you skim it off and that’s how you get cream. Nowadays there are many other ways of making all kinds of cream, but to be officially allowed to call a product cream it has to contain at least 10% fat.
Below I will discuss all types of cream. To distinguish between them, I have divided them into the well-known (Dutch) types of cream and the lesser known types of cream.
Officially, pastry cream is not a real type of cream, but since it contains the word cream, I will discuss it briefly. Pastry cream is similar to custard and is made from sugar, egg yolks and milk. So there is no cream in it at all. Besides, you have to make it yourself and you won’t find it in the fridge section of your supermarket. Want to know how to make it? Check the recipe for pastry cream here.

Crème fraîche is a type of cream with a fat content of 30%. This makes it a real cream. It is often firm and thick, but after stirring for a while it becomes more liquid. Crème fraîche can be used in both hot and cold dishes. For cold preparations, you can replace crème fraîche with sour cream.
Cooking cream is actually a light version of heavy cream. It is basically the same product, but with less fat. This means you can’t whip it until it gets stiff. It is usually used to add a creamy taste or texture to sauces or soups, but you can achieve the same effect with unwhipped heavy cream or crème fraîche.
Cooking cream usually has a fat content of 20%. In the Netherlands this is called cooking cream (kookroom) but it might also be called single cream.
Mascarpone is not actually a type of cream, but an Italian cheese made from cream. It is therefore similar in consistency to cream cheese and is used in much the same way. It has a fat content of around 40% and can be used to make delicious tiramisu or mascarpone cream. It’s also quite easy to make yourself and I’ll be sharing a recipe for that later.
Cream cheese, like mascarpone, is a type of cheese. Made from cream, the name says it all. It can only be called cream cheese if it meets a number of requirements, one of which is that it is made from cream.
This is why cheaper but similar products are often called dairy spread or soft cheese rather than cream cheese. Want to make a cream cheese topping? Make sure you use a product that mentions cream cheese on the label.

Whipping cream is cream as it should be. It has a fat content of 35% and is actually the cream that is skimmed of the top of the milk. Unlike cream with a lower fat content, whipped cream is easy to whip (due to the higher fat content).
Want to make whipped cream that doesn’t deflate? Whip some mascarpone first and then add the whipping cream and sugar. Whip this into stiff peaks. That way the end result will hold much better.
Sour cream is known in the Netherlands both by it’s English name and by the Dutch name. On the shelves you will usually find it as sour cream. It has an incredibly low fat content of just 10%, so it can only just call barely call itself cream.
It is actually the light sister (or brother) of crème fraîche, and you can easily substitute them. It is often advised not to heat sour cream, but I have never had any problems with it.
With foreign I mean the types of cream that aren’t (easily) available in The Netherlands. So it might not be foreign to you.
Clotted cream comes from England. It is an incredibly thick cream with a fat content of about 64%. Clotted cream is rarely used in cooking or baking, but it is used as a garnish. Think of scones with clotted cream.
Clotted cream is a little less known here in the Netherlands but it is becoming more common and it’s a bit easier to find in some stores during the holidays. Depending on where you live it might be easy or not so easy to find.
You can make it yourself, real clotted cream is made in the oven and is a pretty labor intensive job (I tried it once and will share my recipe and experience soon!), but there is also a quick version that comes close to the original. I will share how to make that soon too!
Another British product is double cream. It is an incredibly fatty whipping cream that stiffens incredibly well. It has a fat content of around 48% and is therefore much thicker than Dutch whipping cream or slagroom.
Always check how it is used in a recipe to see how best to replace it. If it’s to be used in a recipe, you can use normal whipping cream, but it won’t be the same. If it needs to be whipped until stiff, use the mascarpone and whipping cream trick from above.
Heavy cream is the American equivalent of double cream, but with less fat. Are you still with me? It is lighter than double cream, but in most cases thicker than Dutch 35% whipping cream.
Heavy cream has a fat content of between 36% and 40%. This makes it much closer to Dutch whipping cream, and you can basically always substitute heavy cream for whipping cream. The difference in fat content is minimal.
And there you have it; the entire list of cream types you can find in the grocery stores. Which ones you can find is depending on where you live and whatever the retail stores buy but with the above list you should be able to replace whatever is mentioned in a recipe with another type. Taking the above considerations into account.
Baking and using a type of cream pretty much go hand in hand. There are the types where the word cream is literally in the name, but there are also different types of cream where it is not immediately obvious that it is a cream.
And then you have the difference between the names used in different countries and different types of creams mentioned in foreign recipes. It’s no surprise that a lot of people get confused and we’re often asked what the difference is and what can be substituted for what. To shed some light on the cream situation I will explain it in this article. Where possible I will also give the Dutch name for the cream.
Perhaps the most helpful place to start is by explaining what cream is. Cream is a dairy product made from cow’s milk. When the whole milk sits for a while, a layer of fat rises to the top, you skim it off and that’s how you get cream. Nowadays there are many other ways of making all kinds of cream, but to be officially allowed to call a product cream it has to contain at least 10% fat.
Below I will discuss all types of cream. To distinguish between them, I have divided them into the well-known (Dutch) types of cream and the lesser known types of cream.
Officially, pastry cream is not a real type of cream, but since it contains the word cream, I will discuss it briefly. Pastry cream is similar to custard and is made from sugar, egg yolks and milk. So there is no cream in it at all. Besides, you have to make it yourself and you won’t find it in the fridge section of your supermarket. Want to know how to make it? Check the recipe for pastry cream here.
Crème fraîche is a type of cream with a fat content of 30%. This makes it a real cream. It is often firm and thick, but after stirring for a while it becomes more liquid. Crème fraîche can be used in both hot and cold dishes. For cold preparations, you can replace crème fraîche with sour cream.
Cooking cream is actually a light version of heavy cream. It is basically the same product, but with less fat. This means you can’t whip it until it gets stiff. It is usually used to add a creamy taste or texture to sauces or soups, but you can achieve the same effect with unwhipped heavy cream or crème fraîche.
Cooking cream usually has a fat content of 20%. In the Netherlands this is called cooking cream (kookroom) but it might also be called single cream.
Mascarpone is not actually a type of cream, but an Italian cheese made from cream. It is therefore similar in consistency to cream cheese and is used in much the same way. It has a fat content of around 40% and can be used to make delicious tiramisu or mascarpone cream. It’s also quite easy to make yourself and I’ll be sharing a recipe for that later.
Cream cheese, like mascarpone, is a type of cheese. Made from cream, the name says it all. It can only be called cream cheese if it meets a number of requirements, one of which is that it is made from cream.
This is why cheaper but similar products are often called dairy spread or soft cheese rather than cream cheese. Want to make a cream cheese topping? Make sure you use a product that mentions cream cheese on the label.
Whipping cream is cream as it should be. It has a fat content of 35% and is actually the cream that is skimmed of the top of the milk. Unlike cream with a lower fat content, whipped cream is easy to whip (due to the higher fat content).
Want to make whipped cream that doesn’t deflate? Whip some mascarpone first and then add the whipping cream and sugar. Whip this into stiff peaks. That way the end result will hold much better.
Sour cream is known in the Netherlands both by it’s English name and by the Dutch name. On the shelves you will usually find it as sour cream. It has an incredibly low fat content of just 10%, so it can only just call barely call itself cream.
It is actually the light sister (or brother) of crème fraîche, and you can easily substitute them. It is often advised not to heat sour cream, but I have never had any problems with it.
With foreign I mean the types of cream that aren’t (easily) available in The Netherlands. So it might not be foreign to you.
Clotted cream comes from England. It is an incredibly thick cream with a fat content of about 64%. Clotted cream is rarely used in cooking or baking, but it is used as a garnish. Think of scones with clotted cream.
Clotted cream is a little less known here in the Netherlands but it is becoming more common and it’s a bit easier to find in some stores during the holidays. Depending on where you live it might be easy or not so easy to find.
You can make it yourself, real clotted cream is made in the oven and is a pretty labor intensive job (I tried it once and will share my recipe and experience soon!), but there is also a quick version that comes close to the original. I will share how to make that soon too!
Another British product is double cream. It is an incredibly fatty whipping cream that stiffens incredibly well. It has a fat content of around 48% and is therefore much thicker than Dutch whipping cream or slagroom.
Always check how it is used in a recipe to see how best to replace it. If it’s to be used in a recipe, you can use normal whipping cream, but it won’t be the same. If it needs to be whipped until stiff, use the mascarpone and whipping cream trick from above.
Heavy cream is the American equivalent of double cream, but with less fat. Are you still with me? It is lighter than double cream, but in most cases thicker than Dutch 35% whipping cream.
Heavy cream has a fat content of between 36% and 40%. This makes it much closer to Dutch whipping cream, and you can basically always substitute heavy cream for whipping cream. The difference in fat content is minimal.
And there you have it; the entire list of cream types you can find in the grocery stores. Which ones you can find is depending on where you live and whatever the retail stores buy but with the above list you should be able to replace whatever is mentioned in a recipe with another type. Taking the above considerations into account.

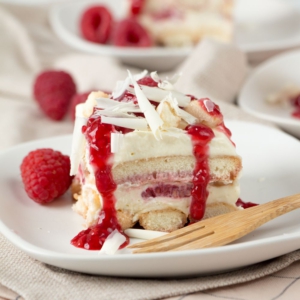
Sometimes, a recipe makes me happier than others. That can be due to all sorts of things, but in this case, it was because the end result was even tastier and more beautiful than I had hoped. To be honest, I’m also extra happy with the photos of this raspberry ice cream.
Photographing ice cream is always challenging because you have to work quickly, and there’s not much room to move around and adjust your setup. For this ice cream, which I made with raspberry jam, I had a few compositions in mind.
Still, I didn’t get the perfect shot right away. That is, until I started scooping and the swirl of the jam became clearly visible. Then, I went wild with my camera! The hardest part was choosing from all the photos I took. The ice cream is perfect for the summer heat!

Make the base of the ice cream by whipping the cream to stiff peaks. You can use a food processor or an immersion blender. Whatever you have available. Fold the condensed milk and the vanilla through the cream. Now add raspberry jam until you have the desired taste. Keep in mind that freezing the mixture will dull the flavors a little bit so be aware of that.
Add the ice cream mixture to a container. First add a layer to the container and spread raspberries on top. Repeat this until all ice cream and all raspberries are used. Add a little bit of raspberry jam on top and swirl it through with a spoon for a nice effect. End with some raspberries.
Now the hardest part of making this ice cream is waiting. You will need around 6 hours in the freezer before the ice cream is set. Take it out of the freezer 10 minutes before you’re ready to eat so it can soften just a little bit.


You can store the raspberry ice cream in an airtight container in the freezer for around 3 months.
Do you love homemade ice cream but don’t want complicated recipes or an ice cream maker? Then you’ve come to the right place! I’ve collected lots of easy ice cream recipes that you can whip up in no time. They’re perfect for hot days or when you’re craving a delicious, refreshing dessert. The below recipes are already online but expect more to come soon!

Absolutely. That will make it even faster as you only have to wait for the ice cream to churn.
You can’t remove them from the fresh raspberries but you can use other fresh berries if you want. You can remove them from the jam or raspberry puree by using a fine mesh sieve. But to be honest if the seeds bother you it’s best to go for something like strawberries instead and turn this into a strawberry ice cream.
Typically this happens if you leave the ice cream in the freezer uncovered for too long. Use an airtight container or cover the ice cream with plastic wrap.

A tasty and easy recipe for pastry cream or crème pâtissière. One of those great basic recipes that you can use for endless different recipes.
To start with a simple explanation on what pastry cream is; it’s essentially a type of custard that is thick enough to hold its shape. It’s delicious and can be used for different kinds of fillings. The recipe below is my favorite vanilla pastry cream but there is so much you can do with it.
And the good news is; it is incredibly easy to make. Sure you can buy a ready made bag of powder in the grocery store but trust me when I say it is so much tastier if you make it yourself!
Once you’ve made your own, you won’t be so quick to use a ready-made mix again. Not only is it much tastier, it is also incredibly easy to make.
BAKING TIP: As described at the end of the recipe, the pastry cream will keep for several days in an airtight container.


The recipe for making your own pastry cream is super easy. You use pretty simple ingredients and I will soon be giving you lots of ways to use pastry cream in your favorite recipes too. Cream puffs are just one example of what you can do.
You need the following ingredients:
First you make your egg mixture by splitting the whole eggs and separating yolk from egg white. Take a medium bowl and whisk sugar, vanilla sugar and egg yolks together. You’re not using the egg whites in this recipe but you can save them for making a meringue later.
TIP: Check out my tips on how to beat egg whites to perfect stiff peaks.
Now take a medium saucepan and add the milk. Gently heat the milk until it is hot. Now add a little bit of the hot milk into your egg yolk mixture and whisk till it is incorporated and smooth. While you keep stirring add the remaining milk gradually until you have a smooth milk mixture.
Pour the mixture back into the saucepan and turn up to medium-high heat. Keep stirring while you bring it to the boil and keep stirring until it has a custard consistency. Pour the hot pastry cream into a clean large bowl and cover the top of the cream with a piece of plastic wrap. That way you prevent a film from forming on top of the pastry cream. Leave to cool to room temperature before placing it in the fridge to cool completely.
Check the full recipe in the recipe card below. Some of my favorite desserts like this strawberry custard tart are made with pastry cream!

Yes, you can! I will soon add a recipe for a custard pastry cream which is super easy and delicious to make.
You can very easily make crème légère from the pastry cream by adding whipped cream. It is also called Swiss cream or lightened pastry cream. The cooking process is the same, you just add whipped cream which makes for a lovely light and fluffy texture.
Making pastry cream with double cream is very easy: just replace the milk in the recipe with double cream! This will give you an extra creamy custard, but even without the double cream, the end result is still very tasty and creamy. You can also use half of the milk and half heavy cream
Yes, you can! It is a very tasty, creamy addition to your baking. I will soon have some recipes online that show you how to do it.
Yes you can, although I have not yet tested this myself. The result will be somewhat different. Corn starch has a higher binding power compared to flour. So you will need half the amount of corn starch compared to flour.
It is important to cover the pastry cream with plastic wrap directly on top of the cream to prevent a skin forming on the cream. The chilled pastry cream can be stored in the fridge for several days. If I’m not going to use it directly in a cake, I usually store it in an airtight container.
Usually when the pastry cream doesn’t thicken properly the egg yolk mixture hasn’t been cooked sufficiently yet. Cooking it for a little longer usually solves the problem.
Once you’ve mastered making this delicious vanilla flavor pastry cream you can vary with adding flavors. You can make a lemon pastry cream or a chocolate cream version for instance. Using chocolate milk instead of regular milk will give it a nice chocolate flavor.
Adding a bit of lemon zest will give it a subtle lemon flavor and there are more ways to add flavors. A common used method is to add some extract. Almond extract is a classic but I will be sharing more tips on flavoring the pastry cream later.
TIP: Looking for more recipes with egg yolks? Try this recipe for Dutch eggnog (advocaat).

A slagroomtaart is probably the most popular Dutch birthday cake there is. Want to make your own Dutch cream cake? It is so easy! In this recipe I will tell you exactly how to bake the cake, fill it and decorate it.
I made my first cream cake in 2015, several years ago now. Its recipe has not been published on the blog until today, but has been in my first baking book since 2016. I have been asked for my cream cake recipe quite often.
Fortunately, I know that many home bakers had my book at home and could just make the cake, but now it’s time to share this delicious cream cake on the blog!
The cake base of a slagroomtaart is very light and airy, we also call it ‘biscuit’ or ‘kapsel’. Think sponge cake or chiffon cake. you could use some lemon zest or spices to have some extra flavor in the cake.
We use this cake base for a lot of Dutch cake recipes, but the cream cake is definitely the most popular one. In this video, you can see how soft and fluffy the cream cake is:
View this post on Instagram

The base of the cream cake is filled with jam and whipped cream. Optionally, a syrup can be brushed on the cake layers to moisten the cake or add flavor. If you make the cake several days in advance, there is a chance that the cake will get a little dry. The syrup prevents this.
When I make this whipped cream cake for special occasions, I usually make it the night before and don’t use the trembler syrup. Usually friends and family eat the whole cake and there are no leftovers.
And then a little bit more about the cake filling, the jam I mean. If you want to go for the classic flavors, you choose strawberry jam. For the cake in the picture, I had chosen a jam made from several kinds of red fruits, but you can basically use any jam you like.
For the whipped cream I use just normal whipping cream as there aren’t a lot of options in the Netherlands, but if you have access to heavy cream that’s an even better option.

To decorate the cake, use hazelnut bresilienne (also known as nougatine). These are toasted pieces of hazelnut with a caramelized layer of sugar around them. Not only beautiful for decoration, but also incredibly delicious. For a change of pace, you can substitute other types of nuts for the crunchy topping. Pecans, for example, are a good substitute.
Another way to decorate a whipped cream cake is to pipe swirls of whipped cream onto the top of the cake and then stick pieces of fresh fruit into them. Kiwi or tangerine slices really belong here. For this version I used kiwi and strawberry, delicious!
Optionally, you can use chocolate decorations (store bought or homemade) to decorate the cake. Or you can order a festive and edible photo print online and stick it on the cake.
After you’ve filled and stacked the cake layers, it’s time to decorate the sides and top of the cream pie with whipped cream. You can use a piping bag or a spatula, whichever comes easiest. Use the spatula to spread the whipped cream evenly on the outside of the cake. Be sure to save some whipped cream for the swirls on top of the cake.
For the side of the cake, it can be helpful to use a spatula in conjunction with a rotary spatula. You hold the spatula in one place while you gently rotate the turntable.
Finally, decorate the top of the cake with swirls of whipped cream. Fill a pastry bag with the whipped cream and choose a nozzle of your choice (I used a large star nozzle) and hold your piping bag straight over the cake as you start to spray the tufts.

I do not recommend freezing a cream cake. The whipped cream will dry out and won’t taste as good. However, you can make the sponge layers well in advance and freeze them in an airtight container for up to three months. You can also make the jam and nougatine well in advance and store them until you are ready to make the cake.
That way, you have the cake pieces ready to go, and all you have to do is whip the cream and assemble the cake. It saves time!
I prefer to eat a whipped cream cake the same day or the day after. Whipped cream generally doesn’t get any better, but you can store the cake in the refrigerator for 2-3 days.
Of course you can! In fact, you can use any shape, round, square or rectangular. I used this round pan for the recipe below, but square pans are also available. Just make sure you get the right size.
You can use the ‘Convert Recipe’ button in the recipe card below to convert the recipe to fit any size pan of your choice.
Nougatine adds a nice crunchy element to a whipped cream cake, which is necessary because the biscuit, jam and whipped cream are soft in texture. So I would not simply omit the hazelnut bresilienne, but rather replace it. For example, toasted almond slivers, sprinkles or crumbled cookies.
A medium egg weighs 50 grams on average, so you’ll need about 4. Beat the eggs and then weigh the mixture on the scale until you have 175 grams.

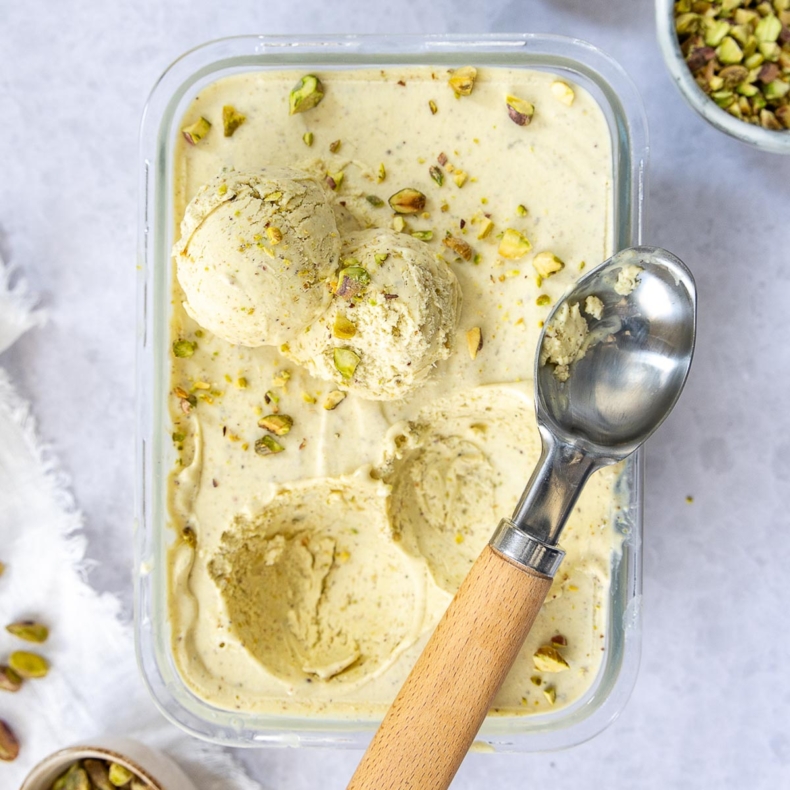
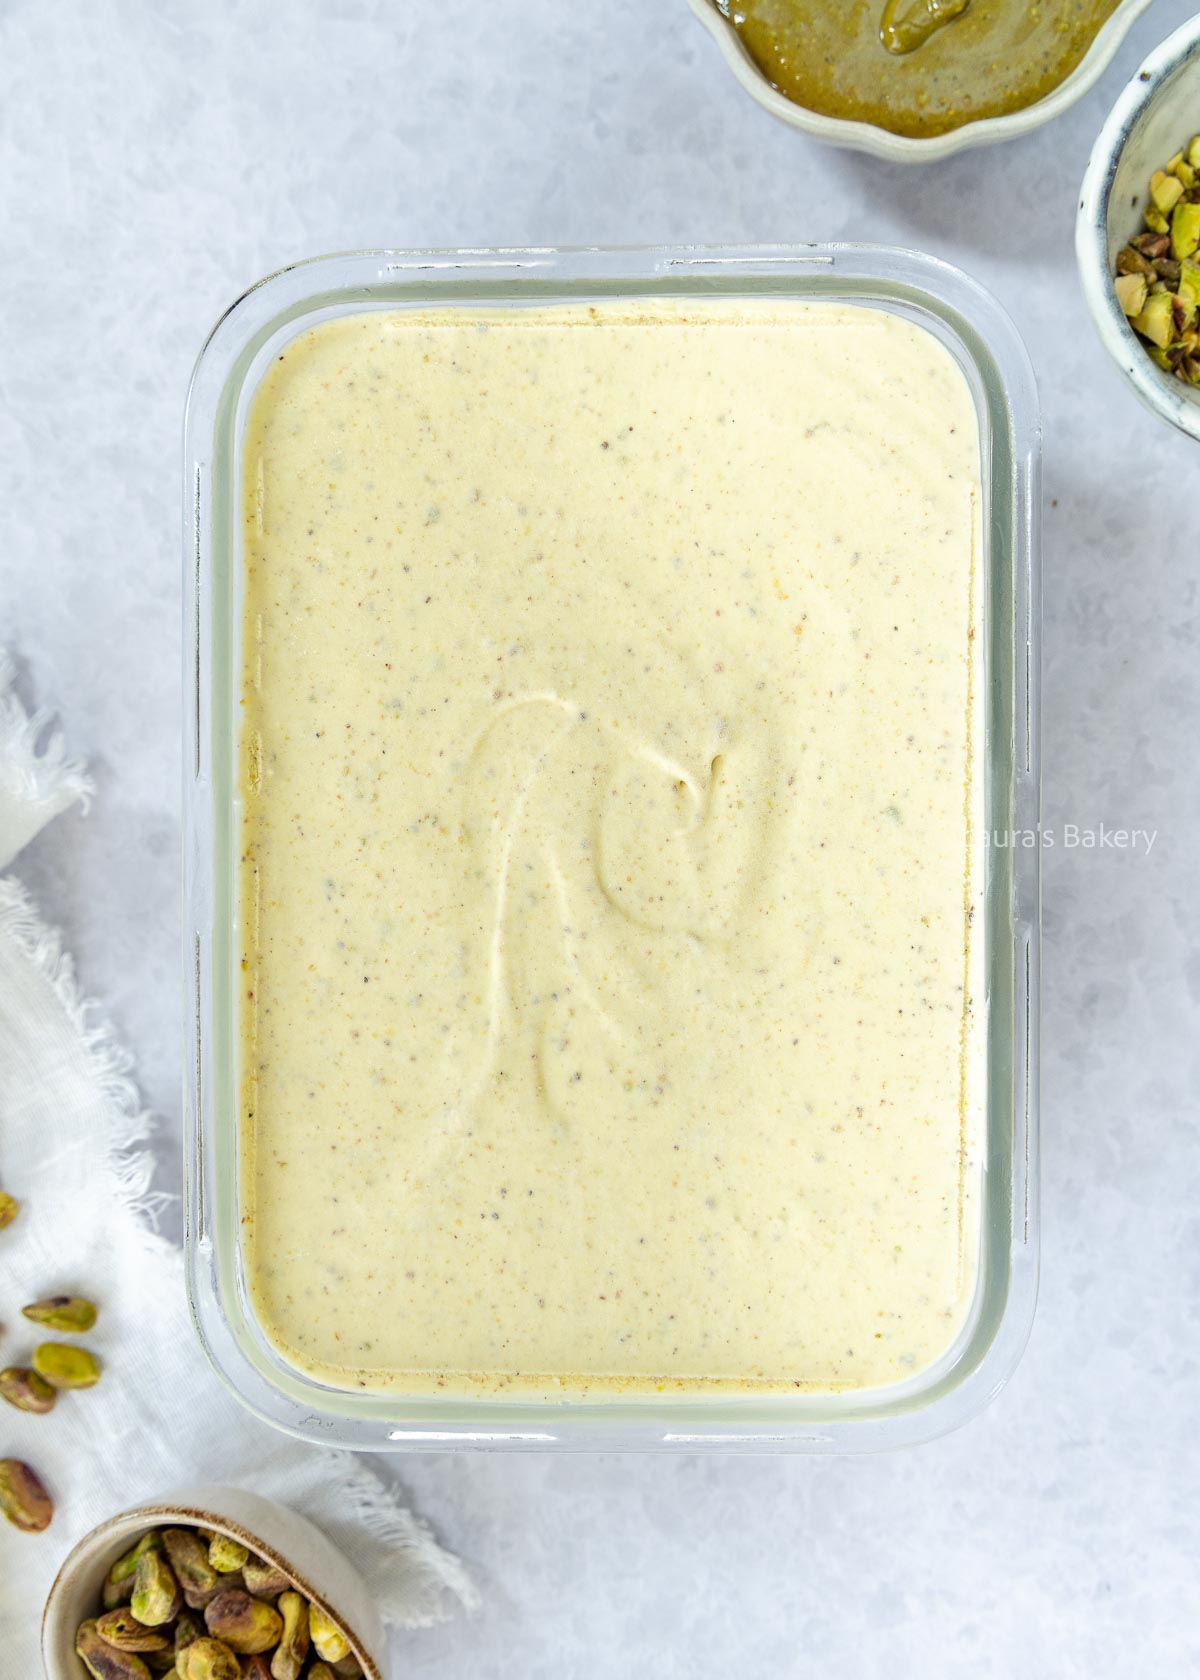
Pistachio has always been one of my favorite ice cream flavors, so creating a homemade recipe was inevitable. With this easy recipe, you can whip up a batch of delicious pistachio ice cream in no time with just four ingredients.
While most recipes use egg yolks and whole milk in the ice cream base, this recipe uses condensed milk and heavy cream making it also suitable for pregnant women.
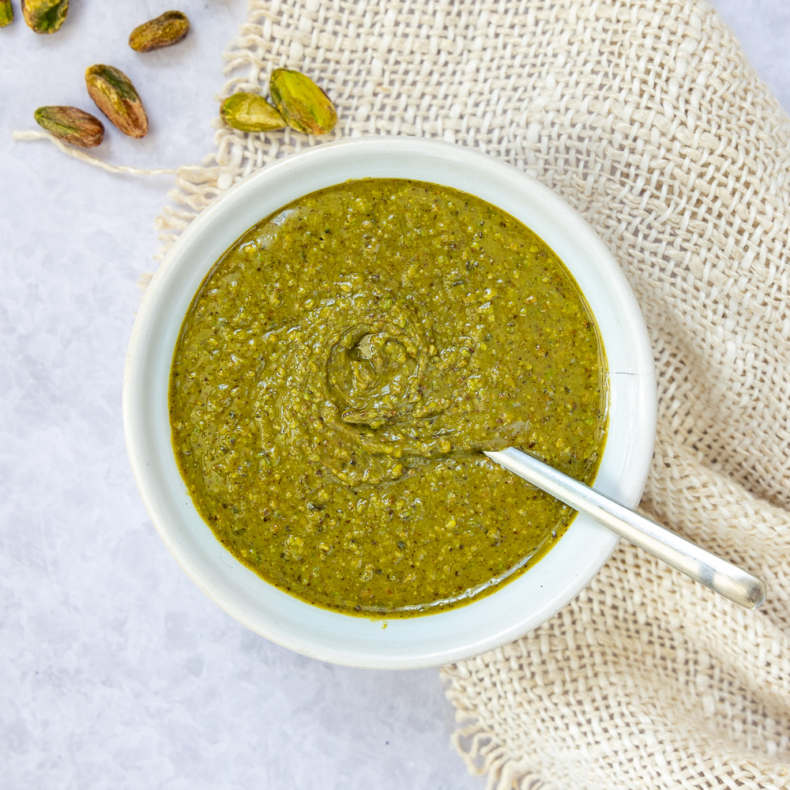
You really don’t need much to make a delicious ice cream mixture yourself. I recently shared my recipe for pistachio paste, which is the key ingredient in this ice cream. Let me tell you a little more about the ingredients:
This recipe has been developed so that you don’t need an ice cream maker. However, using an ice cream machine will allow you to enjoy your churn ice cream more quickly.
So if you cannot wait to taste homemade ice cream you might want to use a machine. But as mentioned that is not necessary for this recipe.
If you do own a machine use the manufacturer’s instructions for making the ice cream.

Homemade pistachio ice cream should be stored in an airtight container in the freezer. Ideally, it should be stored in a separate freezer, as the temperature there is more consistent.
A shallow freezer container can be handy because it allows the ice cream to reach the right temperature more quickly when you want to serve it. I like to use glass freezer containers for this purpose.
You can store it for up to three months. Once you have defrosted it (even partially), it is best not to refreeze it.
I can almost smell summer, so it’s time to dig out the best ice cream recipes! I’ve put together a great selection of my two favorite popsicles for you. But stay tuned for more ice cream recipes soon.
To make this pistachio ice cream, I used my homemade pistachio paste. I left the paste slightly coarse so you can taste small pieces of pistachio in the ice cream. For a more vibrant color and completely smooth texture, grind the paste very finely.
For a nice swirl effect, mix a little pistachio paste into the top layer of ice cream once you’ve scooped it into the freezer container. It looks great and gives an extra strong pistachio flavor!
If you don’t want to make it yourself, you can buy a ready-made version. These are now available in more and more supermarkets and online. The color and texture may vary depending on the brand, but it’s best to choose one made from 100% pistachios. You can go for a smooth paste or a more coarse paste. Both will work. Remember that the bright green versions you might find in the supermarkets generally use green food coloring to make them look so green. Real pistachios can vary in color from purple to brownish or very green. If you make it your pistachio cream you will have a different color depending on which pistachios you use.
You don’t need an ice cream maker for this recipe. Would you rather use an ice cream maker to enjoy your ice cream as soon as possible? That’s possible, too! Follow the instructions with the machine.
You can find it at cooking stores and online shops, or easily make it yourself. It can be used as a 1:1 replacement for vanilla extract, which has the same strong flavor. This time, I chose paste so you could see the specks of vanilla in the ice cream. Alternatively, you can use a vanilla bean; you only need one pod. Read more about different vanilla flavorings here.

This easy recipe for cream cheese frosting is perfect for a carrot cake, red velvet cake, and really any kind of cake or pastry. What about cinnamon rolls with a creamy layer of homemade cream cheese icing?
The first time I made my own cream cheese frosting was, of course, for a carrot cake. I was an instant fan of this delicious cream cheese icing and use it regularly for all kinds of other recipes.
This frosting is made with a few simple ingredients: a combination of butter, powdered sugar, vanilla extract and, of course, cream cheese. The butter adds firmness and the vanilla extract and powdered sugar add flavor and sweetness.

I intentionally didn’t make the frosting too sweet, so you can make it a sweeter frosting if you like by adding more powdered sugar. If you add more icing sugar, the structure will be somewhat firmer.
This recipe is my absolute favorite frosting and a lot of my family and friends really love it as well. I recently made red velvet cupcakes for them with a nice swirl on top and they were gone before I knew it.
As you can see from the carrot cake in the photo, you can use this frosting to fill a layered cake. If your frosting is still a little on the soft side after you make it, just put it in the refrigerator for a while until it is firm enough. You can also pipe swirls of cream cheese frosting, but not as high or tight as you are used to with my buttercream recipe.
I like to use room temperature butter for this recipe as it’s easier to mix it until light and creamy. I do use cold cream cheese, because it will make sure the frosting isn’t getting too thin. The brand of cream cheese I use is Philadelphia, I like the structure and it works every time. Make sure you use a full-fat cream cheese, I noticed the cheaper ones are an other type of cream cheese and are often too thin and watery.
BAKING TIP: Read more about the difference between cream cheese frosting and buttercream.

I already named a few of my favorite recipes which are going really well with this frosting recipe. I will make a small list of baked goods that are perfect for this frosting. And after that I will list some ingredients that pair very good with the frosting as well.
As you can see, this frosting is perfect for fresh and fruity summer recipes, but also for the warmer flavors of fall. That makes it the best cream cheese frosting recipe ever if you ask me.

Yes, you can, but your frosting will be much less firm. This is because the butter makes the frosting firm in the refrigerator, making it suitable for filling cakes and piping swirls. Without the butter, you can still use the frosting on a sheet cake or spread a little on a cupcake. And it’s perfect for more of a glaze-like topping on cinnamon rolls.
You absolutely can! For example, you can mix orange or lemon zest (just the colored part of the zest, not the white-that’s bitter) into the cream cheese frosting, or replace the vanilla extract with another flavor extract. You could even add melted chocolate for a chocolate cream cheese frosting, it’s delicious!
This is almost always because the ingredients were not at the same temperature. You can try heating the mixture a little and mixing until smooth (don’t heat the frosting too long, you don’t want the butter to melt). Another reason this happens is adding wet ingredients all at once instead of in smaller portions. I always add a little bit, mix it well and then add the rest (in 1 or 2 parts).
I never do this myself, but it is theoretically possible. You can also make mascarpone frosting if you like.
You may have mixed the frosting too long. If you put your frosting in the refrigerator for (at least) an hour, the butter can set and your thicker frosting should be usable again.
For anyone wondering if this frosting tastes like cream cheese: yes, you can still taste the cream cheese. It could hardly be otherwise when it is the main ingredient. The taste is more subtle because of the other flavor additives.
This is a softer frosting. You can pipe small swirls and frost a cake just fine. You can’t use it to frost a cake and then cover it with fondant or marzipan though. The frosting is too wet and will make fondant or marzipan melt.

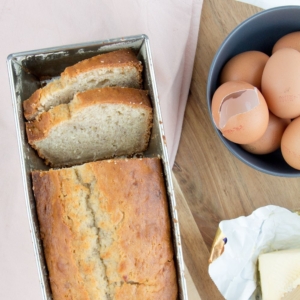
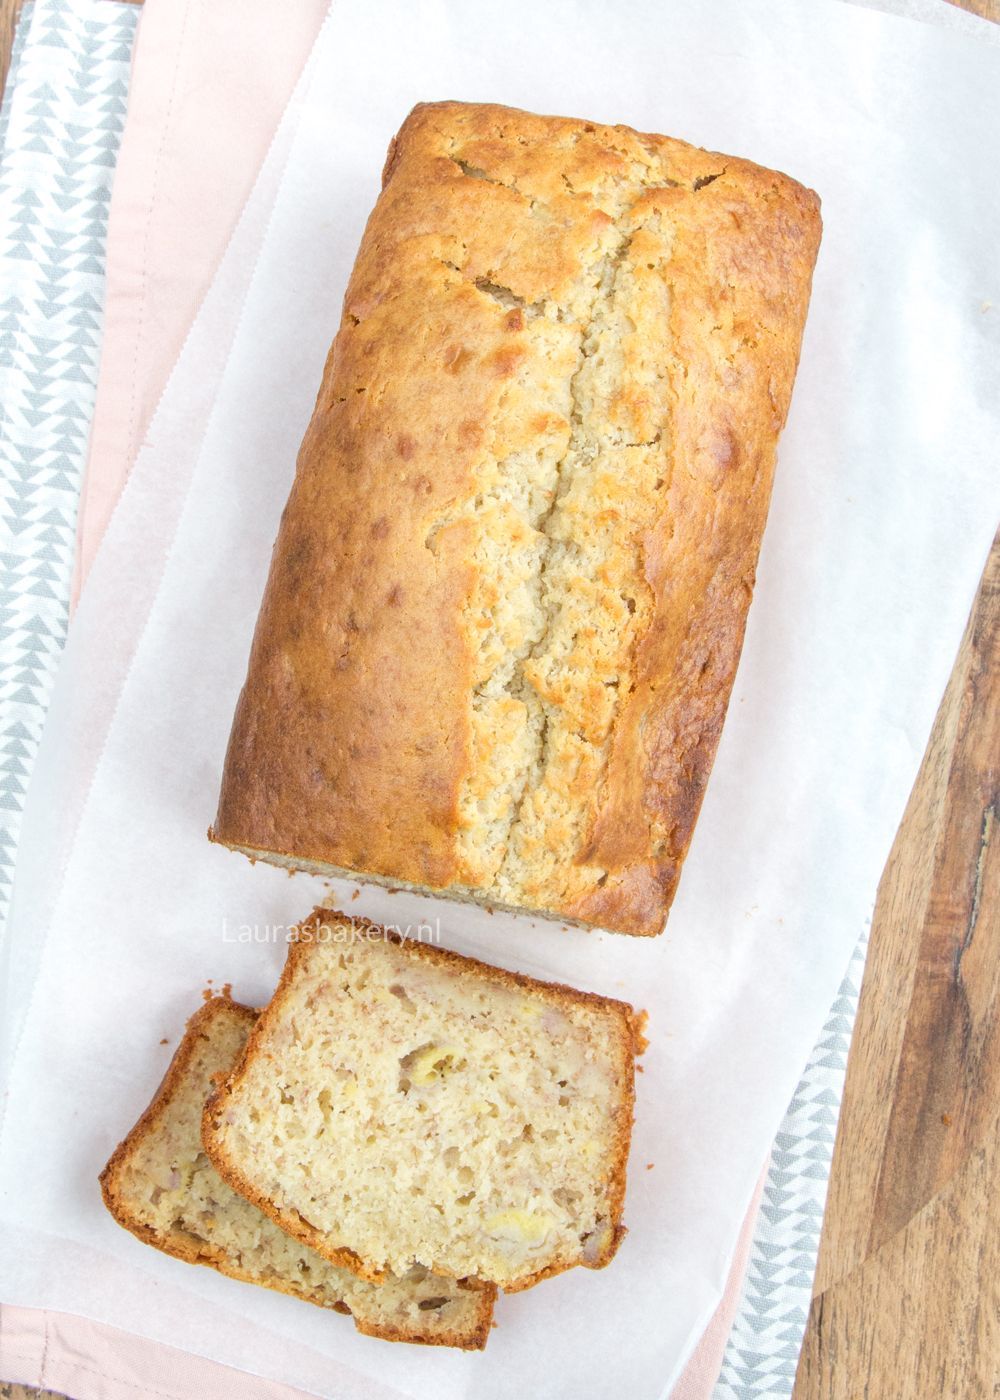
Imagine this: a delicious, creamy banana bread that tastes like a real treat. Look no further, this is the right recipe for you! The cream cheese mixed into the batter makes the most perfect cream cheese banana bread. You will love it!
I love a good banana bread. I make my recipe for healthy banana bread the most, but sometimes I love to make this banana bread with cream cheese. Where my healthy banana bread has no sugar of butter in it, this one does call for butter and sugar. And more important: cream cheese! It really takes a banana bread to the next level.
There are multiple ways of incorporating cream cheese into you banana bread. I chose to add it to the batter for that perfect creamy and moist results. But you could also make a banana bread with cream cheese filling by adding a sort of a cheese cake mixture in the batter before baking.
Another delicious variation: add a cream cheese frosting to your banana loaf after baking! To be honest, you could even do that with the recipe for my cream cheese banana bread. I’ll promise it will taste amazing with a cream cheese layer!

The recipe speaks for itself, but I will share some tips with you so you get the best results and this will become your favorite banana bread recipe!
Most important: the bananas! I always use overripe bananas for the best result. Mash the bananas with a fork or use a hand blender. It’s perfectly fine to have some lumps in your mashed banana. But if you like a more smooth batter, use a hand blender.
For my healthy banana bread I only use a whisk or spatula to make the batter, but for this recipe you will need an electric mixer. It’s important to mix butter, cream cheese and sugar into a creamy mixture and a electric hand- or stand mixer with the paddle attachment is best for that. Unless you have very strong arms 😉 .
The entire recipe is in the recipe card down below. But it’s actually no more than mix all the wet ingredients together and then add your dry ingredients and mix until incorporated. After that, you’ll pour the batter into a prepared loaf pan and your easy banana bread recipe is ready for the oven!
Oh and for preparing you loaf pan: you can use a nonstick spray, grease it with butter and dust with flour or just line it with parchment paper. Just pick you favorite way for a prepared baking pan.
And after baking: enjoy you best homemade banana bread recipe ever!
I’ve written a separate blog post about this subject. So if you want to know everything about storing banana bread, I recommend to read that post. Just looking for some quick tips? I will share them here!
I like to store my banana bread in slices. If you store them together in a container or freezer bag, make sure to put some pieces of parchment paper between the slices. This will prevent them from sticking together.
Before you wrap up you loaf for storing on room temperature or in the freezer: make sure you have let it cool to room temperature on a wire rack.
You can, but it is possible that the baking time will change a bit. I haven’t tried this myself, so I can’t tell you exactly how long it will need.
Of course! Just add in some chocolate chips, a swirl of peanut butter or some nuts. I bet it will taste amazing! I think I’m gonna try a chocolate chip banana bread myself the next time!
Yes it is. You can just replace the caster sugar with the same amount of brown sugar.
Again: yes you can! The recipe will make about 10-12 muffins. Bake them for 20-22 minutes (or until done).
Although both are a leaving agent, they are not the same in ‘strenght’. It is possible to make this recipe with baking soda, but the recipe will need a few adjustments. I haven’t tried this myself and therefore can’t share these adjustments.

The perfect summer recipe with a Dutch twist: stroopwafel ice cream! You will absolutely love it.
You already know I have this love for all things stroopwafel. I’ve already shared my favorite recipe for making Dutch stroopwafels yourself. If you can’t be bothered to make the stroopwafels, you can use other waffles of your own choice.
Stroopwafels are essentially (a sort of) syrup waffles and nothing is more tasty than a warm stroopwafel if you ask me. Stroopwafel is a very popular Dutch cookie, and on my Dutch website, this is one of the favorite flavors of ice cream.
You really only need about 4 ingredients for this simple recipe.

Making the ice cream is super easy. You whip the heavy cream until you have stiff peaks. Fold the cinnamon and the condensed milk in until smooth. Chop the stroopwafel cookies into small pieces and fold them into the mixture.
Add to a airtight container and – if you want – add some of the caramel on top. Use a fork or a skewer to mix the caramel, making a swirl.
Place it into the freezer and let it set in about 6 hours.
You can store the ice cream with stroopwafels in the freezer for up to three months. But I guarantee it will be finished so much faster than that!
You can really add whatever cookie you like. The advantage of the stroopwafel is that the cookies stay firmer due to their texture, but in general if you add the cookies at the last minute, fold it in and place it in the freezer, the cookies will retain some of their crunch.
Instead of the caramel you can also use a chocolate sauce and swirl that through the ice cream. You can also add some chopped dark chocolate or add some vanilla extract for a different flavor.
Really, with this kind of ice cream, your only limit is your imagination. Feel free to mix in whatever you like: marshmallows, mini fudge, chopped cookies, chopped chocolate or whatever else you fancy.

When it comes to flavor, I always prefer cream cheese frosting to buttercream frosting. But I do use buttercream often enough, simply because sometimes it is more appropriate for what I am making. So there is a difference in use, but also in taste. Today I will discuss the difference between buttercream and cream cheese frosting, because choosing the right frosting for your project is an important decision.
There are several recipes for buttercream. From the simplest 1:1 with powdered sugar and butter to the Swiss meringue buttercream or Italian buttercream. Each buttercream has its pros and cons, but we will explain that one day in an article about all types of buttercream. When I talk about buttercream in this article, I mean a standard buttercream like the one you get with this ermine frosting recipe.
But it could also be a flavored or colored buttercream. By the way, the linked recipe does not taste like butter, it is really a nice airy cream that tastes creamy but doesn’t have that overpowering butter taste. It’s a simple buttercream recipe and definitely my favorite. If you’ve never tried making a buttercream with flour in it this is your hint to do so for next time. The smooth consistency will be your new favorite. But again, with any type of frosting; it always depends what you’ll be using it for.
Buttercream is mainly used to decorate cakes and cupcakes. It is very easy to work with and it is great for piping and cake decorating in general. This is why this traditional buttercream is used most often in America, where people love larger-than-life layer cakes. Cupcakes are also still very popular in the United States.
The biggest difference between my ermine frosting recipe and a recipe for traditional American buttercream is that – on average – the American recipes use more sugar and instead of unsalted butter they use shortening. This creates a beautiful really white buttercream and this is usually called a buttercream frosting. Of course while tastes differ and are mostly depending on your personal preference, I like to think that the ermine frosting is tastier compared to a traditional buttercream.
One of the great things about buttercream is that it is ideal for piping beautiful swirls and it doesn’t flatten out or at least not much. It is also perfect for adding in colors. I prefer to work with gel-based colors. I find the color more consistent and easier to get to the right vibrancy. So in general buttercream is a pretty allround frosting to use and I always use it to create beautiful smooth cakes. It’s also ideal for using certain kind of piping nozzles. When using buttercream I know that the shapes I make will keep perfectly.
When I want a really smooth end result, I will always choose buttercream.

Cream cheese frostings vary in use and taste. Let’s start with the taste, compared to regular buttercream a cream cheese frosting is even creamier and has a richer and deeper flavor. It has a slightly more tangy flavor and yes you can still taste the cream cheese but it doesn’t dominate the end result. I love using a cream cheese icing as it has a beautiful creamy texture and I love the flavor best. My favorite cream frosting recipe is this one. The perfect consistency for a red velvet cake recipe for instance!
If you want to finish a cake with a generous layer or decorate it, you are less likely to use cream cheese frosting. I sometimes pipe it on a cupcake or spread it on a cake, but I know the result will not be as smooth as buttercream. It is also more important for this frosting to set in the fridge than with buttercream. A cake with cream cheese frosting should be kept in the refrigerator at all times.
You could use cream cheese frosting for decorating the cake, but it will be less stable due to the needed temperature. Buttercream will keep better at room temperature which is great if your cake has to be out of the fridge for a bit.
So what is cream cheese frosting good for, you may ask? Cream cheese frosting is used because of its flavor and the fact that it combines beautifully with cakes like red velvet or a carrot cake. So if you’re going to use cream cheese, use it for flavor more than for decorating.
I love using full-fat cream cheese for that same reason. While there might be a place and time for low-fat cream cheese, I would never pick it if I had the choice. The type of cream cheese used also makes a difference to the end result
Recipes that would be delicious with cream cheese frosting:
Recipes that would be great with buttercream:

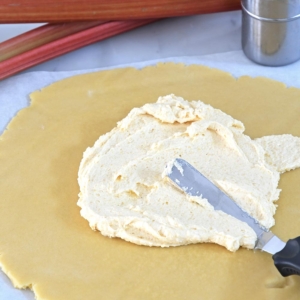
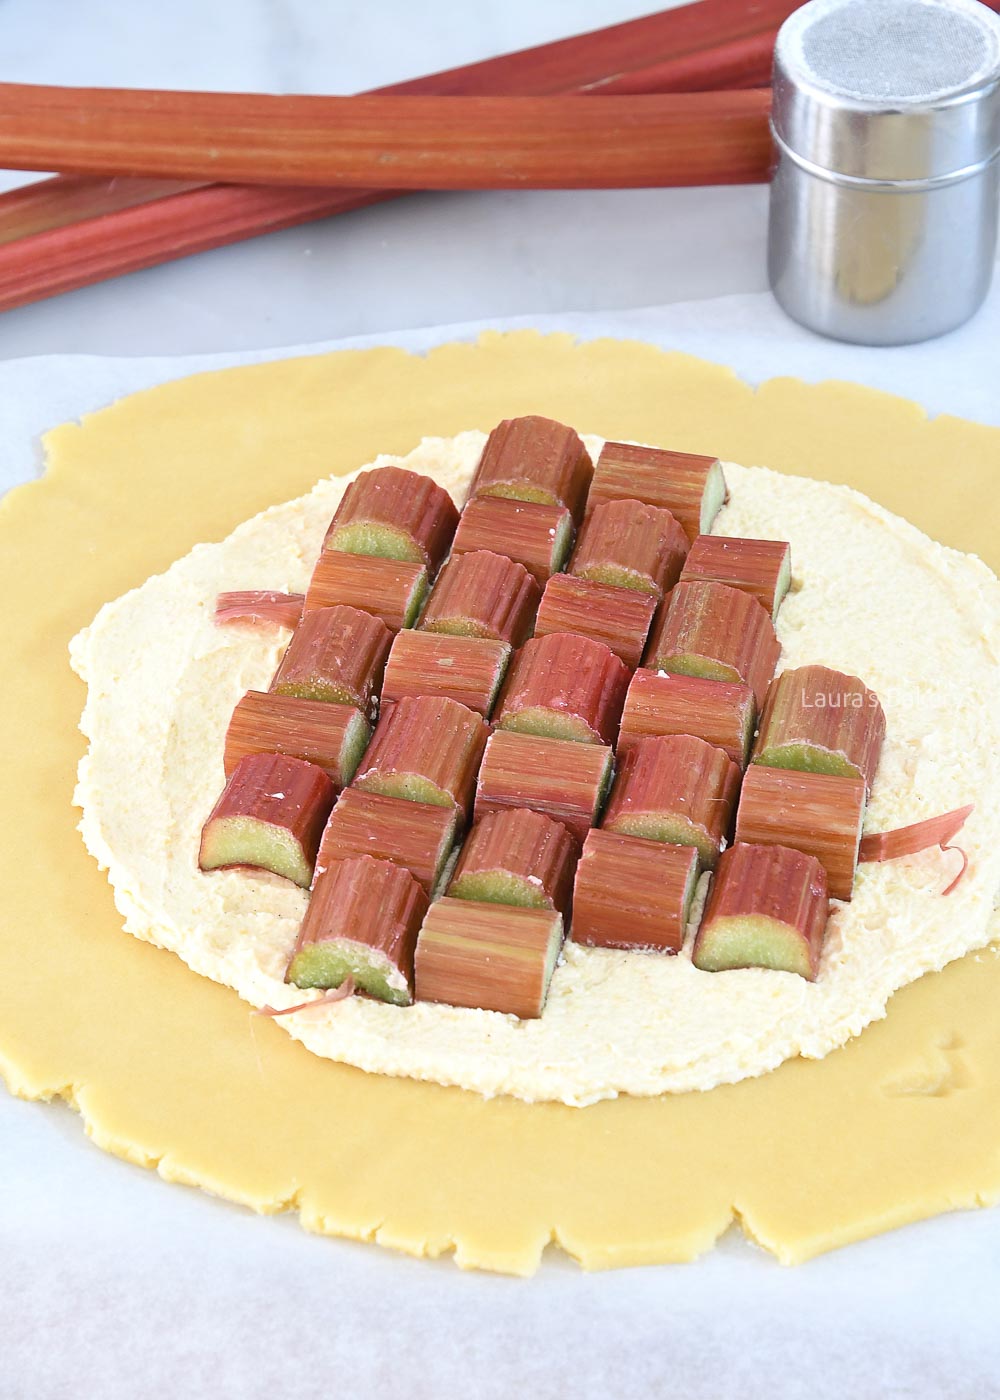
This is a classic and one of the most delicious recipes for tartlets. I’m talking about strawberry tartlets with pastry cream, of course! The buttery crust goes so well with the delicious strawberries and makes for a perfect summer dessert.
How cheerful are these strawberry tartlets? They are perfect for high tea as they are not too big. I filled each strawberry tartlet with pastry cream. In principle, you can use any kind of fresh fruit to top the tartlets. But it is hard to beat the combination of a crispy tartlet base, fresh strawberries and the rich pastry cream.

For making these pretty little tartlets it is important to know that to make these I used a specific mould from my own line of products but these are pretty similar. Of course you can use other little tart pans if you want but keep in mind that it might also have an effect on the total number of tartlets and/or the preparation time needed. I also like to use pastry cases with removable bottoms for easy removal of the tartlet shells once baked golden brown.
For making these beautiful fruit tarts you will also need pastry cream. For that you need to follow the recipe I linked to here.
Other than that you need the following ingredients at room temperature:
And for the filling fresh strawberries and the pastry cream. In addition you will need plastic wrap for wrapping the tart dough, a mixing bowl, rolling pin and your tartlet molds. You can make this in a stand mixer but quite frankly it is so easy that you can also make this quickly in a bowl with your hands or with a hand mixer.
Once made and baked golden brown you can fill the tart shells with the delicious cream and finish the mini tarts by adding the fresh strawberries. Optionally you can add a bit of whipped cream on top. A delicious dessert in no time at all!

Strawberry tartlets are definitely in my top 3 favorite strawberry cakes. Especially when strawberries are in season, I highly recommend making something delicious with strawberries every week. Luckily, strawberry season lasts all summer long, so there are plenty of strawberry recipes to inspire you. Here are a few strawberry recipes to try:
It depends on the reason. For a lighter filling, you could use Swiss cream, but if you just don’t like pastry cream, mascarpone cream is a good (and easy) alternative. If you want to know more about all the different creams out there, check this article.
Absolutely! But keep in mind that the times and quantities will vary. I will soon share a recipe for a larger tart using the same pastry crust.
You could use a muffin tin to bake the tartlet bases. For all my tips on making a basic tart recipe, see my article ‘Making your own tartlets’.
Would you like to prepare the strawberry tartlets ahead of time? Then I recommend the following:

Want to make carrot cake? This easy recipe makes a creamy, fluffy and spiced carrot cake. The best carrot cake recipe I’ve ever had! So if you’re a carrot cake lover I would urge you to try this recipe!
Here it is at last: a recipe for carrot cake! And if I may be so bold, this really is the most delicious carrot cake ever. I had eaten a lot of carrot cakes and had a clear idea of what I wanted my version to be. The result was even more delicious than I had hoped, so you can understand how happy I am with this easy carrot cake recipe.
This carrot cake is airy, creamy, and has just enough spices. It’s perfect on its own, but when paired with the cream cheese frosting, it’s a real party. I made a layer cake out of it myself, but hesitated for a long time about whether to bake it in a bundt. I’m sure it would also look great with cream cheese frosting and walnuts on top.
Baking tip: Did you know that you can make carrot cake in an air fryer? I’ll share the recipe for that soon too.

A carrot cake is a cake in which grated fresh carrots are mixed into the batter. This not only gives the carrot cake a beautiful color, but also gives it a slightly sweet taste and a nice smoothness.
In addition, carrot cake always contains a special spice mixture consisting of at least cinnamon and ginger, but preferably also nutmeg and cloves.
Before the recipe came to Holland, it was already very popular in England and later in America. That is why we have so many words for this delicacy. Think worteltaart (in Dutch), carrot tart or carrot pie, depending on which country you live in.
Personally, I like to stick to the official English name carrot cake as most people would refer to it that way. Even most people in The Netherlands.
One final element that a carrot cake is known for is the topping. A carrot cake topping is usually called a frosting, a cream cheese frosting to be exact. This is my favorite cream cheese frosting recipe. This is a mixture of cream cheese, butter, powdered sugar and vanilla.
It seems that this frosting is a modern addition, not found in old recipes. Whoever came up with it, I am very grateful, because the sweet and creamy addition of the frosting completes a spicy carrot cake!

In my opinion, a carrot cake should have a deliciously creamy base, but the layers should also be nice and fluffy and with moist crumbs. To get both that creaminess and lightness in this carrot cake, I played around with the ingredients. Below I will tell you a bit more about the role of the ingredients in this layer cake:
As always make sure all ingredients are at room temperature before you start baking your homemade carrot cake recipe.

I personally used baby carrots, but you can also use winter (big) carrots.
Don’t grate the carrots too coarsely (like julienne), but certainly not so finely that they come out as a mush. You want small, thin strands of carrot. That’s what tastes best in the cake. I like to use a coarse grater to grate the carrots.
If you do have julienne cut carrots, make sure to chop them into smal pieces before adding the carrot to the batter.
You certainly can, but I haven’t done it myself (yet!). I read in the comments that someone has already baked this carrot cake recipe in this Nordic Ware cake pan with a baking time of 60 minutes.
This cake has three layers and I prefer to bake them in the oven at the same time. I use three of these 9-inch cake pans around the house. By greasing and dusting them with flour, the cakes come out perfectly after baking.
Yes, you can. The only thing you need to be aware of is the effect of the baking soda on the dough, as the baking soda is activated when it comes into contact with the light brown caster sugar or baking powder. Therefore, divide the carrot cake batter into three bowls (just weigh it out) and add the baking soda just before you pour it into the prepared pans and put it in the oven.
If you do it in 3 separate layers, yes. But not if you want to bake all of the batter in one big cake. I do not recommend it for this recipe.
You bake the cake in 3 separate layers because you get a better result than if you bake it as 1 big cake and cut it later.
Do you want to bake it in a larger springform pan and serve it as a single layer cake? Use a 24 cm (9.5 inch) or 26 cm (10 inch) pan. The bake time will need to be longer, so it’s best to experiment. Use a skewer or a cake tester in the center of the cake to check if the cake is done (it should come out clean) before you remove it from the oven.
Haven’t done that myself, but it’s definitely possible. The best thing about this carrot cake recipe is that it is pretty flexible. Cupcakes usually take 18-20 minutes to bake.

Frangipane is a delicious filling for cakes, pies, tarts and other pastries. You bake this velvety almond cream in tart bases or in cakes, including various types of French pastries. Another bonus is that frangipane – using only ground almonds – is naturally gluten free.
Frangipane, as the name suggests, is a basic French recipe (also called creme d’amande) for a cake filling based on almond meal, sugar, eggs and butter.
Funny enough it took me quite a while before I first started using frangipane. And it is such a great addition to so many different baking dishes, that I’m not sure anymore why I didn’t use it sooner.
It’s also a recipe that appears in many French pastry recipes (like galette des rois!) and it is delicious when used as a pastry cream in fruit tarts or in a shortbread base tart.
A frangipane almond filling is baked and makes a tart or pie nice and creamy. It is often combined with fresh fruit, simply because that is a classic combination.
I love using it with summer fruits. You only need 4 ingredients to make your own frangipane tarts and you can make it in a few minutes. ‘A child can do the laundry’ as we like to say here in the Netherlands (meaning that it’s really easy)!
This almond cream filling is a true French classic. It consists of a crispy tart shell filled with a baked frangipane filling. A common name for such a tart is a bakewell tart. You might have heard of this before. This filling is sometimes topped with apples or pears, which adds a nice fresh element.
It’s also delicious as a croissant filling and you might have tasted it before in almond croissants (my favorite croissants!) I have made a pear frangipane tart in this way that is simply unbeatable. And you can expect some delicious frangipane based recipes in the coming weeks and months. I’ve got quite a few lined up already.

You need just a few simple ingredients to make a homemade frangipane cream, unless you want to make your own almond flour from whole almonds (white ones). If that is the case, use a blender or food processor. Be careful not to grind the almonds too long, as this will release the fats and make an almond butter instead of almond flour.
The frangipane is very easy to spread on a pie base using a spoon or a pastry bag. I personally find it very handy to use a palette knife to smooth it all out (as shown in the photos), but if you don’t have one at home, a spatula or knife will work just as well.
The recipe below is for the basic frangipane almond cream and gives you the main ingredients but keep in mind that you will need a base to use the frangipane on and that is had to be baked.
As a base, you can use buttery puff pastry, a pie crust, short crust or a store bought tart shell. There are different ways of using the creme frangipane and I’ll be sharing more on that later.

No, ideally you should always use room temperature butter. This is the basic rule for all my recipes, unless otherwise stated.
I have not tested this myself, but I think it should be possible. In that case, use only hard margarine. Have you tested this at home? If so, would you share your results in a comment below the recipe card? That will help other readers (and me) 🙂 .
Yes you can, even though officially you shouldn’t, but as with the almond paste, you can vary the frangipane by substituting the almonds with pistachios, ground hazelnuts or pecans (or use a mix of different nuts). You grind this into a flour in a food processor and then use it in the recipe below.
I’ve also made a coconut paste before (a variation on the almond paste), so I’m pretty sure you can make a coconut version using the basic recipe below. In that case, replace the almond flour with 100 grams of dry, grated coconut. So stick to equal amounts of either nuts or coconut.
Yes, you can. Making frangipane is a little more work than making almond paste, but it gives a richer flavor. I don’t necessarily find a shortcrust base with frangipane tastier than one with almond paste, but it’s tasty anyway, so feel free to try it. Use the same amount by weight as the recipe calls for almond paste.