Monster Cookies With Royal Icing

Posted: October 30, 2025 Last modified: November 1, 2025
Monster Cookies With Royal Icing

These cute monster cookies with royal icing are proof that Halloween treats don’t have to be scary at all. I made them with no idea of what I exactly wanted to make, but I love how they turned out!

Sometimes I try out a technique I might use again later, and other times I just invent a new cookie on the spot. Usually, they don’t turn out interesting enough to post on the blog, but these cookies were different!

I didn’t feel like making really scary monsters and I think these look just so sweet especially with the square shapes.

Why This Recipe Works

Using royal icing to make sweet cookie monster cookies for Halloween is easy to do and even if you don’t want Halloween decorations, you can make little pumpkins out of them or use other cookie cutters in different shapes. It’s just fun to get you in the Halloween spirit!

More fun Halloween treats

Sweet monster cookies-4
Sweet monster cookies-5

Recipe Ingredients

For the cookie recipe I used either my cut out sugar cookies or the chocolate sugar cookies . You will need about 30 cookies in a square size. Obviously, depending on how many you want to make. More is always a good thing!

In addition, you also need to make royal icing according to this recipe here.

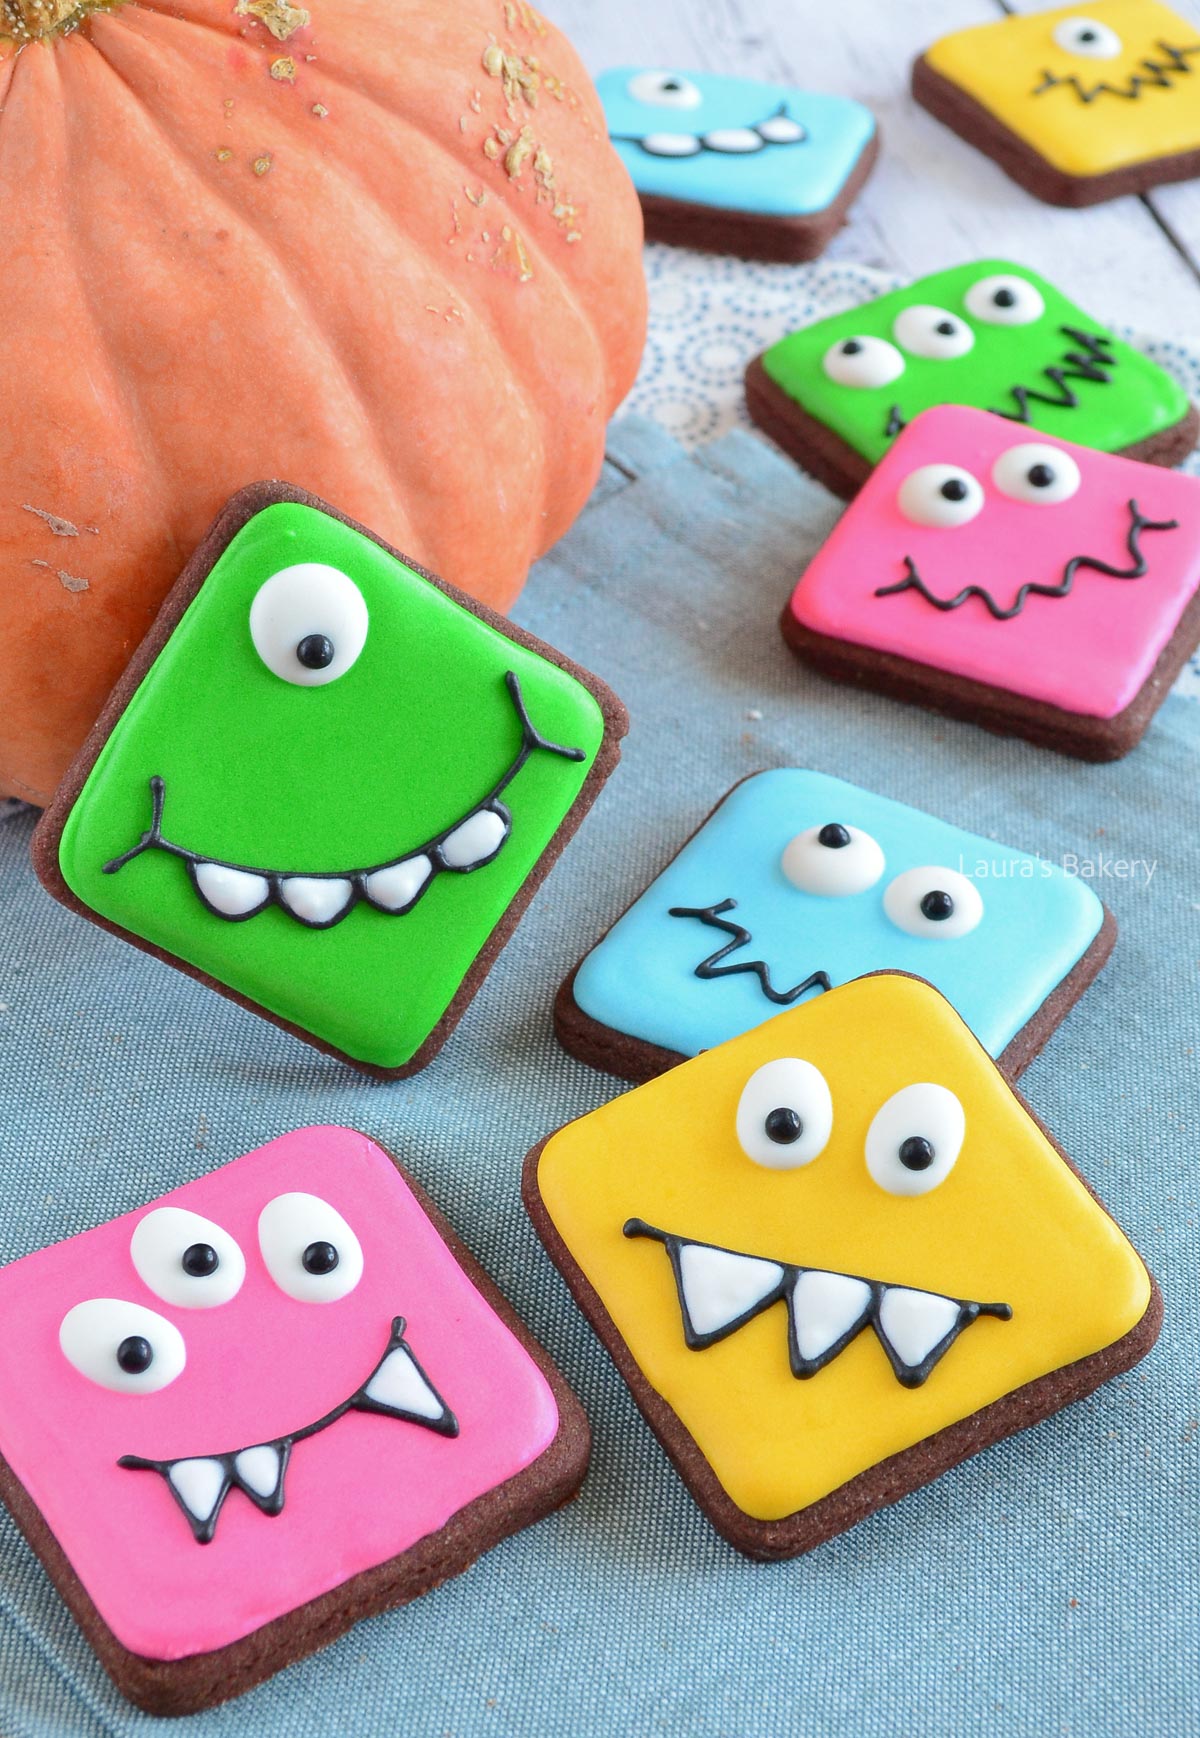
You will also need a couple of different sizes piping tips and food coloring depending on what you want to make. In the recipe card I give you all the colors that I used. While orange is maybe the standard Halloween color, I went with sweeter colors like blue, pink, green and yellow.

BAKING TIP: To cut the cookie dough into neat squares you can use anything that is square or use specific cookie cutters.

How To Make Monster Cookies with Royal Icing

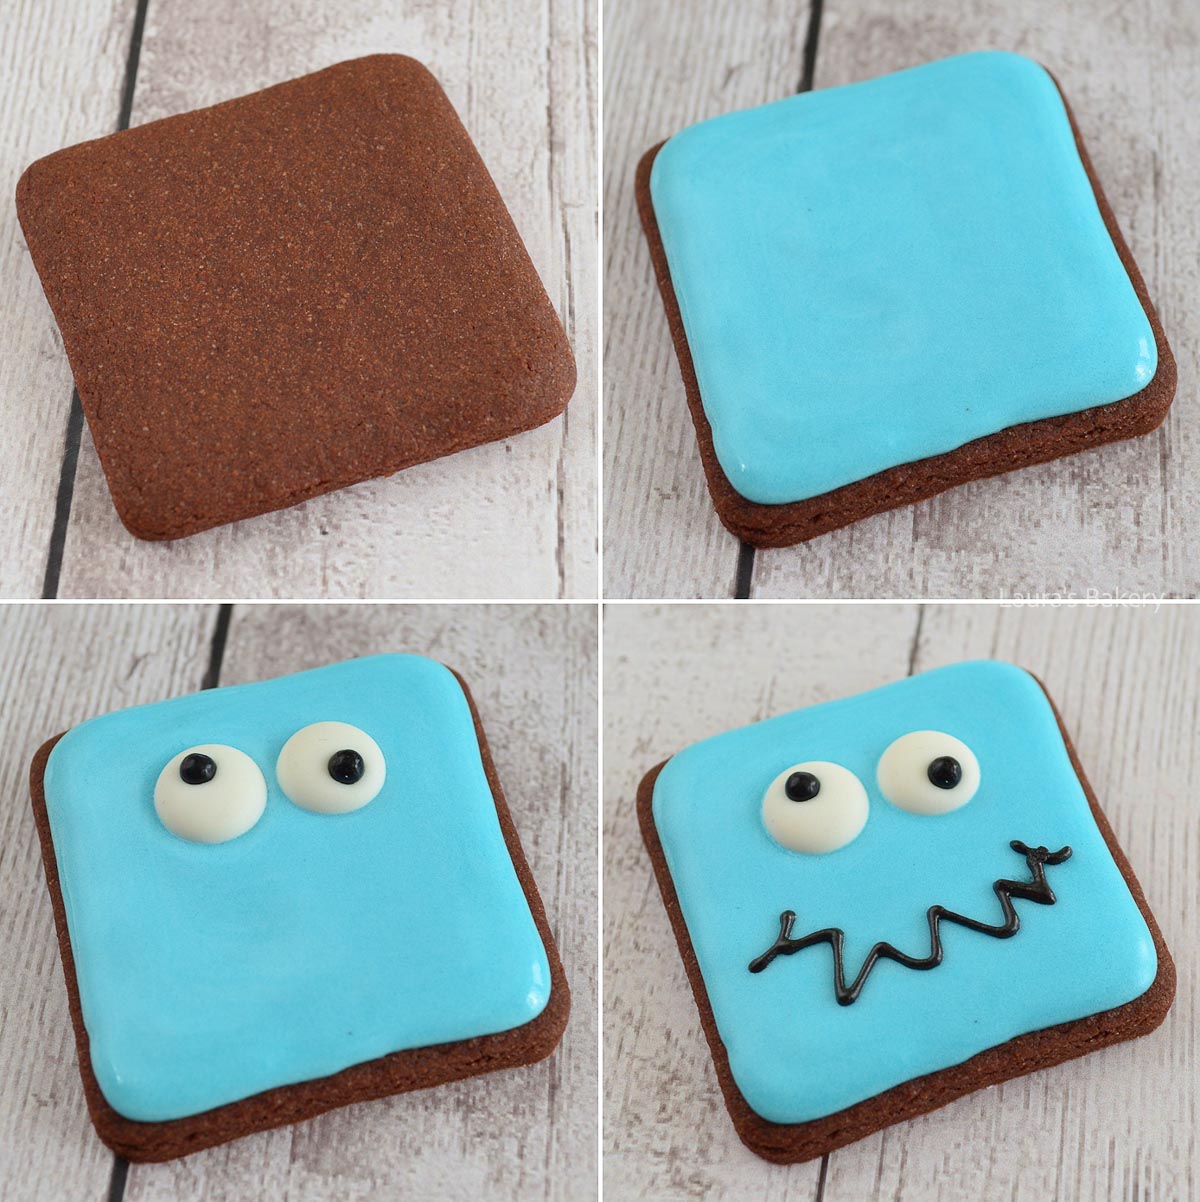
Make sure you make the royal icing according to the 20 second rule, which I explain in my article about royal icing. Next: color the icing and add the different colors into different piping bags. You start by piping the base for the cookies. Let that dry for a few hours.

It’s fun to mix the piping of the eyes a bit. Pipe some while the background layer is still wet and others while it has completely dried. The wet surface will let the eyes sink in the bottom layer.

Piping on a completely dried surface will make sure they eyes sit on top of the purple layer. Using both of those methods will create a fun effect.

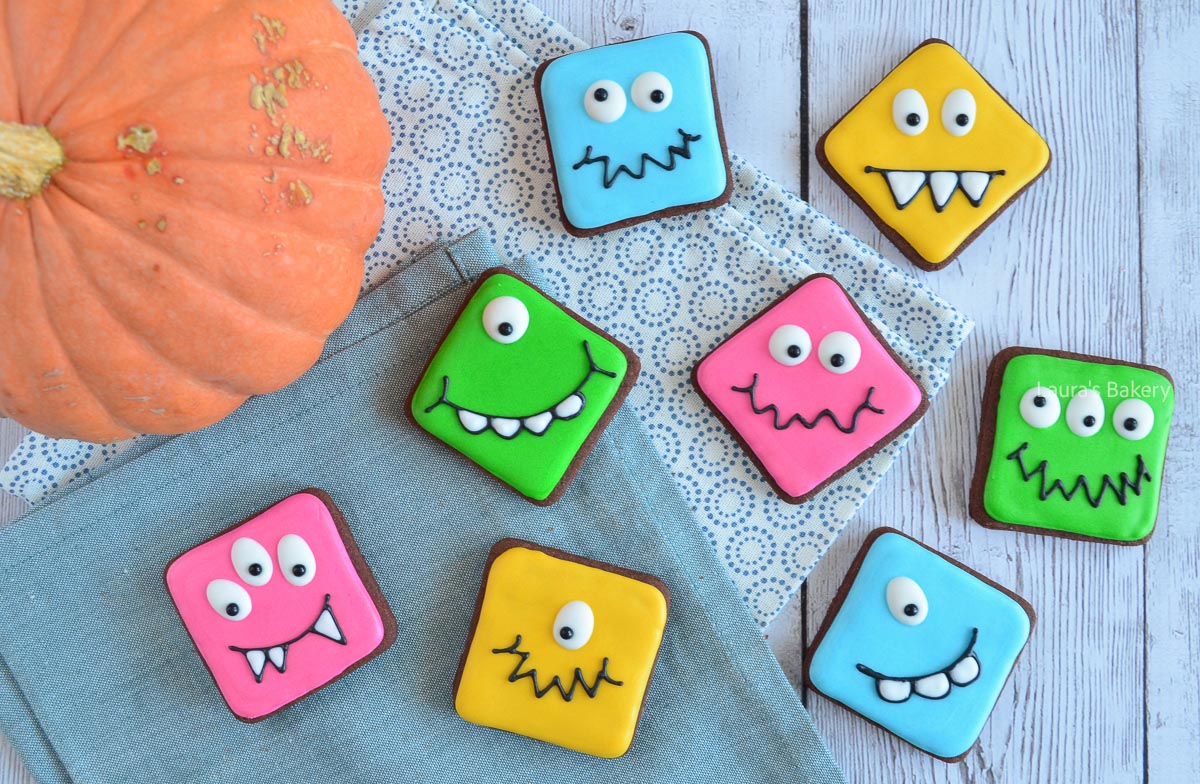
Have fun making different shapes

Create each cookie different so you have a nice mix of Halloween cookies. Change the number of eyes, the shape of the mouth and even how many teeth they have.

Storing Royal Icing Cookies

In an airtight container, the decorated cookies will keep for about 3-4 weeks. The cookies will soften a bit due to the icing which I actually really like in combination with the crispy icing on top.

You can freeze them, but the moisture can affect the royal icing. They keep for up to 3 months.

Laura Kieft   I

FAQ Monster Cookies With Royal Icing

Do I need special tools to make these cookies?

Not really. Square cookie cutters make it easier to get neat cookies, but you can also use anything that has the right size for cutting. Alternatively you can go freestyle and use a sharp knife.

For decorating, a few piping bags and small round tips (#2 or #3) are enough.

What icing consistency should I use?

You’ll want “20-second icing”. That means when you drag a spoon through the icing, it takes about 20 seconds for the surface to smooth out again. It’s thin enough to flood the cookie but thick enough to hold its shape.

Can I use store-bought icing instead of royal icing?

You can, but the finish won’t be quite as smooth and crisp. Royal icing is the best option if you want that classic decorated-cookie look.

How do I keep the colors from bleeding into each other?

Make sure to let each layer of icing dry completely before adding details on top. If you pipe eyes onto wet icing, they’ll sink in for a smooth finish.

If you wait until the base is dry, the eyes will sit on top. Both are fine – you just want to be intentional about the look.

Can I make these cookies ahead of time?

Yes! Bake the cookies a day in advance, then decorate. Once decorated and fully dried, they’ll keep in an airtight container for up to 4 weeks.

Do the cookies get soft from the icing?

Yes, the icing can make the cookies a little softer. Some people love the texture contrast, while others prefer crisp cookies. If you’d like them crunchy again, you can refresh them briefly in the oven at a low temperature.

Can I use different colors for the eyes?

Definitely! I used only white eyes in this case, but gave some of the cookies three eyes, while others just have one. But you can absolutely give the eyes different colors as well.


Sweet monster cookies

Save
Print recipe

No votes yet

Monster Cookies with Royal Icing

Not a fan of spooky Halloween treats? You can make it much cuter instead – just look at these adorable monster cookies! I’ll explain how to make them.
Prep Time5 minutes
Cook Time10 minutes
Decorating1 hour
Total Time1 hour 15 minutes
Servings: 30 cookies

Ingredients 

  • Chocolate sugar cookies Square cookies, about 2 inches/5cm
  • Royal icing see recipe
  • 5 piping tips #2 Wilton
  • 1 piping tip #1 Wilton
  • 6 piping bags + couplers
  • Black sugar pearls or candy eyes

Icing Colors

  • White
  • Pink = Americolor Deep Pink
  • Yellow = Wilton Golden Yellow
  • Blue = Wilton Royal Blue
  • Green = Americolor Mint Green
  • Black = Americolor Super Black

Instructions

  • Bake the cookies according to the recipe. It’s best to do this a day in advance.
  • The icing needs to be thinned to make 20-second icing (since the recipe makes stiff icing). In this article, you can read all about the different types of icing. Once your icing has the right consistency, divide it into small bowls and color each one. Fill your piping bags with the colored icing.
  • Apply the base layer of icing in the color of your choice. First outline the cookie, then immediately fill it in.
  • If you’re using ready-made candy eyes, place them on the wet icing. If not, let the icing surface dry first, then use white icing to make the eyes and place a black sugar pearl as the pupil. It’s fun to have each eye look in a different direction – and feel free to vary the number of eyes too: one, two, or even three!
  • Add the mouth. You can simply pipe a black line or give your monster some teeth. There are lots of ways to make the line, take a look at the ones I made for inspiration.
  • If you’re adding teeth, first outline the mouth with black icing. Let it dry slightly before filling the teeth area with white icing. If it’s hard to reach the corners, use a toothpick to spread the icing.
  • Let the icing dry completely.
Tips

I decided not to use the traditional Halloween colors, but if you do, they’ll still look super cool! Or maybe you want to go pastel – all different shades of pink, some glitter, or… well, the possibilities are endless!
How to store

Store in an airtight container for up to 4 weeks.

Links in this article may be affiliate links. If you purchase something through such a link, I will receive a small commission, without you paying anything extra.

Leave a comment

Your email address will not be published. Required fields are marked *

Recipe Rating